Table of Contents
Advertisement
Advertisement
Table of Contents

Summary of Contents for RBR CncGcoder HD
- Page 1 CncGcoder Models HD & HDx Manual ®...
-
Page 2: Table Of Contents
Table of Contents WELCOME........................... 3 IN THE BOX ......................... 4 Optional Accessories........................... 4 HANDHELD OVERVIEW ..................... 5 Overview..............................5 Charging the Battery ..........................6 Turning On and Off..........................6 Plugging in Cable ..........................7 Inserting SD Cards ..........................7 USING THE HANDHELD ..................... 8 Using the Stylus............................ - Page 3 Table of Contents File Transfer between Computer....................... 17 Transferring using the SD Card..................17 ® Transferring using ActiveSync ..................17 File Transfer between CNC........................ 18 Sending a Program to the CNC..................18 Receiving a Program from the CNC................. 18 On-Screen Help........................... 19 ®...
-
Page 4: Welcome
Welcome Welcome ® ® Thank you for purchasing the CncGcoder HD or the CncGcoder HDx . You are now able to easily communicate with you Machine Tool CNCs right on the shop floor. ® Review the following manual for information on how to set-up and use the CncGcoder New products, software, and updates will be available at www.CncGcoder.com. -
Page 5: In The Box
Adds storage capabilities to the CncGcoder ® Adds ability to transfer files between computer and CncGcoder ® USB Microsoft ActiveSync Cable (available through RBR) (Not recommended for HDx Users) ® Mounts the CncGcoder to the computer as a drive ®... -
Page 6: Handheld Overview
Setting Up Handheld Overview Overview CncGcoder® HD Manual... -
Page 7: Charging The Battery
Setting Up Charging the Battery Connect the AC power adapter to the DC jack located on the top of the unit. When connected to the AC power adapter, the battery will recharge in four hours. The LED will flash orange while the battery is charging. Turning On and Off Press the Power key to turn the unit on and off. -
Page 8: Plugging In Cable
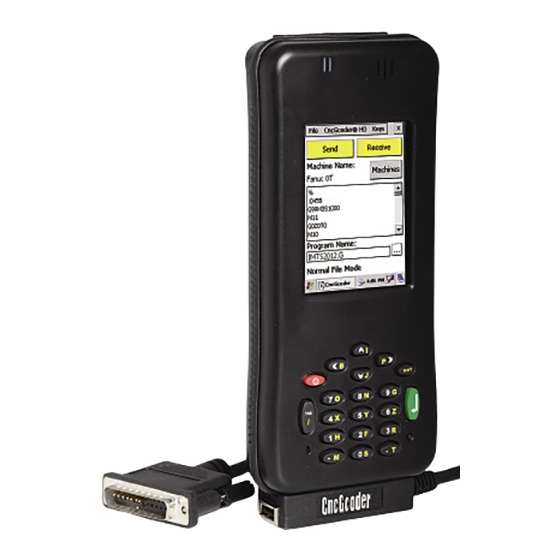
Setting Up Plugging in Cable ® Plug the CncGcoder HD RS-232 serial cable into the base of the unit with the arrows facing up. Tighten the two screws to ensure a secure connection. Connect the 25-pin end into the serial port on the machine tool CNC. (HD cable shown, HDx cable similar) Inserting SD Cards Insert the SD Card with the connectors down into the SDIO slot located at the top of the device. -
Page 9: Using The Handheld
Using the Handheld Using the Handheld Using the Stylus The stylus replaces a computer’s mouse and is used as follows: Touch the screen once with the stylus to select options, close applications, or launch menus from the taskbar. Double Touch the screen twice with the stylus to launch applications, open files, and view the contents of folders. -
Page 10: Using File Explorer
Using the Handheld Using File Explorer File Explorer lets you browse the contents of folders on your handheld. To activate an application, open a folder, or open a file: Use the stylus to double-tap on the icon Use the four arrows on the keypad to highlight the icon and then press Enter on the keypad to select the item Important Directory Icons The root folder on your handheld. -
Page 11: Device Desktop
Using the Handheld Device Desktop Desktop Icons My Device is the root folder on the handheld. My Device is similar to My Computer on the computer. Recycle Bin is similar to the PC Recycle Bin. Drag files and folders to the Recycle Bin for deletion. -
Page 12: Setting Backlight And Contrast
Using the Handheld Setting Backlight and Contrast Open Display Select the Backlight tab. Choose the amount of time backlight stays on while the device is idle. Slide the bar between dark and light to adjust the screen’s brightness. Select the Contrast tab. Slide the bar to the desired screen contrast. -
Page 13: Setting The Power
Using the Handheld Setting the power Open Power Select the Battery tab to monitor the battery level. Charging will display on the screen while the handheld is plugged-in. Select the Schemes tab to set up the Power Schemes. Select how long the device stays on while the unit is not in use. -
Page 14: Using The Cncgcoder
® Using the CncGcoder ® Using the CncGcoder Opening the Program ® There are two ways to open the CncGcoder program. Open the CncGcoder application on the desktop. The last G-Code program will display on the screen. Open any file with a .txt, .nc, or .g file ®... -
Page 15: Adding A New Machine
® Using the CncGcoder Adding a New Machine 1. Tap on the machine name box under Machine Name to see a flashing cursor. Use the on-screen keyboard or the keypad to enter a machine name. 2. Select the communications settings from the dropdown menus along the right side of the screen. -
Page 16: Setting The Advanced Settings
® Using the CncGcoder Setting the Advanced Settings NOTE: These settings rarely need to be changed. Only change these settings if you are having trouble communicating with the CNC. ® 1. Select CncGcoder HD > Advanced from the menu bar. 2. -
Page 17: Navigating The File Screen
® Using the CncGcoder Navigating the File Screen Tips for navigating the File Screen include: The path to the current open directory is displayed after Look In: The name of the current file is displayed in the box after Name: Select a file extension from the dropdown menu next to Type:... -
Page 18: Saving A G-Code File
® Using the CncGcoder Saving a G-Code File 1. Select File>Save File from the menu bar on the main screen. 2. Tap on the box next to Name: to see a flashing cursor. Use the on-screen keyboard or the keypad to enter a program name. Or, navigate to an existing G-Code program to overwrite with the current program. -
Page 19: File Transfer Between Cnc
® Using the CncGcoder File Transfer between CNC ® Files are transferred from the main screen of the CncGcoder . When transferring a program, make sure the receiving end is ready before any data is sent. NOTE: Tap the Abort button at any time during the data transfer to abort the send or receive. -
Page 20: On-Screen Help
® Using the CncGcoder On-Screen Help A quick program reference guide is available in the ® CncGcoder Select CncGcoder® HD>Program Help from the menu bar on the main screen to view the help topics available. Tap on a topic to view more information. Select the OK button to return to the topic list. -
Page 21: Battery Precautions
Battery Precautions Battery Precautions The CncGcoder® HD handheld computer uses a specially designed Lithium-Ion battery. Proper care and usage of the CncGcoder® HD handheld computer will allow it to hold a charge longer and lengthen its overall life. Most of the precautions involved with handling the Lithium-Ion battery amount to simply using the same common sense you would use around any electrical equipment. -
Page 22: Troubleshooting
Troubleshooting Troubleshooting Also view the current Tips and FAQs available at www.cncgcoder.com for more support. Resetting the Device A reset may become necessary when the device no longer responds to a tap or button press. For example, the device may require a reset after the battery power drops below a critical level. -
Page 23: Trouble Communicating With The Cnc
Troubleshooting Trouble Communicating with the CNC ® The CncGcoder HD will communicate with most CNCs with an RS-232 serial port. If you are having trouble communicating, try the following tips Send to the Palm first. If odd characters are received, most likely there is a parity or baud rate problem. -
Page 24: Revisions
Revisions Revisions Version 1.1.0.2 1. File name can now be up to 50 characters. 2. File list defaults to All Files. 3. Switching Machines does not automatically switch to the default directory. 4. When a directory cannot be found, switch to root directory. 5. -
Page 25: Tech Note 1: Cncgcoder ® Hd To Computer File Transfer
Tech Note 1 ® Tech Note 1: CncGcoder HD to Computer File Transfer ® Due to the change from Palm™ OS to the Windows CE OS, different options are available for transferring files to the computer. This change was prompted by the needs of the customers and provides the following benefits. -
Page 26: Option B: Transfer From Older Computer Using Sd Card
Tech Note 1 Option B: Transfer from Older Computer using SD Card SD Card Reader and SD Card supplied by customer NOTE: Windows 98 may need a driver installed. USB Port Required Required Desktop OS: Windows 98, Windows 2000, Transfer files from an Windows ME, Windows XP, Mac OS 9, Mac OS X older computer that does not meet the... -
Page 27: Option C: Transfer Using Microsoft ® Activesync ® Cable
Option D: Transfer using DNC Software ® CncGcoder 25-pin to 9-pin Serial Adapter optional accessory available at RBR. Serial Port Required ® Connect the CncGcoder HD Serial Cable to the bottom of handheld and the ®... - Page 28 RBR Associates, Inc. 8408 Wilmette Ave. Darien, IL 60561 Phone: 630-971-8729 FAX: 630-971-2974 www.cncgcoder.com Updated 09/23/2008...
Need help?
Do you have a question about the CncGcoder HD and is the answer not in the manual?
Questions and answers