Table of Contents
Advertisement
Advertisement
Table of Contents

Summary of Contents for Arturia MINIFUSE 2
- Page 1 USER MANUAL _MINIFUSE 2...
- Page 2 Information contained in this manual is subject to change without notice and does not represent a commitment on the part of Arturia. The software described in this manual is provided under the terms of a license agreement or non-disclosure agreement. The software license agreement specifies the terms and conditions for its lawful use.
- Page 3 However, please be sure to read this manual even if you are an experienced user, as we describe many useful tips that will help you get the most out of your purchase. We're sure you will find MiniFuse 2 a powerful tool in your setup and we hope you'll use it to its fullest potential.
- Page 4 The information contained in this manual is believed to be correct at the time of printing. However, Arturia reserves the right to change or modify any of the specifications without notice or obligation to update the hardware that has been purchased.
-
Page 5: Table Of Contents
Changing default system audio input and output ..................8 5.1.1. MacOS..............................................8 5.1.2. Windows ............................................10 5.2. Using the MiniFuse 2 as an audio device with your DAW ............... 11 5.2.1. Configuring audio in Ableton Live................................... 12 5.2.2. Configuring audio in FL Studio ..................................13 5.2.3. -
Page 6: Introduction
Thank you for purchasing our compact audio interface, the MiniFuse 2. We at Arturia are committed to delivering excellent products that satisfy the needs of modern musicians and producers - we are confident that the MiniFuse 2 will be a perfect companion to any computer-based music production and recording setup. -
Page 7: Connection Diagram
Note: We strongly recommend using the included cable with your interface when connecting your device to a computer to avoid any connectivity issues. The included USB cable has been specially designed for the Arturia MiniFuse 2. Arturia - User Manual MiniFuse 2 - CONNECTION DIAGRAM... -
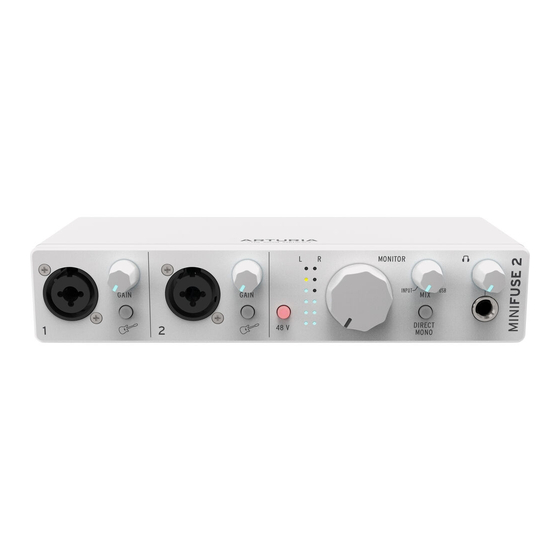
Page 8: Front Panel Features
3. FRONT PANEL FEATURES The front panel of the MiniFuse 2 provides access to most of the essential features on the unit. 1. The combo jack(s) accept two different kinds of input - XLR and TRS - allowing you to connect a variety of microphones and instruments into the MiniFuse. - Page 9 Instead of monitoring the input signal through software, the MiniFuse 2 gives you the option of using Direct Monitoring. Direct Monitoring sends the input signal(s) directly to the outputs, allowing you to listen to the input(s) directly without any latency introduced by computer processing.
-
Page 10: Rear Panel Features
4. REAR PANEL FEATURES The rear panel of the MiniFuse 2 provides access to audio and MIDI connections. Outputs - these 1/4” balanced stereo outputs can be connected directly to active studio speakers or other devices such as amplifiers and mixers. -
Page 11: Setup
5. SETUP The first time you connect the MiniFuse 2 to your computer, it will appear as an external disk drive. Open the drive to access its contents, and double-click the Click here to Get Started link. This link will open the MiniFuse registration page in your web browser. Follow the instructions there to register your unit and download the MiniFuse Control Center application. -
Page 12: Changing Default System Audio Input And Output
3. Click the Sound icon. 4. If you would like all computer audio - such as audio from browsers and movie players - to be played back through the MiniFuse 2, click the Output tab and select the MiniFuse as the default output device. - Page 13 5. If you would like to use a microphone connected to the MiniFuse 2 as the default sound input into your computer, click the Input tab and select the MiniFuse as the default input device. Arturia - User Manual MiniFuse 2 - SETUP...
-
Page 14: Windows
- to be played back through the MiniFuse 2, choose "MAIN Left/Right (MiniFuse 2) from the Output menu. If you would like to use a microphone connected to the MiniFuse 2 as the default sound input into your computer, choose the input channel from the Input menu. -
Page 15: Using The Minifuse 2 As An Audio Device With Your Daw
Most audio applications have their own audio settings, where you can select the active audio device. Here we will show you how to configure the MiniFuse 2 with several audio applications. The process will be similar in other audio applications. -
Page 16: Configuring Audio In Ableton Live
In the Preferences window, click the Audio tab to access the audio device settings. Select CoreAudio (MacOS) or ASIO (Windows) in the Driver Type menu. Select the MiniFuse 2 in the Audio Input Device and Audio Output Device menus. ... -
Page 17: Configuring Audio In Fl Studio
5.2.2. Configuring audio in FL Studio In FL Studio, click the Options menu, then click Audio Settings. In the Device menu select the MiniFuse. Arturia - User Manual MiniFuse 2 - SETUP... -
Page 18: Configuring Audio In Analog Lab
Our own Analog Lab software can work in standalone or plug-in mode. When using the standalone application, follow these steps to configure it for use with the MiniFuse 2: In Analog Lab, click the Menu button at the top left (three horizontal lines), then click Audio MIDI Settings. -
Page 19: Recording Audio Into Your Daw
5.3. Recording audio into your DAW Once your DAW has been configured to use the MiniFuse 2 as an input audio device, create a new audio track where you would like to record your performance. Here we will show the process in Ableton Live. -
Page 20: Using The Minifuse 2 As A Midi Device With Your Daw
5.4. Using the MiniFuse 2 as a MIDI device with your DAW The MiniFuse 2 features standard 5-pin MIDI input and output ports on the rear panel that can be used to connect MIDI-compatible devices to your computer. While most MIDI controllers nowadays come with direct MIDI-over-USB connectivity, there are devices like synthesizers and drum machines that only feature standard 5-pin MIDI input and output ports. -
Page 21: Configuring Midi In Fl Studio
5.4.2. Configuring MIDI in FL Studio In FL Studio, select the MiniFuse 2, then click the Enable button. You should now receive MIDI signal from the MiniFuse into your DAW Arturia - User Manual MiniFuse 2 - SETUP... -
Page 22: Configuring Midi In Analog Lab
In Analog Lab, click the Menu button at the top left (three horizontal lines), then click Audio MIDI Settings. In the MIDI Devices menu, enable MiniFuse 2. You should now receive MIDI signal in Analog Lab. Arturia - User Manual MiniFuse 2 - SETUP... -
Page 23: Recording Midi From The Minifuse 2 Into Your Daw
Place a software instrument like a synthesizer or drum machine on this track. In the MIDI From menu select the MiniFuse 2, or you can leave this menu to All Ins to receive MIDI from all connected devices, including the MiniFuse. -
Page 24: Minifuse Control Center
6. MINIFUSE CONTROL CENTER Your MiniFuse 2 includes a convenient control center application that makes it possible to access many of its features directly from your computer. The application can be found in: • Mac: Applications\Arturia\MiniFuse Control Center • Windows: C:\Program Files (x86)\Arturia\MiniFuse Control Center 6.1. - Page 25 ASIO is a Windows audio protocol that is optimized for low-latency and high-fidelity. We recommend using the ASIO driver provided by Arturia for best results. Arturia - User Manual MiniFuse 2 - MINIFUSE CONTROL CENTER...
-
Page 26: Device Controls
16 bit recordings, so turning up a quieter high-bitrate recording after the fact will not add any noticeable noise to the mix. Arturia - User Manual MiniFuse 2 - MINIFUSE CONTROL CENTER... - Page 27 The example on the right shows the ideal volume range to ensure crisp and clean recordings with lots of detail. Arturia - User Manual MiniFuse 2 - MINIFUSE CONTROL CENTER...
-
Page 28: Loopback Recording Feature
7.1.1.1. Change system audio output on Mac 1. Go to the Applications folder and open System Preferences. 2. Click Sound and ensure that "MiniFuse 2" is selected in the Output tab. Arturia - User Manual MiniFuse 2 - LOOPBACK RECORDING FEATURE... - Page 29 3. Next, go back to the Application folder and open the Utilities folder. 4. Open the Audio MIDI Setup application. 5. In the Window menu, select Show Audio Devices. 6. Click the MiniFuse 2 in the left panel, then click Configure Speakers. Arturia - User Manual MiniFuse 2 - LOOPBACK RECORDING FEATURE...
- Page 30 "Main Left/Right" inside the Configure Speakers panel in Audio MIDI Setup. Arturia - User Manual MiniFuse 2 - LOOPBACK RECORDING FEATURE...
- Page 31 "MAIN Left/Right" from the Speaker icon in the taskbar. 4. To change the output back, select "MAIN Left/Right" output from the menu. Arturia - User Manual MiniFuse 2 - LOOPBACK RECORDING FEATURE...
-
Page 32: Record Audio From Specific Applications
The process will be similar for other applications. 1. In the Reason menu, click Preferences. 2. Click the Audio tab, and set the Audio Device to MiniFuse 2. 3. Click the Channels button next to Active Output Channels. Arturia - User Manual MiniFuse 2 - LOOPBACK RECORDING FEATURE... - Page 33 4. In the pop-up window, enable Output 3 / Output 4. This will send all audio from Reason to the MiniFuse's Loopback feature. Arturia - User Manual MiniFuse 2 - LOOPBACK RECORDING FEATURE...
-
Page 34: Recording Into Your Daw
Here we will show the process in Ableton Live. The process will be similar in other applications. 1. In the application's preferences, ensure that the MiniFuse 2 is configured to be used as an input device. - Page 35 Audio MIDI Setup, and change the speaker outputs to "Main Left" and "Main Right". • On Windows, click the Speaker icon in the taskbar, and select "MAIN Left/Right" from the menu. Arturia - User Manual MiniFuse 2 - LOOPBACK RECORDING FEATURE...
-
Page 36: A Quick Primer On Digital Audio
Latency is a direct byproduct of sample rate and buffer size settings, so adjusting these settings in your host application or the audio driver will have an impact on latency. Arturia - User Manual MiniFuse 2 - A QUICK PRIMER ON DIGITAL AUDIO... -
Page 37: Sample Rate
24kHz, while the same sound recorded at 48kHz and played at half speed will only be able to reproduce frequencies up to 12kHz. Arturia - User Manual MiniFuse 2 - A QUICK PRIMER ON DIGITAL AUDIO... -
Page 38: Buffer Size
However, keep in mind that high sample rates come at a cost of significantly higher CPU usage, so this is not a recommended way of dealing with latency. Arturia - User Manual MiniFuse 2 - A QUICK PRIMER ON DIGITAL AUDIO... -
Page 39: How To Deal With Latency
CPU may already be working hard to keep up. For mixing and mastering purposes we recommend buffer sizes of 1024-2048 samples. Again, depending on your specific system and project you may be able to use lower settings. Arturia - User Manual MiniFuse 2 - A QUICK PRIMER ON DIGITAL AUDIO... -
Page 40: Specifications
• Audio interface • USB-C to USB-A cable • Exclusive software bundle containing: Arturia's Pre 1973, Rev PLATE-140, Delay TAPE-201, Chorus JUN-6 ◦ audio effects Arturia's Analog Lab Intro containing thousands of ready-to-use ◦ instruments and sounds Ableton Live Lite ◦... -
Page 41: Hardware Specifications
-100dB typical (A-weighted) Cross-talk @ 1kHz -116dB Speaker Outputs Output impedance 94Ω Maximum output Level +12dBu Frequency response 20Hz to 20kHz +/-0.09dB Dynamic range 107.5dB typical (A-weighted) THD+N @ 1kHz -101dB typical (un-weighted) Arturia - User Manual MiniFuse 2 - SPECIFICATIONS... - Page 42 +/-0.09dB Dynamic range 104dB (A-weighted) Power @ 33ohm 137mW Various Supported frequency rates 44.1 kHz, 48 kHz, 88.2 kHz, 96 kHz, 176.4 kHz, 192 kHz USB 2 Audio compatibility Windows, Mac OS Arturia - User Manual MiniFuse 2 - SPECIFICATIONS...
-
Page 43: Declaration Of Conformity
Important notice: DO NOT MODIFY THE UNIT! This product, when installed as indicated in the instructions contained in this manual, meets FCC requirement. Modifications not expressly approved by Arturia may avoid your authority, granted by the FCC, to use the product. -
Page 44: Software License Agreement
The License is not a sale of the original SOFTWARE. 2. Grant of License Arturia grants you a non-exclusive license for the use of the software according to the terms and conditions of this Agreement. You may not lease, loan or sub- license the software. - Page 45 (a) return of the purchase price or (b) replacement of the disk that does not meet the Limited Warranty and which is returned to Arturia with a copy of your receipt. This limited Warranty is void if failure of the software has resulted from accident, abuse, modification, or misapplication.
Need help?
Do you have a question about the MINIFUSE 2 and is the answer not in the manual?
Questions and answers