Table of Contents
Advertisement
Advertisement
Table of Contents

Subscribe to Our Youtube Channel
Related Manuals for Celestron 21017


Summary of Contents for Celestron 21017
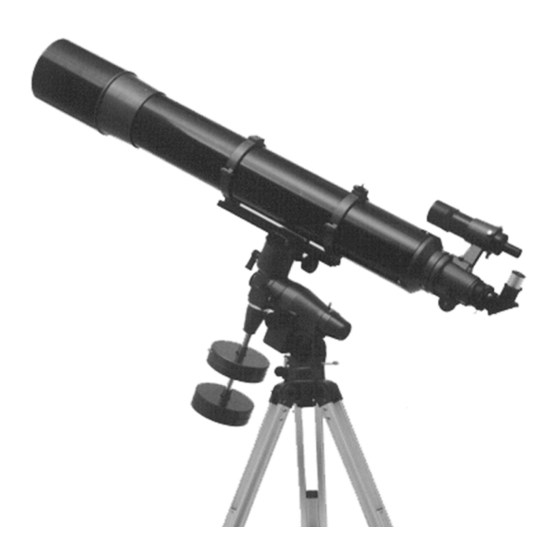
- Page 1 The CR-150 HD 6" Refractor Model #21017 INSTRUCTION MANUAL...
-
Page 2: Table Of Contents
T T T T T A B L E A B L E A B L E A B L E A B L E INTRODUCTION INTRODUCTION INTRODUCTION ... INTRODUCTION INTRODUCTION ... 4 4 4 4 4 How to Use this Manual ... 5 A Word of Caution ... -
Page 3: Celestial Photography Celestial Photography
CELESTIAL OBSERVING CELESTIAL OBSERVING ... CELESTIAL OBSERVING ... 3 6 CELESTIAL OBSERVING CELESTIAL OBSERVING Observing the Moon ... 36 Observing the Planets ...37 Using the Lens Cap Aperture Stop...37 Observing the Sun ... 37 Observing Deep-Sky Objects ... 38 Using the Setting Circles ...38 Star Hopping ...39 Viewing Conditions ...41 Transparency ... -
Page 4: Introduction
I N T R O D U C T I O N I N T R O D U C T I O N Welcome to the Celestron world of amateur astronomy! For more than a quarter of a century, Celestron has provided amateur astronomers with the tools to explore the universe. -
Page 5: How To Use This Manual
How to Use This Manual How to Use This Manual This manual is designed to instruct you in the proper use of your Celestron refracting telescope. This includes assembly, initial use, and long term operation and maintenance. There are four major sections to the manual. The first section covers the proper procedure for setting up your Celestron refracting telescope. -
Page 6: Therefractor Opticalsystem
Earth’s axis of rotation. When this is done, the telescope (when fitted with an optional clock drive) can track the stars. The directional movements on this mount are North/South and East/West. The Celestron CR- 150 HD, 6 inch refractor uses a German equatorial mount called the CG-5 mount. -
Page 7: Unpacking Your
A S S E M B L I N G A S S E M B L I N G The CR-150 HD (#21017) refracting telescope is offered on a German equatorial mount. The CR-150 HD is shipped in two boxes. The first box includes the... - Page 8 1. Lens Cap (not shown) 2. Dovetail Slidebar 3. Declination Lock 4. Declination Setting Circle 5. Counterweight Shaft 6. Counterweights 7. Tripod Leg 8. Accessory Tray • The CR-150 HD The CR-150 HD The CR-150 HD The CR-150 HD The CR-150 HD The CR-150 HD Figure 2-1 9.
-
Page 9: Assembling The Cg-5 Equatorial Mount
Setting Up the Tripod Setting Up the Tripod Setting Up the Tripod Setting Up the Tripod Setting Up the Tripod Adjusting the Tripod Adjusting the Tripod Adjusting the Tripod Adjusting the Tripod Adjusting the Tripod Height Height Height Height Height Assembling the CG-5 Equatorial Mount The tripod comes fully assembled with the metal plate, called the tripod head, that holds the legs together at the top. -
Page 10: Attaching The Accessory Tray
Attaching the Accessory Attaching the Accessory Attaching the Accessory Attaching the Accessory Attaching the Accessory With the tripod set up, you are ready to attach the accessory tray to the tripod. Tray Tray Tray Tray Tray There are three wing bolts that hold the accessory tray to the bracket. 2. -
Page 11: Attaching The Equatorial Mount
Attaching the Equatorial Attaching the Equatorial Attaching the Equatorial Attaching the Equatorial Attaching the Equatorial Mount Mount Mount Mount Mount The equatorial mount allows you to tilt the telescope’s axis of rotation so that you can track the stars as they move across the sky. The CG-5 mount is a German equatorial mount that attaches to the tripod head (i.e., metal plate on the tripod). -
Page 12: Attaching The R.a. Slow Motion Knob
Attaching the R.A. Slow Motion Knob With the mount securely in place, you are ready to attach some of the accessories (the telescope tube will be added last). Start with the Right Ascension (R.A.) slow motion knob. The R.A. slow motion knob allows you to make fine pointing adjust- ments in the direction the telescope is aiming (once it is attached to the mount). -
Page 13: Attaching The Declination Slow Motion Knob
Attaching the Declination Slow Motion Knob Like the R.A. slow motion knob, the DEC slow motion knob allows you to make fine pointing adjustments in the direction the telescope is pointed. The DEC slow motion knob attaches in the same manner as the R.A. knob. The shaft that the DEC slow motion knob fits over is toward the top of the mount, just below the telescope mounting platform. -
Page 14: Attaching The Counterweight Bar And Counterweights
Attaching the Counterweight Bar and Counterweights The last item to be mounted before the telescope tube is the counterweight bar and counterweights. Used to balanced the telescope, the counterweight bar attaches to the opposite side of the mount as the telescope. To install the counterweight bar: 1. -
Page 15: Attaching The Telescope To The Mount
Attaching the Telescope Attaching the Telescope Attaching the Telescope Attaching the Telescope Attaching the Telescope to the Mount to the Mount to the Mount to the Mount to the Mount With the mount fully assembled, you are ready to attach the telescope to the mount. -
Page 16: Removing The Lens Cap
Balancing the Telescope Balancing the Telescope Balancing the Telescope Balancing the Telescope Balancing the Telescope in R.A. in R.A. in R.A. in R.A. in R.A. The telescope should be balanced after all the standard accessories (i.e., star diagonal, eyepiece, etc.) have been attached to the telescope. The correct procedure for attaching these accessories is discussed in the section on “Telescope Basics.”... -
Page 17: Balancing The Telescope In Dec
Balancing the Telescope Balancing the Telescope Balancing the Telescope Balancing the Telescope Balancing the Telescope in DEC in DEC in DEC in DEC in DEC The telescope should also be balanced on the declination axis to prevent any sudden motions when the DEC clamp is released. To balance the telescope in DEC: 1. -
Page 18: Adjusting The Mount In Altitude
Adjusting the Mount Adjusting the Mount Adjusting the Mount Adjusting the Mount Adjusting the Mount in Altitude in Altitude in Altitude in Altitude in Altitude Adjusting the Mount Adjusting the Mount Adjusting the Mount Adjusting the Mount Adjusting the Mount in Azimuth in Azimuth in Azimuth... -
Page 19: Disassembling And Transporting Your Cr-150 Hd
When not in use, your Celestron CR-150 HD can be left fully assembled and set up. However, all lens and eyepiece covers should be put back in place. The opening to the rear cell must also be covered. -
Page 20: Attaching The Accessories
Attaching the Attaching the Attaching the Attaching the Attaching the There are several accessories that come standard with all the Celestron refractor telescopes. The installation and use of each of these is described in this section. Accessories Accessories Accessories Accessories... - Page 21 Eyepieces are commonly referred to by focal length and barrel diameter. The focal length of each eyepiece is printed on the eyepiece barrel. The longer the focal length (i.e., the larger the number) the lower the eyepiece magnification (i.e., power) and the shorter the focal length (i.e., the smaller the number) the higher the magnification.
-
Page 22: Focusing
Focusing To focus your telescope, simply turn either of the focus knobs located under the focus tube (see figure 4-1). Turn the focus knobs until the image is sharp. Once sharp, turn the knobs toward you to focus on an object that is closer than the one you are currently observing. -
Page 23: Aligning The Finder
The finder comes mounted in the finder bracket. To mount the finder to the telescope, The finder comes mounted in the finder bracket. To mount the finder to the telescope, The finder comes mounted in the finder bracket. To mount the finder to the telescope, The finder comes mounted in the finder bracket. -
Page 24: Image Orientation
Daytime Observing Daytime Observing Daytime Observing Your Celestron CR-150 HD telescope works well as a terrestrial spotting scope. When not used to examine objects in the night sky, it can be used to study objects here on Earth. WARNING ! -
Page 25: Nighttime Observing
10. Take your time and study your subject. If looking at the Moon, look for small details in the craters. That’s all there is to using your Celestron telescope. However, don’t limit your view of an object to a single eyepiece. After a few minutes, try using a different optional eyepiece, a more powerful one. -
Page 26: Calculating Magnification
You can change the power of your Celestron CR-150 HD telescope just by chang- Calculating Magnification ing the eyepiece (ocular). To determine the magnification for your telescope, you would simply divide the focal length of the telescope (1200mm) by the focal length of the eyepiece that you are using. -
Page 27: General Photography Hints
General Photography Hints General Photography Hints Your Celestron telescope can be used for both terrestrial and astronomical photography. Your telescope has a fixed aperture and, as a result, a fixed f/ratio. To properly expose your subjects photographically, you need to set your shutter speed accordingly. -
Page 28: The Celestial Coordinate System
Your Celestron telescope comes equipped with setting circles that translate the celestial coordinates into a precise location for the telescope to point. The setting circles will not work properly until you have polar aligned the telescope and set the R.A. -
Page 29: Motion Of The Stars
Like the Sun, the stars also appear to move across the sky. This motion is caused Motion of the Stars Motion of the Stars Motion of the Stars Motion of the Stars Motion of the Stars by the Earth’s rotation. For observers in the northern hemisphere, all stars appear to move around the north celestial pole. -
Page 30: Polar Alignment
Polar Alignment Polar Alignment Polar Alignment Polar Alignment Polar Alignment In order for the telescope to track the stars it must meet two criteria. First, you need a drive motor that will move at the same rate as the stars. For the CR-150 HD there are two optional motor drives (#93518 and #93523) that can be fitted to it. -
Page 31: Finding The Pole
For each hemisphere, there is a point in the sky around which all the other Finding the Pole Finding the Pole Finding the Pole Finding the Pole Finding the Pole stars appear to rotate. These points are called the celestial poles and are named for the hemisphere in which they reside. -
Page 32: Latitude Scales
Latitude Scales Latitude Scales Latitude Scales Latitude Scales Latitude Scales The easiest way to polar align a telescope is with a latitude scale. Unlike other methods that require you to find the celestial pole by identifying certain stars near it, this method works off of a known constant (your latitude) to determine how high the polar axis should be pointed. -
Page 33: Pointing At Polaris
Pointing at Polaris Pointing at Polaris Pointing at Polaris Pointing at Polaris Pointing at Polaris This method utilizes Polaris as a guidepost to the celestial pole. Since Polaris is less than a degree from the celestial pole, many amateurs simply point the polar axis of their telescope at Polaris. -
Page 34: Declination Drift
Declination Drift Declination Drift Declination Drift Declination Drift Declination Drift This method of polar alignment allows you to get the most accurate alignment on the celestial pole and is required if you want to do long exposure deep-sky astrophotography through the telescope. The declination drift method requires that you monitor the drift of selected guide stars. -
Page 35: Polar Alignment Finders
. If you don’t, they can be learned by using the Celestron Sky Maps (#93722) or consulting a current astronomy magazine. To align the R.A. setting circle: 1. -
Page 36: Celestial Observing
C E L E S T I A L With your telescope set up, you are ready to use it for celestial observing. This section covers visual observing of both solar system and deep-sky objects. Observing the Moon Observing the Moon Observing the Moon Observing the Moon Observing the Moon... -
Page 37: Using The Lens Cap Aperture Stop
For safe solar viewing, use a Celestron solar filter. This filter reduces the intensity of the Sun’s light, making it safe to view. With this filter you can see sunspots as they move across the solar disk and faculae, which are bright patches seen near the Sun’s edge. -
Page 38: Observing Deep-Sky Objects
Objects system. They include star clusters, planetary nebulae, diffuse nebulae, double stars, and other galaxies outside our own Milky Way. The Celestron Sky Maps (#93722) can help you locate the brightest deep-sky objects. Most deep-sky objects have a large angular size. Therefore, low-to-moderate power is all you need to see them. -
Page 39: Star Hopping
Star Hopping Star Hopping Star Hopping Star Hopping Star Hopping You can use your setting circles to find these objects (as described earlier in this manual) or try star hopping. Star hopping is done by using bright stars to guide you to an object. - Page 40 Star hopping may take some getting used to since you can see more stars through the finder than you can see with the naked eye. And, some objects are not visible in the finder. One such object is M57, the famed Ring Nebula. Here’s how to find 3.
-
Page 41: Viewing Conditions
Viewing Conditions Viewing Conditions Viewing Conditions Viewing Conditions Viewing Conditions Viewing conditions affect what you can see through your CR-150 HD telescope during an observing session. Conditions include transparency, sky illumination, and seeing. Understanding viewing conditions and the affect they have on observ- ing will help you get the most out of your telescope. - Page 42 Once adjusted to the outdoor temperature, don’t touch the telescope tube with your hands. When pointing the telescope, hold the telescope by the star diagonal. If observing with others, make sure no one stands in front of or directly below the telescope tube.
-
Page 43: Celestial Photography
C E L E S T I A L After looking at the night sky for awhile you may want to try photographing it. Several forms of celestial photography are possible with your Celestron CR-150 HD telescope. The most common forms of celestial photography, in order of difficulty are: short exposure prime focus, piggyback, and projection photography. -
Page 44: Short Exposure Prime Focus
5. Trip the shutter using a cable release. 6. Advance the film and repeat the process. Above is a listing of recommended exposure times when photographing the Moon at the prime focus of your Celestron telescope. 44 • Celestial Photography Remove the eyepiece from the 1 "... - Page 45 The exposure times listed here should be used as a starting point. Always make exposures that are longer and shorter than the recommended time. Also, try bracketing your exposures, taking a few photos at each shutter speed. This will ensure that you will get a good photo. If using black and white film, try a yellow filter to reduce the light intensity and to increase contrast.
-
Page 46: Piggyback
Piggyback Piggyback Piggyback Piggyback Piggyback The easiest way to enter the realm of deep-sky, long exposure astrophotography is via the piggyback method. Piggyback photography is done with a camera and its normal lens riding on top of the telescope. Through piggyback photography you can capture entire constellations and record large scale nebulae that are too big for prime focus photography. - Page 47 The exposure time depends on the film being used. However, five minutes is usually a good starting point. With slower films, like 100 ISO, you can expose as long as 45 minutes. With faster films, like 1600 ISO, you really shouldn’t expose more than 5 to 10 minutes.
-
Page 48: Projection Photography
Projection Photography Projection Photography Projection Photography Projection Photography Projection Photography This form of celestial photography is designed for objects with small angular sizes, primarily the planets and individual lunar features. Planets, although physically quite large, appear small in angular size because of their great distances. Moderate to high magnification is, therefore, required to make the image large enough to see any detail. -
Page 49: Maintenance
Occasionally, you may experience dew build-up on the objective lens of your telescope during an observing session. This may be removed with a hair dryer or by pointing the telescope at the ground. Since your Celestron refractor has a built-in dew cap, the dewing process is slightly reduced. If moisture condenses on the inside of the lens, remove the accessories from the telescope. -
Page 50: Optional Accessories Optional Accessories
O P T I O N A L The following is a partial list of optional accessories available for your Celestron CR-150 HD. volt battery. The hand controller module is very compact and fits easily in the palm of your hand. Motors for both axes are included, along with brackets, clutches and hardware. -
Page 51: Optional Accessories
20mm of eye relief — perfect for eyeglass wearers! They are available in the following focal lengths: 2.5mm, 4mm, 5mm, 6mm, 9mm, 10mm, 12mm and 15mm. Celestron also offers the LV Zoom eyepiece (#3777) with a focal length of 8mm to 24mm. It offers an apparent field of 40 8mm. -
Page 52: Optional Accessories
Sky Maps (#93722) - Celestron Sky Maps are the ideal teaching guide for learning the night sky. You wouldn’t set off on a road trip without a road map, and you don’t need to try to navigate the night sky without a map •... -
Page 53: The Messier Catalog
THE MESSIER CATALOG THE MESSIER CATALOG THE MESSIER CATALOG THE MESSIER CATALOG THE MESSIER CATALOG The Messier Catalog, compiled by Charles Messier, was the first extensive listing of star clusters and nebulae. Messier’s primary observational purpose was to discover comets. He compiled this list so that others searching for comets would not be confused by these objects. - Page 54 NGC# NGC# NGC# Const. Const. Const. NGC# NGC# Const. Const. NGC 1960 NGC 2099 NGC 1912 NGC 7092 NGC 2287 NGC 1976 NGC 1982 NGC 2632 NGC 2437 NGC 2422 NGC 2548 NGC 4472 NGC 2323 NGC 5194-5 NGC 7654 NGC 5024 NGC 6715 NGC 6809...
- Page 55 NGC# NGC# NGC# Const. Const. Const. NGC# NGC# Const. Const. NGC 3031 NGC 3034 NGC 5236 NGC 4374 NGC 4382 NGC 4406 NGC 4486 NGC 4501 NGC 4552 NGC 4569 NGC 4548 NGC 6341 NGC 2447 NGC 4736 NGC 3351 NGC 3368 NGC 3587 NGC 4192...
-
Page 56: List Of Bright Stars
LIST OF BRIGHT STARS The following is a list of bright stars that can be used to align the R.A. setting circle. All coordinates are in epoch 2000.0. Star Name Constellation Sirius Canopus Arcturus Rigel Kent. Vega Capella Rigel Procyon Betelgeuse Achernar Hadar... -
Page 57: For Further Reading
FOR FURTHER READING The following is a list of astronomy books that will further enhance your understanding of the night sky. The books are broken down by classification for easy reference. Astronomy Texts Astronomy Now ... Pasachoff & Kutner Cambridge Atlas Of Astronomy ... Audouze & Israel McGraw-Hill Encyclopedia Of Astronomy ... - Page 58 CI together with proof-of-purchase satisfactory to CI. The Proper Return Authorization Number must be obtained from CI in advance of return. Call Celestron at (310) 328-9560 to receive the number to be displayed on the outside of your shipping container.
- Page 59 Celestron International 2835 Columbia Street Torrance, CA 90503 Tel: 310-328-9560 Fax: 310-212-5835 Web site: www.celestron.com Copyright 1999 Celestron International All right reserved (Products or instructions may change without notice or obligation). Item #21017-INST 10-99 Price $10.00...
Need help?
Do you have a question about the 21017 and is the answer not in the manual?
Questions and answers