Table of Contents
Advertisement
Quick Links
FeverWarn Models FW1100A and FW1100B
Table of Contents
Safety Precautions ................................................................................................................................2
Unpacking the Boxes............................................................................................................................2
Overview ................................................................................................................................................3
Components Inside the FeverWarn Stand Box ...............................................................................3
Connecting the FeverWarn Unit to the Optional Stand .................................................................4
(Model FW1100B only) .........................................................................................................................6
Initial Testing ..........................................................................................................................................8
Installing the FeverWarn App .............................................................................................................9
Connecting to a Device ...........................................................................................................11
Scans and Reports ...................................................................................................................12
Downloading Reports .............................................................................................................13
Device Settings .........................................................................................................................14
Calibration .................................................................................................................................15
Edit Temperature Threshold ..................................................................................................18
Edit Alarm Based on Temperature Type ..............................................................................19
Edit Display Settings ................................................................................................................19
Edit Messages to Display ........................................................................................................20
Adjust Scanner Volume ...........................................................................................................20
Network Connectivity (1100B Model only) ..........................................................................21
Device Support ........................................................................................................................ 22
Installation .......................................................................................................................................... 23
Recommendations for Accurate Scanning .....................................................................................24
Customizing Your Crystalball Account ........................................................................................... 25
Final Words ..........................................................................................................................................27
Contact Customer Support ...............................................................................................................27
Getting Started with FeverWarn
Advertisement
Table of Contents

Summary of Contents for MachineSense FeverWarn FW1100A
-
Page 1: Table Of Contents
Unpacking the Boxes..........................2 Overview ..............................3 Components Inside the FeverWarn Stand Box ................3 Connecting the FeverWarn Unit to the Optional Stand ..............4 Creating a MachineSense Crystalball Account for Your FeverWarn Scanner (Model FW1100B only) .........................6 Initial Testing ............................8 Installing the FeverWarn App ......................9 Using the FeverWarn App: Connecting to a Device ......................11... -
Page 2: Safety Precautions
Optional Equipment FeverWarn Floor Stand Supports Models FW-1100A3 and FW-1100B3 Self-Service Thermal Hand Scanner (FW-FS-1000) Optional FeverWarn Wall-Mount/Desktop Stand Desktop Supports Models FW-1100A3 and FW-1100B3 Self-Service Thermal Hand Stand Scanner (FW-DS-1000) QC-FW005-051821 MachineSense • Sales: +1-443-457-1165 • feverwarn@machinesense.com • www.feverwarn.com... -
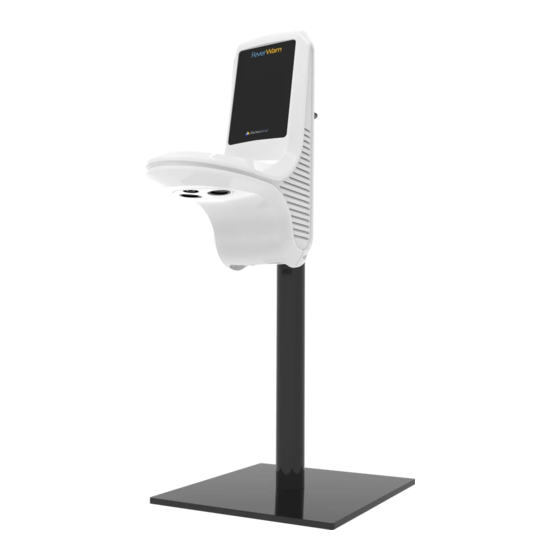
Page 3: Overview
Let’s get started. Components Inside the FeverWarn Stand (option) Box 1. Base floor plate, 12 in. x 12 in. (Figure 1). 2. Extendable pole, three (3) sections (Figure 1). Figure 1 MachineSense • Sales: +1-443-457-1165 • feverwarn@machinesense.com • www.feverwarn.com QC-FW005-051821... -
Page 4: Connecting The Feverwarn Unit To The Optional Stand
FeverWarn unit came in. (Figure 5). 5. Connect the bracket to the pole with the screw and lock washer (Figure 6). (continued on next page) Figure 5 Figure 2 Figure 4 Figure 6 Figure 3 QC-FW005-051821 MachineSense • Sales: +1-443-457-1165 • feverwarn@machinesense.com • www.feverwarn.com... - Page 5 8. Plug all the cables into their respective connectors in the scanner (Figure 9). 9. Set the unit in its location and plug the scanner into an outlet. Figure 8 Figure 7 Micro-USB Type A USB power Figure 9 MachineSense • Sales: +1-443-457-1165 • feverwarn@machinesense.com • www.feverwarn.com QC-FW005-051821...
-
Page 6: Creating A Machinesense Crystalball Account For Your Feverwarn Scanner (Model Fw1100B Only)
If you don’t have an account, please follow the instructions below. If you already have a MachineSense Crystalball account, you’ll only need to onboard your new device by logging into MachineSense’s Crystalball, navigating to the “Machines”... - Page 7 “FEVERWARN QUICK INSTALLATION” button on the next screen (Figure 14). Up to 20 FeverWarn units can be added. That’s it! You have created your MachineSense Crystalball account and onboarded your new FeverWarn model FW1100B scanner(s). NOTE: This procedure will onboard your new device to a default “location”...
-
Page 8: Initial Testing
FeverWarn 1100A records all scans to the mobile app. Proceed to the section of the manual entitled, “Installing and Using the Figure 16 FeverWarn App.” QC-FW005-051821 MachineSense • Sales: +1-443-457-1165 • feverwarn@machinesense.com • www.feverwarn.com... -
Page 9: Installing The Feverwarn App
Fill in the requested information and then tap the “COMPLETE ACCOUNT OPERATION” button at the bottom of the screen (Figure 17c). IMPORTANT: MachineSense allows for one email address per Figure 17b customer. If you manage two or more company’s scanners, you either must put all the sensors under one account or use different email addresses for separate accounts. - Page 10 ON-BOARD ANOTHER DEVICE button. If you get a failure message, try a couple more times before calling for help as sometimes the connection requires a retry or two to get it right. Figure 18 Figure 19 051821 QC-FW005-051821 MachineSense • Sales: +1-443-457-1165 • feverwarn@machinesense.com • www.feverwarn.com...
-
Page 11: Using The Feverwarn App
4. You are now on the “Home screen” (Figure 22) where you can navigate the app with the following options: a. Scans and Reports b. Device Settings c. Network Connectivity (Model 1100B ONLY) d. Device Support Figure 20 Figure 21 Figure 22 MachineSense • Sales: +1-443-457-1165 • feverwarn@machinesense.com • www.feverwarn.com QC-FW005-051821 051821... -
Page 12: Scans And Reports
7. Turn on REALTIME UPDATES, which will add scans as they happen, by pressing the toggle switch (Figure 25). When real-time updates are turned on, the toggle switch will turn orange, otherwise, the switch is white. Figure 23 Figure 24 Figure 25 QC-FW005-051821 MachineSense • Sales: +1-443-457-1165 • feverwarn@machinesense.com • www.feverwarn.com... -
Page 13: Downloading Reports
2. After selecting the DOWNLOAD icon, you will be prompted to choose Fahrenheit or Celsius. 3. Press EXPORT (Figure 27). 4. Name the file. 5. Press OK to download the report to your device (Figure 28). Figure 26 Figure 27 Figure 28 MachineSense • Sales: +1-443-457-1165 • feverwarn@machinesense.com • www.feverwarn.com QC-FW005-051821... -
Page 14: Device Settings
4. Change the display settings including units of temperature, the temperature scanned and the time. 5. Provide custom messages to display after a scan. 6. Adjust the volume of the alarm. Figure 29 Figure 30 Figure 31 QC-FW005-051821 MachineSense • Sales: +1-443-457-1165 • feverwarn@machinesense.com • www.feverwarn.com... -
Page 15: Calibration
Wait while the alert is triggered (Figure 33). 3. Wait for the device to be ready to calibrate. You will see a message “Calibration started successfully” (Figure 34). (continued on next page) Figure 32 Figure 33 Figure 34 MachineSense • Sales: +1-443-457-1165 • feverwarn@machinesense.com • www.feverwarn.com QC-FW005-051821... - Page 16 8. After clicking ‘Get Realtime Data’ – verify temperature using a medical thermometer – place fist under sensor and tap the ‘Log Data Point 1’ (Figure 36). 9. After successfully logging data point 1, warm up your fist to create an elevated temperature. Take the temperature of your fist with the medical thermometer and log it in the temperature field. Immediately place your warmed fist under the FeverWarn sensor and tap ‘Log Data Point 2’ (Figure 37). 10. It is important to keep your fist stable until the data point is captured. (continued on next page) Figure 35 Figure 36 Figure 37 QC-FW005-051821 MachineSense • Sales: +1-443-457-1165 • feverwarn@machinesense.com • www.feverwarn.com...
- Page 17 Using the FeverWarn App Calibration (continued) Once data point 2 is captured, click ‘Finish Calibration’ (Figure 38). ‘Calibration completed successfully’ pop up will appear (Figure 39). Figure 38 Figure 39 MachineSense • Sales: +1-443-457-1165 • feverwarn@machinesense.com • www.feverwarn.com QC-FW005-051821 051821...
-
Page 18: Edit Temperature Threshold
3. Tap EDIT THRESHOLD. (Figure 40). 4. Select units in Fahrenheit or Celsius 5. Enter an upper boundary for THRESHOLD. 6. Enter a lower boundary for LOWER THRESHOLD. 7. Tap SAVE. Figure 40 QC-FW005-051821 MachineSense • Sales: +1-443-457-1165 • feverwarn@machinesense.com • www.feverwarn.com... -
Page 19: Edit Alarm Based On Temperature Type
4. Select if you want to show the scanned TEMPERATURE or the TIME on the scanner using the toggle switches. 5. Press SAVE DISPLAY SETTINGS to save your changes. Figure 41 Figure 42 MachineSense • Sales: +1-443-457-1165 • feverwarn@machinesense.com • www.feverwarn.com QC-FW005-051821... -
Page 20: Edit Messages To Display
AUDIO SETTING (Figure 44). 1. Use the slider to change the volume from 0 to 5. 2. When you have selected the appropriate volume, press SAVE AUDIO SETTINGS. Figure 43 Figure 44 QC-FW005-051821 MachineSense • Sales: +1-443-457-1165 • feverwarn@machinesense.com • www.feverwarn.com... -
Page 21: Network Connectivity (1100B Model Only)
6. When you have successfully connected to a network, the network name (SSID) will have a green dot next to it and the IP address will display underneath (Figure 46). Figure 45 Figure 46 MachineSense • Sales: +1-443-457-1165 • feverwarn@machinesense.com • www.feverwarn.com QC-FW005-051821... -
Page 22: Device Support
2. RESTORE PREVIOUS CALIBRATION 3. Apply software updates and patches to the device. To use these features, please contact customer support to guide you. • Email: support@machinesense.com • Telephone: 443-457-1165 Figure 47 Figure 48 QC-FW005-051821 MachineSense • Sales: +1-443-457-1165 • feverwarn@machinesense.com • www.feverwarn.com... -
Page 23: Installation
The screen will display ‘GO’ in green, and you should hear a beep. If the screen displays ‘STOP’ in red, it indicates that the person being scanned has a possible fever, and further processing is required. MachineSense • Sales: +1-443-457-1165 • feverwarn@machinesense.com • www.feverwarn.com QC-FW005-051821... -
Page 24: Recommendations For Accurate Scanning
‘STOP’ in red and an audible buzzer. A ‘GO’ screen means no fever has been detected, a ‘STOP’ screen means a possible fever has been detected and further processing is required. QC-FW005-051821 MachineSense • Sales: +1-443-457-1165 • feverwarn@machinesense.com • www.feverwarn.com... -
Page 25: Customizing Your Crystalball Account
(Model FW1100B only) The procedure for onboarding your FW1100B scanner makes some assumptions about scanner locations and zones that you might want to change. This section will help you customize your MachineSense Crystalball account. 1. Browse to crystalball.machinesense.com and login with your established credentials. - Page 26 (Figure 54). Now, click the three-dot menu icon to the right of the pop-up banner and then click “Rename,” which will allow you to change your machine name Figure 53 Figure 54 QC-FW005-051821 MachineSense • Sales: +1-443-457-1165 • feverwarn@machinesense.com • www.feverwarn.com...
-
Page 27: Final Words
Getting Started with FeverWarn l Models FW1100A and FW1100B 27 Final Words Your FeverWarn scanning system is now 100% operational. Browse to crystalball.machinesense.com and log in with your company’s credentials to electronically access this and other helpful documentation and videos. Videos are available on www.machinesense.com and on the YouTube FeverWarn channel. - Page 28 MachineSense Sales: +1-443-457-1165 feverwarn@machinesense.com www.feverwarn.com QC-FW005-051821...
Need help?
Do you have a question about the FeverWarn FW1100A and is the answer not in the manual?
Questions and answers