
Related Manuals for Smartwares HA700+

Summary of Contents for Smartwares HA700+
- Page 1 HA700+ Wireless alarm system with built-in phone transmitter Complete battery operated Installation & operation manual...
-
Page 2: Table Of Contents
TABLE OF CONTENTS INTRODUCTION AND GENERAL POINTS ................3 PRE-PROGRAMMING ......................3 1. PACKAGE CONTENT ......................5 2. INSTALLATION PLANNING ....................6 3. INSTALLING AND PROGRAMMING THE STATION ............8 Installing and programming the alarm station ............8 3.1.1 System description ..................8 3.1.2 Installing the system ................. -
Page 3: Introduction And General Points
INTRODUCTION AND GENERAL POINTS CONGRATULATIONS, you have just made a great step to protect yourself, your home and its content and against assault and theft. Of course an alarm system does not constitute an absolute guarantee against these wrongdoings, but it is sufficiently deterrent. PRE-PROGRAMMING The accessories of the HA700+ were preprogrammed in the factory to a standard configuration that reduces the installation time to the bare minimum. - Page 4 INTRODUCTION We strongly recommend to read this guide carefully before to start any installation, and to follow the installation instructions in order, with the items on a table (if you add or modify accessories). The alarm system HA700+ was designed according to the following principles: Easy installation: Anyone can install the system.
-
Page 5: Package Content
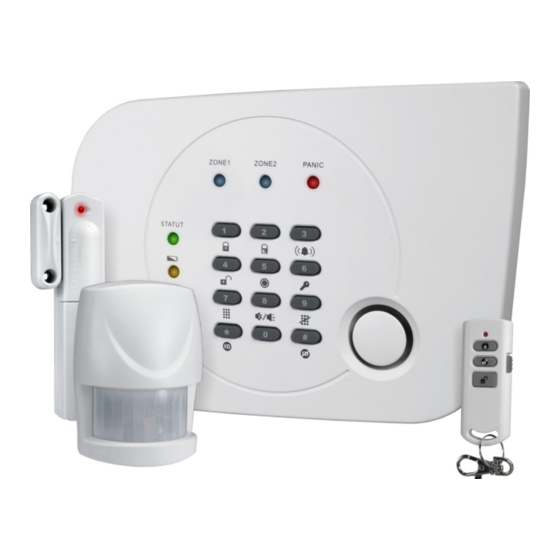
1. PACKAGE CONTENT HA700+ The initial alarm kit should contain the following items: • 1 x Station HA700C • 1 x Wireless movement detector (PIR) SA68P • 1 x Wireless door/window (magnetic) detector SA68M • 1 x Remote control HA700R Also included: •... -
Page 6: Installation Planning
2. INSTALLATION PLANNING Due to a total absence of cable works, a wireless alarm system is very easy to install. It can be changed easily, because it is simple to transfer a detector to a more efficient place if needed. This way, you do not have to worry about realizing a perfect installation from the start. - Page 7 IMPORTANT NOTE BEFORE INSTALLING This section gathers significant information about the system operation or its accessories. ADVICE BEFORE INSTALLING The kit accessories are already programmed in the station BUT extra accessories must be learned by the station so they can dialogue with it. The accessories have an initialization delay, it is therefore imperative that to insert the batteries in each accessory 5 to 10 minutes before to start programming or tests.
-
Page 8: Installing And Programming The Station
3. INSTALLING AND PROGRAMMING THE STATION 3.1 Installing and programming the alarm station 3.1.1 System description A. Panic LED G. Keyboard L. Mains adapter (not included) B. Area 2 LED H. Speaker (100dB) M. Cable tray C. Area 1 LED I. -
Page 9: Installing The System
3.1.2 Installing the system LOCATION OF THE STATION The following aspects are to be considered when selecting a mounting location for the station: Check that an intruder willing to reach the station is forced to use an exit protected by a magnetic detector or must walk in front of an infrared detector. - Page 10 Insert the 4 LR20 alkaline batteries. and fix it there to the metal bracket using the screw. Close the compartment at the rear panel of HA700. Connect the telephone cable 7. Mount the alarm station at this place. Your alarm system is now ready CHANGING THE STATION BATTERIES When the station batteries need to be changed, the station will emit a beep every 30 seconds and the yellow LED will flash.
-
Page 11: Programming The Personal Code
Programming the station 3.1.3 Programming the personal code A personal code must be saved first by using the alarm station keys. You must choose this code, it will be used to enable or disable the system. To change the code: Enter the factory code 1234 Then push the key 6, a long beep will be emitted and the STATUS LED will flash. -
Page 12: Alarm Delay
3.1.6 Alarm delay It is about the working time of the built-in siren when an alarm is triggered. The delay can be set on 1, 2 or 3 minutes. To change the alarm delay: Enter the factory code 1234 (or your personal code). Then push the keys 0 and then 4, a long beep will be emitted and the STATUS LED will flash. -
Page 13: Installing And Programming Accessories
3.2 Installing and programming accessories 3.2.1 Detector learning TABLE: DETECTOR OPERATION DEPENDING ON THE STATION ARMING MODES STATION ARMING MODE TOTAL ARMING PARTIAL ARMING DISARMING PARAMETERS AREA 1* DETECTOR ACTIVE DETECTOR INACTIVE AREA 2* DETECTOR ACTIVE DETECTOR INACTIVE PANIC * DETECTOR ACTIVE * 10 detectors maximum per area To program a detector:... -
Page 14: Remote Control Learning
3.2.3 Remote control learning To program a remote control: Enter 1234 (or your personal code), followed by *, a long beep will be emitted and the STATUS LED will flash. Push the remote control disarming button. When the signal is received, a long beep will be emitted. -
Page 15: Programming The Phone Transmitter
3.3 Programming the phone transmitter 3.3.1 Programming the alert message During a call, the station delivers a message that you must record beforehand. The message maximum duration is 6 seconds. To record the message: Enter 1234 (or your personal code), followed by 5, the STATUS LED will flash. Stand 20-30 cm from the station and record your message. -
Page 16: Alarm Station Operation
4. ALARM STATION OPERATION 4.1 Arming the system During the system arming, whatever will be the chosen mode, there will be an exit delay of 15 seconds. The first 10 seconds will be silent, then there will be 1 beep every second, followed by a long beep at the end of the delay to confirm arming. -
Page 17: Chime Mode
- Enter 1234 (or your personal code), followed by 4.3 Chime mode You can set the station into chime mode. In this mode, it will emit a "ding-dong" when you pass in front of a movement detector or when you open a door/window equipped with a magnetic detector. CAUTION: In this mode the self-protections and the detectors saved in panic area will always be active and will trigger the station. -
Page 18: Function Summary Table
5. FUNCTION SUMMARY TABLE Procedure on the Function Function description station The station rings and the transmitter will call the 1 2 3 4 + 0 1 Triggering mode #1 programmed numbers. The station does not ring and the transmitter will call 1 2 3 4 + 0 2 Triggering mode #2 the programmed numbers. -
Page 19: Accessory Installation And Operation
6. ACCESSORY INSTALLATION AND OPERATION 6.1 Remote control HA700R The remote control allows you to activate several functions of your station (Disarming, Total Arming, Partial Arming, Panic and Test Mode). The remote control has a Panic switch, that when actuated causes immediately a complete alarm situation if the system is in Armed or Disarmed mode (except if the system is in Test mode). - Page 20 CHOOSING A MOUNTING LOCATION The PIR Detector is suitable for mounting in dry interior locations only. The recommended position for a PIR Detector is in the corner of a room mounted at a height between 1.8 and 2m. At this height, the detector will have a maximum range of up to 10m with a field of view of 110°, subject to the position for the PCB being set in 5.
- Page 21 INSTALLING THE PIR DETECTORS (Ensure that the system is in Test Mode). Undo and remove the fixing screw from the bottom edge of the PIR. Carefully pull the bottom edge of the detector away from the rear cover and then slide down to release the top clips Carefully drill out the required mountingholes in the rear cover using 3mm drill according to whether the unit is being mounted in a corner or against a flat wall.
-
Page 22: Door/Window (Magnetic) Opening Detector Sa68M
Note: On initial installation the detector should be set into Walk Test mode ready for testing. Upon completion of Walk Test mode, set DIP1 of SW2 to OFF for normal detection mode. The PIR Detector incorporates an anti-false alarm feature designed to compensate for situations where the detector may be affected by environmental changes, (e.g. - Page 23 Mount the Detector to the fixed part of the frame along the opening edge opposite the hinges using either the double sided adhesive tape or screws provided. If fixing the Detector with screws; fit the Keyhole slot in the top of the Detector over the head of the smaller pan-head screw.
-
Page 24: Resetting The Station
7. RESETTING THE STATION You can reset the station to delete all accessories, the message, the phone numbers and the personal code. To reset the station: If possible, switch the station to test mode (see page 18). Dismount the station from its location and open the compartment at the rear panel of HA700. -
Page 25: Specifications
Frequency : 868 Mhz 9. DECLARATION OF CONFIRMITY Hereby, Smartwares declares that this equipment is in compliance with the essential requirements and other relevant provisions of Directive 1999/5/EC. For the document of conformity go to www.elro.eu or scan the QR code. -
Page 26: Product Guarantee
Keep the receipt - proof of purchase is required in order to rely on guarantee. In the case of problems, please contact with the store where you purchased the product. For further product information call to our Hotline or visit our website: www.smartwares.eu . You can also register your product there.
Need help?
Do you have a question about the HA700+ and is the answer not in the manual?
Questions and answers