Table of Contents
Advertisement
Quick Links
Advertisement
Table of Contents

Summary of Contents for Tensortec MV03
- Page 1 Vehicle intelligent terminal MV03 User Manual...
-
Page 2: Product Introduction
All inspection and maintenance work shall be carried out by qualified engineers.We are not responsible for any problems caused by unauthorized modifications. 5) Environmental requirement MV03 equipment and accessories shall be installed and stored in a cool, dry place;Avoid direct sunlight;Avoid storage with inflammable and explosive materials Product introduction This product is a cost-effective and extensible device specially developed for vehicle video surveillance. -
Page 3: Working Flow
adopts modular design, which has the characteristics of high reliability, flexible installation and convenient maintenance. Working flow DSM camera Beidou/GPS Monitor ADAS camera 3/4G Transmission Local Video and Playback Function: Resolution 720P Network function: support real-time transmission of 4G network, remote alarm, parameter setting and over the air upgrade. Equipment Upgrade: Support local upgrade and OTA upgrades/remote upgrade. -
Page 4: Product Specification
Product Specification Parameter Types Requirements Remarks Camera Resolution AHD720p Default Focal length 3.6 mm Aperture number F2.3 Perspective 75° Working Distance 60-120CM DSM module Working Condition Day and night(all-weather adaptation) parameters Detection of facial All face types,including wearing glasses (sunglasses, myopia) patterns Scope of detection Face, eyes, head, gesture... - Page 5 Video Input/Output Video Display Single Screen,Double Screen Synchronize Channel display Video Compression H.264 Main profile Audio Input/Output Audio Input 1 CH Audio Input Audio Bit Rate 40Kbit/s Audio Output 1 CH Audio Output Video Audio Coding Video Coding Analog HD 720P Resolution Dual-Stream Video Mainstream video, sub-stream 4G network transmission...
- Page 6 Satellite Positioning Tracking sensitivity -159dBm Communication 2G/3G/4G all Netcom External interface Communication interface USB 2.0 x 2,RS232 x 1,RS48S x 1 Network interface WIFI,RJ45 Interfacex1,10M/100M Audio 8Ω/1W DVR Hardware Working Parameters Power input DC:+9V ~ +36V Parameter Power Output +12V/1A Working Current Less than 12w Structure...
- Page 7 Applicable environment Detailed Parameters Remarks Operating temperature -30℃ ~ +70℃ Environmental Storage temperature -40℃ ~ +85℃ characteristics 5% ~ 95% (no frost) Relative humidity Color Function Remarks Power Positive Black PGND Power negative Orange ACC switch cable Purple IO_IN_Right Direction High:Valid (9-28V) Brown and white IO_OUT1...
- Page 8 DSM Camera DSM_AHD_VCC 7 Pin DSM aviation head Interface interface,DSM signal input. Blue DSM _Audio_IN Yellow DSM _AHD_IN Black White Green Purple ADAS Camera 12v Output 7 Pin ADAS aviation head Interface Interface interface, Black definition ADAS camera input (4Pin to 7 Pin converter cable) Blue IO_Reserved...
-
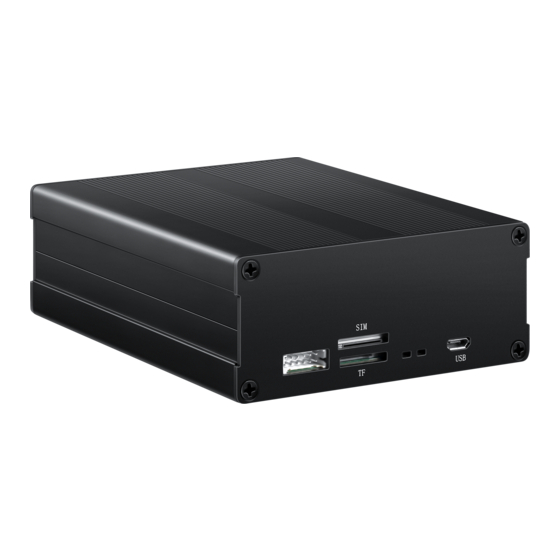
Page 9: Front Panel
Interface Name Description USB Interface Micro USB Serial Port communication,Software Upgrade and Video Export SIM Slot Micro SIM SIM card socket for SIM card insertion Front Panel Storage Card1 TF Card TF card socket, mainly used for the storage of audio and video files and upgrade for DSM and ADAS Standard Accessories Optional Accessories... -
Page 10: Function Description
Function Description Function Status Function Description Remarks Boot self-check or Post Support 1. Indicate the relevant working status through the equipment indicator. Real-time location upload Support 1. To upload device real-time location information to the platform at a certain time interval (default 10 seconds) Alarm broadcast Support 1. - Page 11 Blind area Support 1. The equipment automatically stores the position data in the place of signal weakly and re-transmission automatically transmits the position information while there is a signal. Fatigue Warning Support When the device works normally: 1. When the vehicle speed is greater than 30 km/h, once driver's eyes in the state of abnormally closed last for over 4s was detected by DSM camera, there will be an alert created which called fatigue driving;...
- Page 12 2. When the alarm is generated, the device transmits the calling driving alarm information through 4G module, and the alarm information includes alarm status and picture information to the monitoring platform. L a n e D e p a r t u r e Support 1.
- Page 13 Equipment Installation 1. Notices: 1). Comply with all electronic product specifications, vehicle and other connecting equipment requirements when installing and operating equipment. 2). Power supply and ground: a) Use DC power supply for video recorder. Please pay attention to the positive and negative polarity when connecting power supply. b) The input voltage range of the DVR is 9 V-36 V.
-
Page 14: Installation
3). Humidity requirements: a) Install equipment in a dry environment to avoid moisture, dripping, water spray, etc. Do not install the device in a place where it may accumulate water or a wet place where liquid will drip. b) Do not touch the device with wet hands, or touch the device while standing in the water or in contact with other water sources, because there is a risk of electric shock. - Page 15 Installation of DSM and ADAS cameras 1. Installation position The DMS camera needs to be installed under the left side of the A pillar of the vehicle as follow: and the ADAS camera needs to be installed on the front windshield. 2.
- Page 16 1) Install an application“Calibrator”to android system phone. (This app is developed by our company, only works on android system phone). 2) Open the Calibrator, click the right bottom button “Mine” on your phone, select the server IP 192.168.43.1 as shown below: 3) After the device is started, the mobile phone search WIFI which is called "TS-AP-Equipment-xxxxx",enter password 123456789 to connect the device.
- Page 17 2. DSM Calibration 1) Click DSM calibration, it will take you to the camera position correction page, DSM is recommended to be installed at the left front of the driver, under the A pillar. ( Different type of vehicle has different installation position). Adjust the camera position slightly make sure your face is at the center of the screen inside the blue rectangle frame, you might get “calibration is successful”...
- Page 18 3. ADAS Calibration 1) Click ADAS Calibration, you will get Adjust ADAS camera position page , adjust the camera angle to locate the horizon line between the two yellow guiding lines, make sure the middle line coincides with horizon line, go to the next step. (Measure the height from the ADAS camera to the ground. Find an equal height reference 3 to 5 meters in front of the vehicle, make sure the green line of the debug screen coincides with it by adjusting camera lens.) Horizon/Vanish line calibration...
- Page 19 2) Calibrate vanishing point position, move the blue cross so that the center point of the cross coincides with horizon line. You can use the four direction arrow to adjust slightly, and then go to the next step. 3) Set the parameters information according to your vehicle. After setting, click Finish. Camera height: the height from camera to ground Camera horizon gap: the distance between camera and engine hood Camera left gap: the distance from camera to the left of the vehicle...
- Page 20 4. Parameter setting 1) Open the debugging assistant app tsAide. 2) Connect to the hotspot of the device , the hotspot name is TS-AP-SN, and the password is 123456789; then return to the interface on the phone, friendly reminder: please turning on all permissions during the installation process. 3) After connection successfully, return to the main interface.
- Page 21 4) Click Device setting at the bottom of the screen, it will take you to next page, you can set the debugging mode, DSM alarm parameters, ADAS alarm parameters, terminal parameters, and Manager parameters. When setting terminal parameters, the mobile phone number must be 12 digits. If there is only 11 digits, please add 0 in front.
- Page 22 5. Wiring connection method: 1) Power cable connection method: Open the cover of the car safety box and measure the voltage with a multimeter. As shown in the figure, the range of the voltage of the car power supply is between DC11V and 13V.
- Page 23 2) Install GPS antenna Make sure you don't switch on the equipment power first! a) The arc side of the GPS antenna face the sky, and there is no metal shielding and electromagnetic shielding above. b) In order to receive good signal, the flat bottom of the GPS antenna should be installed as flat as possible, and the angle should not exceed 45 degrees. c) The wiring is as concealed as possible: first, it is beautiful;...
- Page 24 6. Appendix: 1) Common Questions and Answers Q:What should I do if the product has problems that I can't handle? A:please record the product model and software version number, submit detailed problem description, phenomenon, picture to our technical support engineer for analysis. The more detailed you describe, the more convenient it will be for us to analyze and process. Q: What if the on-board device does not have a video output? A: Check the connection status of the host video output line and the display.
- Page 25 2) Troubleshooting:The device is not online a) Check whether the device terminal number is correct or not. Enter 12 digits terminal number according to the platform, set IP and port correct correctly. b) Check whether the 4G signal of the device is normal. If there is no signal, change a place and look at the signal. If there is no 4G signal, there may be a problem with the SIM card.
- Page 26 This equipment complies with FCC radiation exposure limits set forth for an uncontrolled environment. This equipment should be installed and operated with minimum distance 20cm between the radiator and your body. Shenzhen Tensor Technology Co., LTD Cell: 0755-2692 3813 Email: support@tensortec.net Website: www.tensortec.net Address: 5th Floor, Shunhengli Building, No.118 Xin'an 3rd Road, Bao'an District,Shenzhen, Guangdong Province,China V3.0...
Need help?
Do you have a question about the MV03 and is the answer not in the manual?
Questions and answers