
Related Manuals for Arcflash Labs EMG-01 Beta

Summary of Contents for Arcflash Labs EMG-01 Beta
- Page 1 EMG-01 Beta 8 Stage IGBT Coilgun User Manual Arcflash Labs, LLC 8620 Belford Ave, Unit 603 Los Angeles CA 90045 - (424) 256-5087 www.arcflashlabs.com admin@arcflashlabs.com Limited Warranty P a g e...
- Page 2 AS PROVIDED UNDER THIS WARRANTY, IS THE BUYER’S EXCLUSIVE REMEDY. This exclusive remedy will not be deemed to have failed of its essential purpose so long as Arcflash Labs is willing and able to repair or replace any defective product, or refund the purchase price, in the prescribed manner. In the event Arcflash Labs fails to provide the Buyer with free repair or replacement, or refund the purchase price as aforesaid, Arcflash Labs’...
- Page 3 - NEVER INSERT THE FUSE WITH THE SWITCH IN THE ON (REARWARD) POSITION. 1. Introduction The Arcflash Labs EMG-01B (Electro-Magnetic Gun – 01 Beta) is an 8 stage low voltage capacitor augmented fully automatic coilgun. It features 8 stages controlled by a nanosecond-precise microcontroller which allows for firing up to 8 rounds per second at >45m/s.
- Page 4 Terminology and Safety The list below and throughout this manual is a summary of the major hazards associated with the device, but is NOT ALL INCLUSIVE. There are many other hazards associated with the device which are not laid out in this manual. We recommend wearing high voltage, flame retardant gloves at all times when using the device as well as goggles and thick clothing.
-
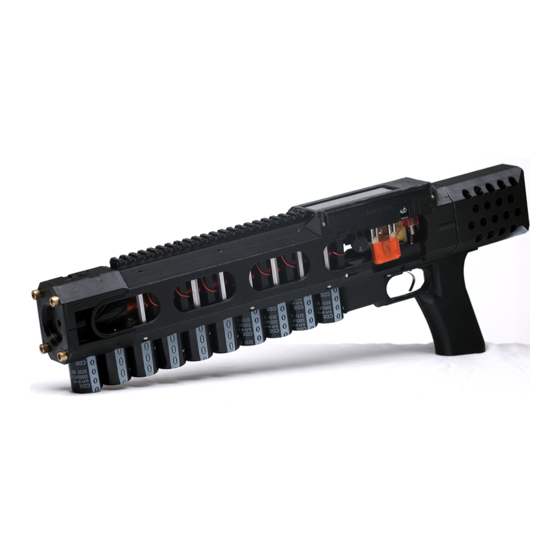
Page 5: Overview Of Components
2. Overview of components Firing mode selector Drive coils (barrel) Main Switch Injector solenoid Mounting rail Display Muzzle Fuse socket Electronics Bay LiPo Battery Compartment Magazine Socket Capacitors Battery Trigger Main fuse Magazine 2.1 Barrel - Muzzle energy is sufficient to break bones, cause serious injury or even death. It goes without saying: never point the gun at anyone or anything you do not intend to destroy. -
Page 6: Electronics Bay
accidental discharge include broken bones and severe injuries – in short, never point the device at anything you don’t want to destroy. Treat it as loaded at all times. The device operates on low voltage (25V), but carries extremely high amperage (300A+) during a shot, which is immediately converted to high voltage (300V+) in the driver coils. -
Page 7: Main Switch
main switch is set to the “discharge” position. The ICL may heat to over 100 C immediately after the gun is shut down but quickly cools within the span of a few minutes. The fuse, main switch and firing mode selector will be discussed in the sections below: 2.3 Main fuse - ALWAYS ENSURE THE POWER SWITCH IS SET TO THE DISCHARGE (FORWARD) POSITION BEFORE INSERTING THE FUSE OR BATTERY. - Page 8 by the microcomputer. The microcontroller slowly increases the capacitor charging current over the course of 6 seconds until the capacitors are at full charge and the power supply is capable of delivering 1500W during full-auto fire. When the switch is placed in the DISCHARGE (FORWARD) position, the battery is disconnected from the main electronics and the capacitors are shorted across the DCL resistive load, discharging them quickly.
- Page 9 2.7 Magazine - The EMG-01B uses a similar magazine retaining mechanism to the SGP-35. Inserting the magazine should be done in a fluid motion. There is no switch or button required to insert or remove the magazine, a ball detent retainer holds the magazine securely in place. The EMG-01B uses a proprietary magazine design and retaining mechanism which was designed to accommodate an 18-round 3D-printed magazine (the MG18).
-
Page 10: Operation
3. Operation 3.1 Startup - ALWAYS ENSURE THE POWER SWITCH IS SET TO THE DISCHARGE (FORWARD) POSITION BEFORE INSERTING THE FUSE OR BATTERY. - NEVER INSERT THE FUSE WITH THE SWITCH IN THE ON (REARWARD) POSITION. - It is unsafe to power up the gun with a magazine inserted - Always check that there is nothing inside the electronics bay before powering up. - Page 11 4. ENSURE THAT THE MAIN SWITCH IS FACING FORWARD – Insert the fuse into its socket. 5. Now flip the Main Switch to its rearward (ON) position. 6. Once the fuse is inserted and the Main Switch is set to the (ON) position, the primary computer should begin to boot up and capacitors will begin to charge.
-
Page 12: Inserting A Magazine
7. Once the capacitors have charged, press the firing mode selector button to switch the gun to the desired firing mode. 3.2 Inserting a magazine 1. Always ensure the gun is powered up and pointed in a safe direction before inserting a magazine. - Page 13 3.3 Shutdown 1. Flip the Main Switch to the DISCHARGE (FORWARD) position. 2. Remove the Main Fuse from its socket – this immediately removes the battery from the circuit. 3. Remove the magazine from the gun and verify that there is no round still remaining in the barrel or electronics bay.
-
Page 14: Hardware Specifications
01B software is expressly discouraged and will immediately void any express or implied warranties. Any attempt to modify the software may render the gun unusable or unsafe. Arcflash Labs, LLC assumes absolutely no responsibility for units which have had their software modified by the end user. - Page 15 15 | P a g e...
Need help?
Do you have a question about the EMG-01 Beta and is the answer not in the manual?
Questions and answers