Table of Contents
Advertisement
Available languages
Available languages
Quick Links
IF YOU HAVE QUESTIONS OR CONCERNS, OR ARE MISSING PARTS DO NOT RETURN SPRAYER TO THE STORE!
PLEASE CALL OUR CONSUMER SERVICE HOTLINE AT 1-800-253-4642. Year Round: Mon to Fri, 8 am to 7 pm, ET;
Addtional Summer Hours: March 1 to August 31: Sat and Sun 10 am to 4 pm, ET.
Or write us at: Root-Lowell Manufacturing Co., 1000 Foreman Rd., Lowell, MI 49331
WARNING!! THIS PRODUCT IS DESIGNED TO SPRAY CHEMICALS THAT MAY BE HARMFUL AND COULD CAUSE
SERIOUS PERSONAL INJURY IF INHALED OR BROUGHT INTO CONTACT WITH THE USER. FAILURE TO READ
AND FOLLOW USER MANUAL INSTRUCTIONS BEFORE USE AND/OR MISUSE OF THIS PRODUCT COULD
•
ALWAYS water test sprayer before each use.
•
ALWAYS wear long sleeve shirts, long pants, goggles, gloves and durable shoes.
•
ALWAYS READ AND FOLLOW label instructions for the chemicals to be applied.
•
AFTER USE release pressure and clean the sprayer.
•
ALWAYS RELEASE pressure in sprayer before servicing.
•
DO NOT alter the sprayer or any components.
•
DO NOT spray flammable, caustic (i.e. acids, chlorines and bleach), corrosive, heated or self-heating
solutions with this sprayer.
•
DO NOT store liquids in the sprayer.
•
NEVER fill tank above the "MAX FILL LINE" on the tank.
A. NOZZLE ASSORTMENT
B. NOZZLE ASSEMBLY
1. Flat fan nozzle
2. Gasket
3. Nozzle cap
4. Nozzle Body
5. Nozzle retaining nut
C. REMOVING ADJUSTABLE POLY NOZZLE
Unscrew the nozzle cap (1) from the nozzle body(3). This is best accomplished
while the retaining nut (2) is tightly fastened to the elbow (5). Next, unscrew the
retaining nut (2). Push the nozzle body (3) out of the retaining nut (2). The gasket
(4) will come out with the body. To reinstall, reverse above instructions.
D. WAND ASSEMBLY
1. Insert wand into flow control valve as shown.
2. Tighten the screw cap (clockwise) onto the flow control.
Hand tighten only.
E. PUMP HANDLE ASSEMBLY
Slide handle assembly over the pump rod. For right-handed spraying,
pump handle can be installed on the opposite side of the tank.
F. SHOULDER STRAP INSTALLATION
The tops of the shoulder straps are pre-attached to the sprayer via a
buckle. The lower portion of the straps are attached by fastening the
strap hooks to the metal frame where the frame exits the tank and bends.
G. FILLING THE SPRAYER
For best results, mix the spray solution in a separate container. Pour the spray solution through the filter basket in
the tank opening. Pump the sprayer handle to prime the pump and fill the pressure cylinder. You are now ready to
spray. NOTE: Do not use wettable powders in this sprayer.
Vivit us on the internet: www. rlflomaster.com
email: service@rlflomaster.com
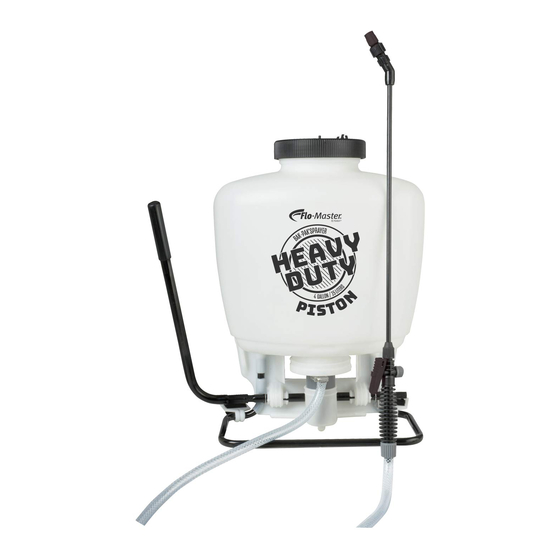
Backpack Sprayer Model 2204HD
RESULT IN EXPLOSIVE FAILURE WITH MAJOR INJURIES.
Adjustable Nozzle
3
5
4
2
Users' Manual
Screw cap Wand
Flat Fan Nozzle
5
1
2
1
2
3
5
O-ring
Flow control
Gauge mount-- DO NOT
LOOSEN OR REMOVE
Advertisement
Table of Contents

Related Manuals for Flo-Master 2204HD

Summary of Contents for Flo-Master 2204HD
- Page 1 Vivit us on the internet: www. rlflomaster.com email: service@rlflomaster.com Users’ Manual Backpack Sprayer Model 2204HD WARNING!! THIS PRODUCT IS DESIGNED TO SPRAY CHEMICALS THAT MAY BE HARMFUL AND COULD CAUSE SERIOUS PERSONAL INJURY IF INHALED OR BROUGHT INTO CONTACT WITH THE USER. FAILURE TO READ AND FOLLOW USER MANUAL INSTRUCTIONS BEFORE USE AND/OR MISUSE OF THIS PRODUCT COULD RESULT IN EXPLOSIVE FAILURE WITH MAJOR INJURIES.
- Page 2 Prompt and thorough cleaning after each use. Manual de instrucciones Rociador de mochila con bomba de pistón Modelo 2204HD ¡¡¡ADVERTENCIA!!! ESTE PRODUCTO HA SIDO DISEÑADO PARA ROCIAR PRODUCTOS QUÍMICOS QUE PODRÍAN SER DAÑINOS Y PROVOCAR LESIONES PERSONALES GRAVES SI SE LES INHALA O SI ENTRAN EN CONTACTO CON EL USUARIO.
- Page 3 B. ENSAMBLAJE DE LA BOQUILLA: 1. Boquilla para abanico plano 2. Empaque 3. Tapa de boquilla 4. Cuerpo de la boquilla 5. Tuerca para retención de la boquilla C. COMO QUITAR LA BOQUILLA AJUSTABLE DE POLI Desenrosque la tapa (1) de la boquilla del cuerpo (3) de la boquilla. Esto se efectúa mejor mientras la tuerca de retención (2) se encuentra bien apretada en el codo (5).
- Page 4 Límpiela rápida y completamente luego de cada uso. Manuel d'instruction Pulvérisateur autonome à pompe à piston Modèle 2204HD ATTENTION – CE PRODUIT EST CONÇU POUR PULVÉRISER DES PRODUITS CHIMIQUES QUI PEUVENT ÊTRE NOCIFS ET PEUVENT CAUSER DES BLESSURES SI INHALÉS OU AMENÉS EN CONTACT AVEC L'UTILISATEUR.
- Page 5 E. POIGNÉE DE POMPE Glisser la poignée sur la tige de la pompe Pour pulvériser à main droite, il est possible d'installer la poignée de pompe sur le côté opposé du réservoir. F. INSTALLATION DES COURROIES D'ÉPAULES Le haut des courroies d'épaules est déjà monté sur le pulvérisateur avec une boucle. La portion inférieure des courroies est attachée en accrochant les crochets des courroies sur le cadre métallique où...
- Page 6 LIMITED WARRANTY Root-Lowell Manufacturing Co. warrants to the original purchaser only that this product will continue to function as intended if used in accordance with operating instructions for as long as the original purchaser owns the product.If the product fails to function as intended—DO NOT RETURN IT TO THE STORE—call our CONSUMER HOTLINE at 1- 800-253-4642 (toll free) for fast service.
Need help?
Do you have a question about the 2204HD and is the answer not in the manual?
Questions and answers
I have a Flo master HD 4Gal model 2204 that I purchased a few years ago. Its stopped working and was set aside for a while. I'm thinking the O-rings may have gone bad. Do you offer a replacement O-ring kit for this model?