Table of Contents
Advertisement
Quick Links
QUICK START
Basic device control information:
To start MotoMonitor receiver:
Press and hold button (1) until diode goes off (5)
To turn off MotoMonitor receiver:
At any of desktops, press and hold button (4) until you can feel vibration
When MotoMonitor is on :
Press long button 1 - to turn on device,
Press short button 1 – to go to another desktop,
Press short button 2 – to move back to previous desktop,
Press long button 2 - to set navigation point,
Press short button 3 - to start/stop stopper,
Press long button 3 - to reset stopper,
Press short button 4 – to refresh screen,
Press long button 4 - to turn off device (or exit from any menu),
Press and hold at the same time buttons 2 and 3 to go in to settings,
Advertisement
Table of Contents

Related Manuals for FLYelectronics MotoMonitor

Summary of Contents for FLYelectronics MotoMonitor
- Page 1 Basic device control information: To start MotoMonitor receiver: Press and hold button (1) until diode goes off (5) To turn off MotoMonitor receiver: At any of desktops, press and hold button (4) until you can feel vibration When MotoMonitor is on : Press long button 1 - to turn on device, Press short button 1 –...
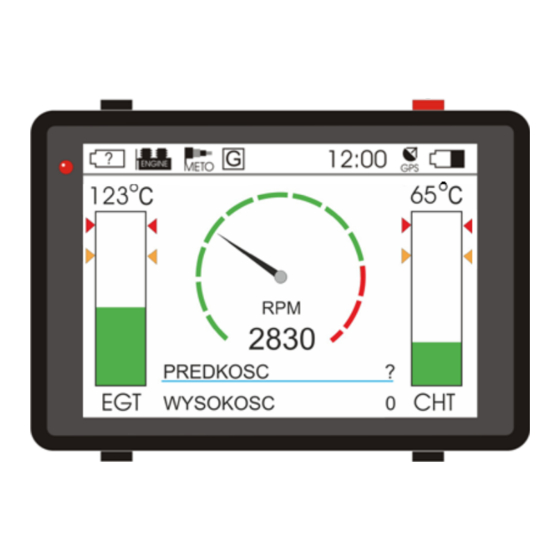
- Page 2 At this section presented are Function icons of devices which are wireless connected to MotoMonitor Receiver. These icons are: - Icon of battery charge level in MotoMonitor transmitter. When transmitter is not connected with receiver you can see question mark, - Icon of transmitter connection. Icon is lighter grey when devices are not connected, if it’s black it means connection is stable,...
- Page 3 Icon "desktop no": Icon shows at which one of 4 desktops we are at present time: G – currently we are on graphic desktop, 1 – currently we are on text desktop no 1, 2 - currently we are on text desktop no 2, 3 - currently we are on text desktop no 3, Section "Starting point name": When receiver gets GPS signal accurate with a place that we have given name before (look-...
- Page 4 More about graphic desktop : 1 – graphic presentation of RPM, 2 – figure presentation of RPM, 3 – Any two parameters of flight, 4 - micro-usb input (charging) WARNING ! Charger must be connected in the way shown above ( USB icon must be turned down) WARNING ! be careful at first battery charging- tight USB input.
- Page 5 Description of transmitter: 1 - micro-usb input (charging) WARNING ! Charger must be connected in the way shown above ( USB icon must be turned down) WARNING ! be careful at first battery charging- tight USB input. 2 – green diode, 3 –...
- Page 6 Notes:...
- Page 7 Notes:...
- Page 8 Notes:...
Need help?
Do you have a question about the MotoMonitor and is the answer not in the manual?
Questions and answers