Advertisement
Available languages
Available languages
Quick Links
www.konigelectronic.info
E E N N G G L L I I S S H H
H H A A V V - - C C R R 2 2 0 0
Digital Clock Radio
Manual
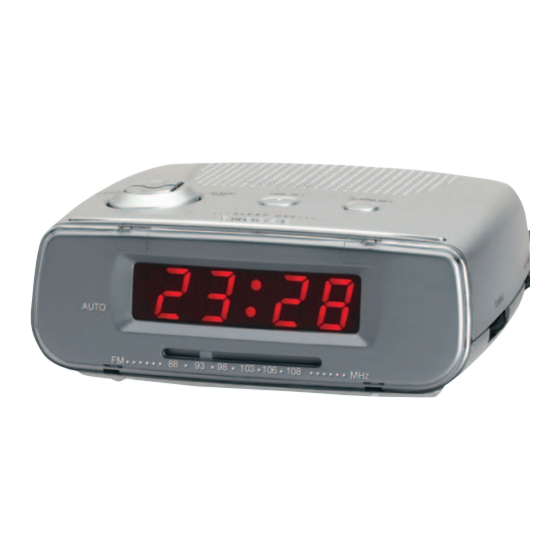
1.
on/off switch
2.
sleep set button
3.
auto indicator
4.
pointer
5.
LED display
6.
AC Cord
7.
snooze/sleep off button
8.
alarm set button
9.
hour set button
10.
tuning control
11.
wave band
12.
volume control/buzz
13.
minute set button
14.
time set button
15.
FM antenna wire
16.
battery back-up
17.
alarm off button
C C L L O O C C K K
Set the ON/OFF/AUTO switch (1) to "off" connect the mains cord to
the power supply. The clock display will flash on and off indicating a
power interruption and that the display time incorrect.
To set the correct time, press the TIME SET button (14) and MINUTE SET
button (13). Or HOUR SET button (9), together, until the correct time
is displayed.
Open the clock battery compartment door and fit a 9V battery. The
purpose of this battery is to store the information relating to alarm
time. And to keep the clock functioning in the event of disconnection
from the mains supply or power interruption. Should this occur. The
clock will continue to keep time, but will not display.
T T O O S S E E T T O O R R R R E E S S E E T T T T H H E E A A L L A A R R M M T T I I M M E E
Press and hold the ALARM SET button (8).
While holding the ALARM SET button (8) press the HOUR SET button
(9) and MINUTE SET buttons (13) to advance the time until the
desired alarm time is shown on the display.
T T O O S S E E T T T T H H E E A A L L A A R R M M T T O O W W A A K K E E T T O O R R A A D D I I O O
Set the alarm time as previously instructed. Select a radio station
and make sure the VOLUME is set as desired.
Slide the ON/OFF/AUTO switch (1) to the AUTO position. When the
actual time matches the selected preset alarm time, the unit auto-
matically turns on for 1 hour and 59 minutes and then shuts off.
N N O O T T E E S S : :
To shut off alarm, press the ALARM OFF button (17) once and alarm time
will be reset for the next day. Slide the ON/OFF/AUTO switch to the position
to turn off alarm and not set it for the next day.
The radio can be temporarily turned off manually by pressing the SNOOZE
button (7); the radio will turn back on automatically 9 minutes later.
T T O O S S E E T T T T H H E E A A L L A A R R M M T T O O W W A A K K E E T T O O B B U U Z Z Z Z E E R R
Set the alarm time as previously instructed. Slide the VOLUME/BUZZER
(12) knob to the BUZZER position; a click is heard and the buzzer will
now be activated.
Slide the ON/OFF/AUTO switch (1) to the AUTO position. When the
actual time matches the selected preset alarm time, the unit auto-
matically turns on for 1 hour and 59 minutes and then shuts off.
T T O O S S H H U U T T A A L L A A R R M M O O F F F F
To shut off the alarm, press the ALARM OFF button (17) once and
alarm time will be reset for the next day. Slide the ON/OFF/AUTO
switch (1) to the OFF position to turn off alarm and not set it for
the next day.
S S N N O O O O Z Z E E F F U U N N C C T T I I O O N N
The alarm can be temporarily turned off manually by pressing the
SNOOZE button (7); the buzzer will turn back on automatically 9
minutes later.
S S L L E E E E P P
Set the ON/OFF/AUTO switch (1) to "OFF" or "AUTO".
Press the sleep set button (2) and minute set button (13) together.
The sleep time will be displayed and count down from 59 minutes to
zero. Release the buttons when the required sleep time is displayed.
The radio will now operate until the sleep time has elapsed or may
be switched off by pressing the snooze/sleep off button (7).
R R A A D D I I O O
The AM bands use an internal directional serial. Rotate the radio
for best reception.
For best FM reception ensure that the FM cord antenna is completely
uncoiled and extended. Rear side of cabinet.
Set the ON/OFF/AUTO/Switch (1) "ON" position.
Set the waveband switch (11) to the required waveband.
Adjust the tuning control (10) to select the desired station.
Adjust the volume control (12) is required.
To turn off the radio, set the ON/OFF/AUTO switch to (1) "OFF". If
the radio does not switch off this may be caused by inadvertent
operation of the sleep set button (2) to cancel this press the
Snooze/Sleep off button (7) once.
S S P P E E C C I I F F I I C C A A T T I I O O N N S S
Frequency range
Output power
Speaker impedance
Battery backup
Power source
D D e e s s i i g g n n s s a a n n d d s s p p e e c c i i f f i i c c a a t t i i o o n n s s a a r r e e s s u u b b j j e e c c t t t t o o c c h h a a n n g g e e w w i i t t h h o o u u t t a a n n o o t t i i c c e e . .
N N o o g g u u a a r r a a n n t t e e e e o o r r l l i i a a b b i i l l i i t t y y c c a a n n b b e e a a c c c c e e p p t t e e d d f f o o r r a a n n y y c c h h a a n n g g e e s s a a n n d d m m o o d d i i f f i i - -
c c a a t t i i o o n n s s o o f f t t h h e e p p r r o o d d u u c c t t o o r r d d a a m m a a g g e e c c a a u u s s e e d d d d u u e e t t o o i i n n c c o o r r r r e e c c t t u u s s e e o o f f t t h h i i s s
p p r r o o d d u u c c t t . .
: AM: 530 – 1600 kHz
: FM: 88 – 108 MHz
: 400mW
: 8 ohm
: 9V Battery (for clock)
: AC 230V/50Hz, 5 Watt
Advertisement

Related Manuals for König Electronic HAV- CR20


Summary of Contents for König Electronic HAV- CR20
- Page 1 www.konigelectronic.info E E N N G G L L I I S S H H H H A A V V - - C C R R 2 2 0 0 Digital Clock Radio Manual on/off switch sleep set button auto indicator pointer LED display...
- Page 2 www.konigelectronic.info D D E E U U T T S S C C H H H H A A V V - - C C R R 2 2 0 0 Digitaler Radiowecker Anleitung Hauptschalter Sleep-Taste Auto-Position -Anzeige Anzeige LED-Display Netzkabel Snooze-Taste/ und abschalten der Sleep-Funktion Alarm-Einstelltaste...
- Page 3 www.konigelectronic.info F F R R A A N N Ç Ç A A I I S S H H A A V V - - C C R R 2 2 0 0 Radio réveil digital Mode d’emploi Interrupteur principal Bouton Sleep Indicateur de la position Auto Indicateur...
- Page 4 www.konigelectronic.info N N E E D D E E R R L L A A N N D D S S H H A A V V - - C C R R 2 2 0 0 Digitale Klokradio Gebruiksaanwijzing on/off schakelaar sleep toets auto indicator...
- Page 5 www.konigelectronic.info I I T T A A L L I I A A N N O O H H A A V V - - C C R R 2 2 0 0 Radiosveglia digitale Manuale interruttore ON/OFF tasto funzione SLEEP indicatore funzione AUTO puntatore display LED...
- Page 6 www.konigelectronic.info E E S S P P A A Ñ Ñ O O L L H H A A V V - - C C R R 2 2 0 0 Radio despertador digital Manual de usuario Botón ON/OFF Botón de temporizador SLEEP Indicador AUTOmático Indicadora Pantalla LED...
- Page 7 www.konigelectronic.info M M A A G G Y Y A A R R U U L L H H A A V V - - C C R R 2 2 0 0 Digitális rádió-ébresztőóra Útmutató főkapcsoló Sleep gomb Auto helyzetjelző mutató...
- Page 8 www.konigelectronic.info S S V V E E N N S S K K A A H H A A V V - - C C R R 2 2 0 0 Digital radioväckarklocka Bruksanvisning huvudströmbrytare tangent Sleep indikator Auto-läge visare display LED strömsladd tangent snooze/ och avstängning av funktionen sleep...
- Page 9 www.konigelectronic.info S S U U O O M M I I H H A A V V - - C C R R 2 2 0 0 Digitaalinen radioherätyskello Käyttöohje pääkytkin painike Sleep asennon Auto merkkivalo taajuusasteikon osoitin LED näyttö virtajohto painike snooze/ ja sleep toiminnon pois päältä...
Need help?
Do you have a question about the HAV- CR20 and is the answer not in the manual?
Questions and answers