Advertisement
Quick Links
XBee Shield Hookup Guide
tutorial
Available online at:
Contents
Introduction
Hardware Overview
Example: Communication Test
Example: Remote Control Arduino
Resources and Going Further
Introduction
Heads up! Originally, this tutorial was written to configure an XBee Series 1 to communicate in
transparency mode. However, this can apply to the XBee Series 3 module as long as you configure
the firmware to the legacy 802.15.4 protocol. For more information, check out the
and XCTU
tutorial.
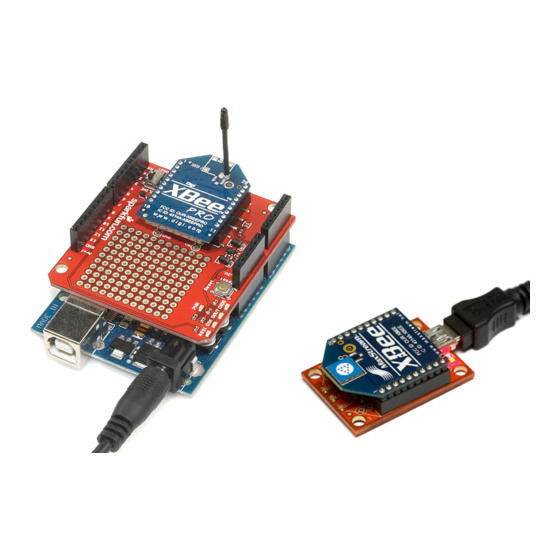
The
XBee Shield
gives your Arduino a seamless interface to
wireless platforms around. With XBee, instead of being tied down by a serial cable -- inches away
from a paired device -- your Arduino can pass data over the air to another device hundreds of feet
away.
http://sfe.io/t230
Page 1 of 24
a
learn.sparkfun.com
XBee
-- one of the most popular
Exploring XBees
Advertisement

Summary of Contents for XBee Shield
- Page 1 Heads up! Originally, this tutorial was written to configure an XBee Series 1 to communicate in transparency mode. However, this can apply to the XBee Series 3 module as long as you configure the firmware to the legacy 802.15.4 protocol. For more information, check out the...
- Page 2 SparkFun XBee Shield WRL-12847 $16.95 Favorited Favorite Wish List Page 2 of 24...
- Page 3 SparkFun XBee 3 Wireless Kit KIT-15936 $78.95 Favorited Favorite Wish List Page 3 of 24...
- Page 4 Covered In This Tutorial The goal of this tutorial is to set up wireless XBee communication between a computer and an Arduino/XBee Shield combo. Then, using a terminal program, we can remotely send data to an Arduino, or read data off of it.
- Page 5 XBee Buying Guide. Heads up! While this tutorial was written for XBee Series 1, you can still follow along using XBee Series 3 modules. Just make sure to configure it with the 802.15.4 (Series 1) firmware. For more information, check out the Exploring XBees and XCTU tutorial.
- Page 6 Exploring XBees and XCTU March 12, 2015 How to set up an XBee using your computer, the X-CTU software, and an XBee Explorer interface board. Favorited Favorite That tutorial will introduce you to XCTU and explain how to configure XBee networks and addresses.
- Page 7 Below we'll go more in-depth on the most important components of the shield. UART/Software Serial Switch One of the most important components on the XBee Shield is the DLINE/UART switch. This switch controls which Arduino pins interface with the XBee.
- Page 8 There's also a chance that, during program upload, spurious -- even harmful -- data might be sent to any device attached to the Arduino's hardware UART. So to avoid any problems that might arise from connecting the XBee to the Arduino's hardware UART, we usually take advantage of the...
- Page 9 "DLINE" position when uploading sketches . Status LED Indicators There are 5 LEDs on the XBee Shield. Each of these LEDs connects to a pin on the XBee, which does most of the LED driving. Here's a table explaining the operation of each LED:...
- Page 10 XBee Socket There is some white silkscreen on the Shield PCB to help orient your XBee as you're plugging it in. Make sure to match up the XBee's two diagonal edges with the two diagonal lines on the PCB.
- Page 11 Exploring XBee's and XCTU tutorial for help with that. Exploring XBees and XCTU March 12, 2015 How to set up an XBee using your computer, the X-CTU software, and an XBee Explorer interface board. Favorited Favorite This example assumes you have XCTU installed...
- Page 12 Copy and upload the sketch below. language:c /***************************************************************** XBee_Serial_Passthrough.ino Set up a software serial port to pass data between an XBee Shield and the serial monitor. Hardware Hookup: The XBee Shield makes all of the connections you'll need between Arduino and XBee. If you have the shield make sure the SWITCH IS IN THE "DLINE"...
- Page 13 To use re-define the software serial pins on an Arduino Mega 2560 or Arduino Leonardo, you would just need to comment out the line where it says: SoftwareSerial XBee(2, 3); // RX, TX and uncomment out the line here: //SoftwareSerial XBee(10, 11); // RX, TX Reroute Pins To reroute the pins, on an Arduino Mega 2560 or Leonardo, you would need to remove the solder jumper and reroute pads to the respective pins.
- Page 14 Warning for Users NOT Using the Arduino Serial Monitor! If you are using Digi's X-CTU or a serial terminal to configure or connect to an XBee by using a RedBoard/Arduino Uno as a serial passthrough, you may need to add a jumper wire between the RST and 5V pin to prevent the Arduino from resetting.
- Page 15 Serial.begin(9600); //USB void loop() if (Serial.available()) //USB { // If data comes in from serial monitor, send it out to XBee Serial1.write(Serial.read()); //XBee/UART1/pins 0 and 1 if (Serial1.available()) //XBee/UART1/pins 0 and 1 { // If data comes in from XBee, send it out to serial monitor Serial.write(Serial1.read());...
- Page 16 Example: Remote Control Arduino Setting up a chat system is fun, but where XBees and the XBee Shield really shine is in passing data to and from an Arduino, so you can remotely control it or receive data from it. In this example, we'll create a simple serial interface, which can be used to set and read analog and digital pins.
- Page 17 - Use 0, l, or L to write LOW - Use 1, h, or H to write HIGH Hardware Hookup: The Arduino shield makes all of the connections you'll need between Arduino and XBee. Make sure the SWITCH IS IN THE "DLINE" POSITION.
- Page 18 // Print a message to let the control know of our intentions: XBee.print("Setting pin "); XBee.print(pin); XBee.print(" to "); XBee.println(hl ? "HIGH" : "LOW"); pin = ASCIItoInt(pin); // Convert ASCCI to a 0-13 value pinMode(pin, OUTPUT); // Set pin as an OUTPUT digitalWrite(pin, hl); // Write pin accordingly...
- Page 19 // Read Digital Pin // Send 'r' or 'R' to enter // Then send a digital pin # to be read // The Arduino will print the digital reading of the pin to XBee. void readDPin() while (XBee.available() < 1) ;...
- Page 20 XBee.println(F("Arduino XBee Remote Control!")); XBee.println(F("============================")); XBee.println(F("Usage: ")); XBee.println(F("w#nnn - analog WRITE pin # to nnn")); XBee.println(F(" e.g. w6088 - write pin 6 to 88")); XBee.println(F("d#v - digital WRITE pin # to v")); XBee.println(F(" e.g. ddh - Write pin 13 High")); XBee.println(F("r# - digital READ digital pin #"));...
- Page 21 Arduino. All of the XBee magic occurs in serial prints and reads. To send data from the Arduino XBee, 's are used to write strings and other data. To read data from the XBee.print()
- Page 22 The power of XBees comes from their simplicity -- they make your projects wireless by simply "serial printing". Resources and Going Further That should be enough to get you started. If you're looking for more XBee and XBee Shield info, check out these resources: Schematic -- If you confused about the layout of the schematic, check out this PDF.
- Page 23 With XBee and the XBee Shield you have all of the tools necessary to take your project to the airwaves. What are you going to make? Need some inspiration? Check out these related tutorials: XBee WiFi Hookup Guide -- Take the next step with XBees, using the XBee WiFi. These...
- Page 24 Page 24 of 24...
Need help?
Do you have a question about the Shield and is the answer not in the manual?
Questions and answers