Table of Contents
Advertisement
Quick Links
Advertisement
Table of Contents

Subscribe to Our Youtube Channel
Related Manuals for SVBONY SV25


Summary of Contents for SVBONY SV25
- Page 1 SV25 Telescope Instructions...
-
Page 2: Table Of Contents
Contents SV25 Refractor Telescope Specifications and configuration Schematic Main Accessories Operating Sequence Precautions What to Look For in the Sky Package Includes Care and Cleaning of Optics... -
Page 3: Sv25 Refractor Telescope
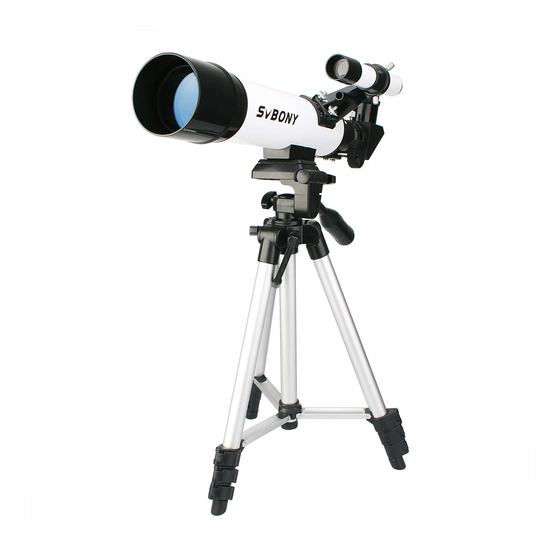
SV25 Refractor Telescope Open up the wonders of the Universe to aspiring astronomers of all ages with the SV25 refractor telescope. The refractor telescope is designed to give the first-time telescope user the perfect combination of quality, value, features and power. -
Page 4: Specifications And Configuration
Specifications and Configuration Aperture:60mm Focal Length:420mm Optical Type:Achromatic Refractor Viewfinder:5x20 90 Degrees mirror-Adapter Magnification 1(9mm Eyepiece)=420/9=47x Magnification 2(20mm Eyepiece)=420/20=21x... -
Page 5: Schematic
Schematic... -
Page 6: Main Accessories
Main Accessories Two correct eyepieces: 9mm;20mm viewing a wide range of objects;moon;planets;or land 1.25" 90 degree zenith mirror: Looking with comfortable angle;diagonal correct upside down and left right reversed image 5x20 finder scope: Locate objects in the main telescope;it provide 5x20 magnification helps find the objects soon Silver aluminum tripod: Preassembled aluminum full size photographic tripod ensures a stable platform quick... -
Page 7: Operating Sequence
Operating Sequence Viewfinder mounted on the telescope,the installation of the telescope to the tripod, the installation of the Enhanced Diagonal to the telescope. Place the 20 mm eyepiece to the Enhance Diagonal, to distant objects on the ground as the target,adjust the 3 screws of the viewfinder, so that the viewfinder and telescope eyepiece observed the same goal Remove the eyepiece from the zenithoscope and attach it to the eyepiece interface of the photo holder... -
Page 8: Precautions
Precautions Blindness Danger! Don't use the product to watch the sun or the sun directly around the place.This will have the risk of blindness. Choking hazard! The child must use the product under the care of an agult.So that the packaging materialss, such as plastic bags and rubber lines away from children.This will have the risk of suffocation. -
Page 9: What To Look For In The Sky
What to Look For in the Sky There is a whole universe of objects to be seen in the night sky so where does one start? Well lets examine the most visible objects first The Moon The moon is the easiest target to find in the night. When it is in the full position, when the entire face is lit, then it bathes the night with a silvery light washing out the rest of the sky from all but the brightest objects. - Page 10 What to Look For in the Sky The Planets The planets are our solar system companions. These range in size from moon size rocky bodies to giant gas balls which could hold 1000 Earths. To find the planets requires some information as to when they are visible. An astronomy magazine such as SkyNews or Sky and Telescope, will give you the locations of the planets from month to month.
- Page 11 What to Look For in the Sky Each of the planets has its own interesting views. Venus is covered with clouds so all we see is an extremely bright light, the brightest next to the moon, however it like our moon goes through phases. In other words the planet surface will, as it travels around the sun, appear to have different amounts of it lit up.
- Page 12 What to Look For in the Sky Saturn, the second largest planet, is not as bright as Jupiter and its moons are not as visible through small telescopes. However it has very large rings that encircle the planet which are spectacular. The planet appears as a pale yellow, as do the rings but one can spend hours looking at these.
-
Page 13: Package Includes
Package Includes... -
Page 14: Care And Cleaning Of Optics
Care and Cleaning of Optics Warning:Improper cleaning of optical components may void the warranty Optical components of a telescope will over time get dirty. The amount of dirt and or dust collected onto a lens or mirror should only be removed with the utmost care and this is at times best left to people with experience in this procedure. - Page 15 Care and Cleaning of Optics 4.If you wish to remove dust from the lenses or mirrors you first should try using a can of filtered compressed air. Remove the dust cap and the dew shield in the case of the refractor style of telescope, or take the mirror cell out of the reflecting type.
- Page 16 このたびは、SVBONY望遠鏡をお買い上げいただきありがとうございます。こ の望遠鏡は倍率調整が可能で、地上観測用とともに天体観測用として開発した 屈折式望遠鏡です。目的に応じ、旅行・スポーツ・ホビー等の楽しみを倍増いた しますが、月のクレーターや土星の環、木星などの惑星の観測にも役立ちます。 本説明書をご精読の上、組み立て方、操作、取り扱いの注意点を正しく理解し て、地上/天体観測をお楽しみください。...
- Page 17 各部の名称...
- Page 18 安全上のご注意 望遠鏡を太陽の方向に向けないようにご注意ください。レンズを通った太陽の光 はとても強力で、目の被害となり、失明してしまう危険があります。 お子様が使用する場合は、観測中の安全を保護者の方が確認してください。...
- Page 19 鏡筒と三脚の組み立て方 鏡筒を三脚の架台に取付けます。 アルミ三脚のステイが地面と平行になるまで三つの脚を外側に開いて立てます。 鏡筒方向調節ハンドルを引き出して架台を地面と水平するようにします。 架台の筒受けネジを鏡筒の下側にあるネジ穴に位置を合わせて差し込みます。 三脚から鏡筒が浮き上がっていないよう注意してください。 確認後、鏡筒取付ネジを架台の下側にあるハンドルで回して、ゆっくりとまたし っかりと締め付けてください。 三脚の長さは、観測場所の条件や観測する人の背の高さなどに合わせて使いやす い高さに調節してください。...
- Page 20 ファインダーの取付と使い方...
- Page 21 ファインダーの取付と使い方 鏡筒にファインダーを取付けます。 望遠鏡鏡筒の後部にファインダー脚を取付けてください ファインダーは3本の調節ネジで軽く仮止めしておきます。 ファインダーをのぞき、本体で見えた景色がファインダーの十字線の重ねって見え ていればいいのですが、一致していない場合はファインダーの向きを動かして調節 します。 ファインダーの向きは、支えている3本の調節ネジを動かすと変えられます。 ファインダーの向きが決まったら、本体で同じ景色が見えることを確認します。ず れている場合には合わせ直してください。...
- Page 22 ピントの合わせ方 天頂ミラーを鏡筒の末端に差し込み、ネジで固定します。 アイピースを天頂ミラーに差し込み、ネジで固定します。 はじめはH20mmアイピースを使ってください。 対物レンズの防塵カバーを外して遠くの景色に望遠鏡を向けます。日中は危険な ために、望遠鏡を太陽に向けないようご注意ください。 ピントハンドルを回すと鏡筒のドローチューブを前後に動かすことができます。 アイピースをのぞきながらピントハンドルを回して、視界の像がはっきり見える ようにピントを合わせます。...
- Page 23 使用上のご注意 窓ガラス越しに望遠鏡を窓外の景色に向けないでください。窓ガラスの反射光は 解像度に影響を与えるので視界の像が歪む可能性があります。 温度も解像度にかかわる大切な要素です。望遠鏡のレンズや反射鏡が外気温に馴 染んでいないと、その膨張や熱気流によって大気の揺らぎ、シンチレーションと 同じように光学系内で揺らぎが起こってしまいます。屋外あるいは室内で窓を開 けたまま観測するなら、望遠鏡が外気温に馴染むまでお待ちください。(場合に よって5分~30分かかります)...
- Page 24 天体の観測 天体観察をするのに向く条件としては、周囲が暗く、視野が広い場所とされます。 これは周囲の光が障害となってしまうという理由と星によっては地平線ぎりぎり でしか見えないものがあるためです。そのためできる限り暗く、障害物が少ない、 視野が広い場所を選ぶと良いでしょう。自宅で観測する場合は庭やベランダなど 外のできる限り広い場所で行うことをお勧めします。 普通の場合は、天体望遠鏡で見える視界の像は上下左右が逆の倒立像です。天頂 ミラーを使えば、鏡像として見えます。 はじめはH20mmアイピースを使ってください。 調節したファインダーで見ながら、望遠鏡を月へ向け、十字線の中心に像が見え るようにします。 望遠鏡のピントを合わせて観測を始めます。 アイピースを付け替えることで倍率を上げることができます。更に詳しく観測し たいなら、高倍率のアイピースに替えてください。 ※惑星や恒星・星団なども以上のようにして観測します。...
- Page 25 地上の観望 天頂ミラーを使わないでください。 接眼アダプターに地上接眼鏡(Erecting Eyepiece)を差し込み・小ネジで固定 します。 地上接眼鏡にH20mmアイピースを差し込み、小ネジで固定します。 望遠鏡のピントを合わせて観測を始めます 更に詳しく観測したいなら、高倍率のアイピースに替えてください。 ※バローレンズはアイピースと併用で、倍率を高めることができます。ただし、解 像度が悪い原因につながります。...
- Page 26 パケージの内容...
- Page 27 保管と保守 ご使用後は、すぐにしまわず本体や三脚の汚れを乾いた布で拭いでください。汚 れを放置するとカビの原因になります。 夜露でレンズが濡れた場合は、よく乾かしてからしまってください。急ぐ場合に はドライヤーの冷風を使用してください。熱風は部品を痛める恐れがあります。 長時間使用しない場合は、なるべく乾燥した風通しの良い場所で保管してくださ い、レンズやアイピースにカビができて見えなくなることがあります。市販の乾 燥剤を添えておくことも有効です。 各回転軸部にゴミや汚れが付かないように、まわりを清潔に保ってください。...
- Page 28 Thanks!...
Need help?
Do you have a question about the SV25 and is the answer not in the manual?
Questions and answers