Advertisement
Quick Links
Please read these safety and operation instructions very carefully before using the
charger and save for future references. All instructions and cautionary markings on
the charger, the battery, and the radio should also apply in conjunction with this
instruction manual.
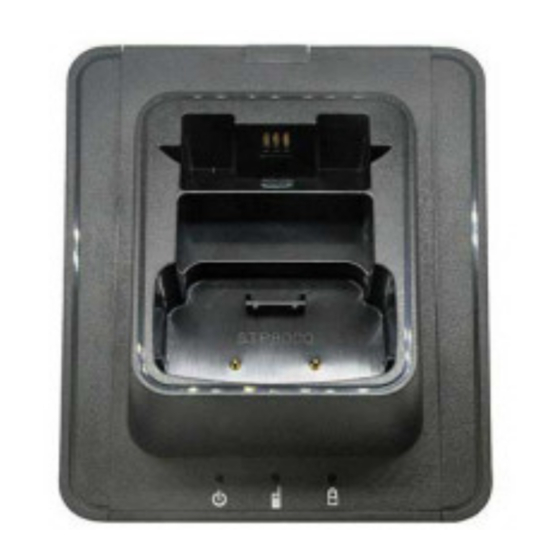
Battery Slot
Radio Slot
Power LED
Charging
Indicators
OPERATING INSTRUCTIONS
This modular universal charger allows user to use it as a single desktop charger or
connect multiple units to form a multi-bay charger.
1. If the charger is used as a single desktop charger, please proceed to Step 6.
2. Hold charger firmly with LED facing you, twist open the side covers to expose
connection panels. Right side cover is opened by twisting counterclockwise;
left side cover is opened by twisting clockwise.
3. Connect a second charger by aligning the connection panel of the adjacent
charger and twist to lock-in position.
4. You may connect any number of units up to six (6) units. DO NOT connect
more than 6 bays.
Side cover
DC Socket
Release tab
5. You may change the charger cup to charge other radio or battery model. Lift
the release tab at the back of the charger and take out the existing cup; replace
with a new charger cup by aligning the front tabs first; and engage the release
tab back to the charger base.
6. Plug power supply unit (PSU) into any DC socket at the back of the charger.
7. Plug the wall receptacle end of the PSU into AC outlet. Power LED will illuminate
to indicate successful power connection. Make sure to use the correct PSU
depending on number of chargers connected before operation.
Table 1: PSU options
PSU Model
DSK-9000-PSU-1
12V 1.5A
DSK-9000-PSU-1/6 12V 9.0A
8. Place radio with battery in the radio slot and (or) a spare battery in the battery
slot. Remove battery spacer if thick battery is being charged. Ensure the radio
charging port and (or) the battery contacts are properly connected to charger's
charging contacts.
9. Do not transmit when the radio is charging.
10. Refer to Table 2 for charging indicators.
Table 2: Charging Indicators:
Maximum
6 units
Output
Number of chargers
1
1, 2, 3, 4, 5, 6
Advertisement

Related Manuals for Sepura DSK-STP9000

Summary of Contents for Sepura DSK-STP9000
- Page 1 Please read these safety and operation instructions very carefully before using the charger and save for future references. All instructions and cautionary markings on the charger, the battery, and the radio should also apply in conjunction with this instruction manual. Battery Slot Side cover Radio Slot...
- Page 2 Battery fault Flash Red *The radio LED only indicates the radio is successfully connected with the For Sepura STP8000, SC20 charger. The charging status of the radio is shown on the radio screen. SAFETY CAUTIONS This charger is for indoor use only. Use only in dry locations/conditions.
Need help?
Do you have a question about the DSK-STP9000 and is the answer not in the manual?
Questions and answers