Table of Contents
Advertisement
Quick Links
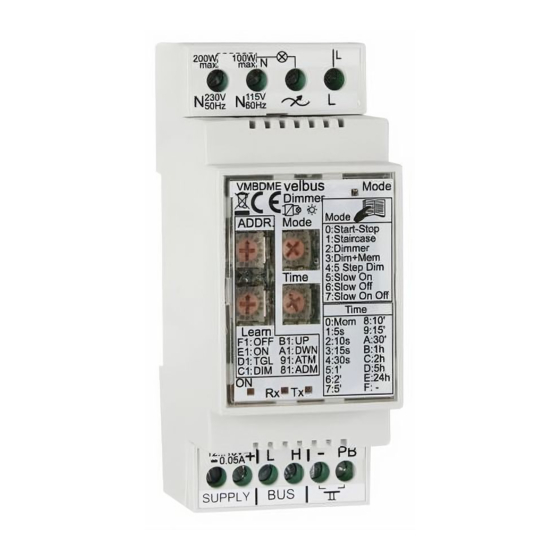
DIMMER FOR ELECTRONIC/RESISTIVE LOAD
1-Channel 200W dimmer suitable for lamp(s)
connected using an electronic transformer.
Required AC power : 100-125V/60Hz or 220-
240V/50Hz.
Maximum load: 200W @ 230V or 100W @ 115V.
9 different operation modes.
16 possible time settings.
Required power supply: 12...18VDC.
Consumption: 40mA.
Velbus Home Automation
Choosing Velbus is choosing comfort, safety and energy saving with the guarantee that your home is
ready for the future. All this for a price barely higher than that of a traditional installation.
VMBDME
Advertisement
Table of Contents

Summary of Contents for Velbus VMBDME
- Page 1 Required power supply: 12...18VDC. Consumption: 40mA. VMBDME Velbus Home Automation Choosing Velbus is choosing comfort, safety and energy saving with the guarantee that your home is ready for the future. All this for a price barely higher than that of a traditional installation.
- Page 2 Load contact Aansluitpunt voor belasting 115VAC connection 115VAC netspanning 230VAC connection 230VAC netspanning LED indication Ledindicatie Power supply Voedingsspanning Receiving Velbus® data Ontvangst van Velbusdata Sending Velbus® data Verzenden van Velbusdata Operating mode Werkingsmode Settings Instellingen Manual control Manuele bediening...
- Page 3 FRANCAIS DEUTSCH ESPAÑOL Câblage Anschlüsse Cableado ® ® Alimentation Velbus Stromversorgung des Velbus-Systems Alimentación Velbus ® ® ® Velbus Velbus Velbus Contrôle direct des boutons poussoirs Control directo de los pulsadores Direkte Drucktastenbedienung Point de connexion d’une charge Anschluss Belastung Punto de conexión para una carga...
-
Page 4: Address Setting
Address setting Enter a unique address (from ‘00’ to ‘FE’ except for ‘81’, ‘91’, ‘A1’, ‘B1’, ‘C1’, ‘D1’, ‘E1’, ‘FE’ and ‘FF’) for each module through the ‘ADDR’ rotating switches example: Adresinstelling address = 28 Stel een uniek adres in voor elke module via de ‘ADDR’... - Page 5 Terminaison Placez le cavalier TERM uniquement dans un module connecté au début ou en fin de connexion Velbus. Effacez le cavalier dans tous les autres modu- les.
- Page 6 USE WITH RESISTIVE LOAD GEBRUIK MET RESISTIEVE BELASTING UTILISATION AVEC CHARGE RÉSISTIVE ANWENDUNG MIT OHMSCHE BELASTUNG 230VAC USO CON CARGA RESISTIVA VELBUS VELBUS 12 ... 18Vdc 12 ... 18Vdc - 6 -...
- Page 7 Lichtstärke über einen Phasenabschnittdimmer zu regeln. Ojo!: Asegúrese de que el transformador electrónico tenga una protección térmica y esté protegido contra cortocircuitos y esté apto para controlar la intensidad luminosa con un dimmer con corte de fase. VELBUS 12 ... 18Vdc - 7 -...
- Page 8 Ojo!: Asegúrese de que el transformador electrónico tenga una protección térmica y esté protegido contra cortocircuitos. Conecte siempre una bombilla al transfor- mador (un transformador sin carga puede dañar el dimmer). VELBUS VELBUS 12 ... 18Vdc 12 ... 18Vdc - 8 -...
- Page 9 TIMESETTING - TIJDSINSTELLING - RÉGLAGE DE DÉLAI - ZEITEINSTELLUNG - AJUSTE DEL TIEMPO Momentary - Momentbediening - Contrôle momentané - Momentbedienung - Control momentáneo 1day - 1dag - 1jour - 1 Tag - 1día On/Off - Aan / Uit - Marche / arrêt - Ein/Aus - Control arranque/parada - 9 -...
- Page 10 MODE LED - LED DE MODE D’OPÉRATION - BETRIEBSMODUS-LED - LED DE MODO DE FUNCIONAMIENTO The LED will not burn if the lamp does not light up. The LED will burn if the lamp burns at a stable light intensity. The LED blinks rapidly as long as the lamp’s light intensity is modifying.
- Page 11 OPERATION MODE - WERKINGSMODE - MODE D’OPÉRATION - BETRIEBSMODUS - MODO DE FUNCIONAMIENTO Operating the push Bedienen van de L’actionnement du Eine Bedienung der Si se pulsa el pulsador, 0 / 8* button will turn the lamp drukknop doet de lamp bouton poussoir allumera Drucktaste lässt die la lámpara se encen-...
- Page 12 A short press will turn on Kort drukken zal de lamp Une pression brève Ein kurzes Drücken wird Una breve presión activará 2 / A* the lamp to full intensity. op volle sterkte doen allumera l’ampoule au die Lampe auf voller la lámpara a intensidad A short press while the branden.
- Page 13 Operating the push button Bedienen van de L’actionnement du Eine Bedienung der Si se pulsa el pulsador, la 4 / C* will turn on the lamp to full drukknop zal de lamp op bouton poussoir allumera Drucktaste wird die Lampe lámpara se encenderá...
- Page 14 Operating the push button Bedienen van de drukknop L’actionnement du bouton Eine Bedienung der Si se pulsa el pulsador la 6 / E* will turn on the immediately zal de lamp onmiddellijk op poussoir allumera instanta- Drucktaste wird die Lampe lámpara se iluminará...
- Page 15 Opmerkingen: De ingestelde mode is enkel van toepassing op drukknoppen aangesloten op de directe drukknopingang en op drukknoppen aangesloten via de VELBUS die de mode-functie toegekend kregen in de leerstand (zie leermode). Indien de ‘TIME’ draaischakelaar op ‘0’ staat, zal de dimmermodule steeds in momentbediening werken ongeacht de ingestelde werkingsmode.
-
Page 16: Learning Mode
Only push buttons connected to the Velbus via a push button interface or a control panel are appropriate for the procedure below. Each command can accept up to 14 different push buttons. Memorize he unique address of the module. -
Page 17: Troubleshooting
To learn a light atmosphere set the dimmer module on address ‘81’. The LEDs of the push buttons creating atmospheric light will blink rapidly. To assign a specific light intensity to an atmosphere push button, operate the corresponding push button until the desired light intensity has been reached. - Page 18 Enkel drukknoppen die via een drukknopinterface of bedieningspaneel op de VELBUS aangesloten zijn komen in aanmerking voor onderstaande procedure. Er kunnen tot 14 verschillende drukknoppen aangeleerd worden per bedieningsfunctie. Onthoud het unieke adres van de module.
- Page 19 Voor het aanleren van lichtsferen moet de dimmermodule op adres ‘81’ geplaatst worden. De leds van de drukknoppen om lichtsferen op te roepen zullen nu snel knipperen. Om een bepaalde lichtsterkte toe te kennen aan een sfeerdrukknop, bedient men de betreffende drukknop tot de vereiste lichtsterkte bekomen wordt. Om alle aangeleerde sfeerinstellingen op volle lichtsterkte te plaatsen, houdt men de manuele bediening op de dimmermodule lang ingedrukt tot de lamp op volle lichtsterkte gaat branden.
-
Page 20: Mode D'apprentissage
® La procédure décrite ci-dessous n’est applicable que pour les boutons-poussoirs connectés au Velbus via une interface de bouton -poussoir ou un panneau de commande. Chaque commande peut accepter jusqu’à 14 boutons-poussoirs différents. -
Page 21: Solutions Aux Problèmes
Pour l’apprentissage d’ambiances il faut placer le module variateur sur l’adresse « 81 ». Les LED des boutons-poussoirs créant les ambiances clignoteront très rapidement. Pour attribuer une intensité lumineuse spécifique à un bouton d’ambiance, actionnez le bouton-poussoir correspondant jusqu’à ce que l’intensité lumineuse souhai- tée soit atteinte. - Page 22 Betriebsmodus aktivieren. programmieren. ® Nur Drucktasten, die über eine Drucktastenschnittstelle oder ein Bedienfeld mit dem Velbus -System verbunden sind, eignen sich für das Verfahren (siehe unten). Es können bis zu 14 verschiedene Drucktasten programmiert werden. Speichern Sie die einzigartige Adresse des Moduls.
-
Page 23: Problemlösung
Um eine programmierte Drucktaste zu löschen, halten Sie diese gedrückt. Lassen Sie die Drucktaste los, dann erlischt die Anzeige-LED. Entfernen Sie alle programmierten Drucktasten einer Bedienungsgruppe, indem Sie die manuelle Bedienung auf dem Dimmermodul gedrückt halten bis die Lampe leuchtet. Beim Loslassen der manuellen Bedienungstaste werden die Lampe und die Anzeige-LEDs aller entsprechenden Drucktasten erlöschen. - Page 24 ® El siguiente procedimiento sólo es apto para los pulsadores conectados al Velbus por una interfaz de pulsadores o un panel de control. Cada mando puede aceptar hasta 14 pulsadores diferentes. Programe la dirección única del módulo.
-
Page 25: Solución De Problemas
Para borrar un pulsador programado, manténgalo pulsado. Al soltar el pulsador, el LED de indicación se apagará Para borrar todos los botones programados de un grupo de control, mantenga pulsado el control manual del módulo dimmer hasta que se ilumine la bombilla. Al soltar el botón de control manual la bombilla y los indicadores LED de todos los pulsadores correspondien- tes se apagarán. - Page 27 VELLEMAN NV Legen Heirweg 33 9890 Gavere Belgium Europe www.velbus.eu...
- Page 28 Modifications and typographical errors reserved - © Velleman nv. HVMBDME - 2010 - ED1 5 4 1 0 3 2 9 4 4 2 7 0 5...
Need help?
Do you have a question about the VMBDME and is the answer not in the manual?
Questions and answers