Advertisement
ZT MODEL
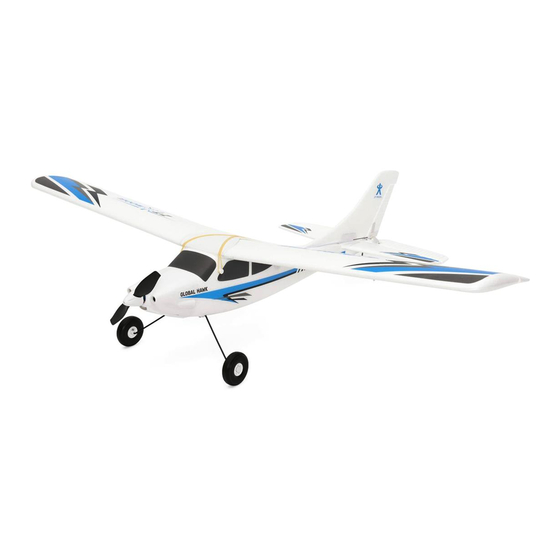
Global Hawk EP Airplane
FEATURES/SPECIFICATIONS:
Powerful 2830-1300kv motor with 30A ESC
All servos and linkages preinstalled
Easy to Assemble!
Durable EPP foam construction.
Wingspan: 1220mm, Length: 915mm, Flying weight: 1000g
Flight Battery: 11.1V 3S 1800~2200mAh 25C Lithium Polymer Battery (T-style plug)
3S LiPo Battery Charger
Required:
(4) 1.5V AA size batteries for the transmitter.
IMPORTANT! Read the ENTIRE instruction guide to become familiar with the model before operating. This
guide contains instructions for safety, operation, and maintenance. It is essential to read and follow all the
instructions and warnings, prior to assembly, setup, or use, in order to operate correctly and avoid damage
or injury.
NOTICE: All instructions, warranties and other collateral documents are subject to change at the sole
discretion of ZT Model.
Advertisement
Table of Contents

Summary of Contents for ZT Model Global Hawk EP Airplane
- Page 1 ZT MODEL Global Hawk EP Airplane FEATURES/SPECIFICATIONS: Powerful 2830-1300kv motor with 30A ESC All servos and linkages preinstalled Easy to Assemble! Durable EPP foam construction. Wingspan: 1220mm, Length: 915mm, Flying weight: 1000g Flight Battery: 11.1V 3S 1800~2200mAh 25C Lithium Polymer Battery (T-style plug)
-
Page 2: Warranty
• WARRANTY Do not return your model to the Store. ZT Model will repair or replace factory defects for 90 days from the date of purchase. This warranty specifically does not cover crash damage, misuse, or abuse. To make a... -
Page 3: Charging The Battery
CHARGING THE BATTERY: Charge the Lithium polymer (Lipo) Battery. Review the warnings in the front of this manual and most importantly, NEVER leave a charger unattended. Plug the C-420 charger into an outlet. The three LED’s will indicate green. Plug the battery into the 4-wire port on the end of the charger. - Page 4 ASSEMBLY: Attach the base parts to the fin. Secure with (2)M2.8x8 screws. Do not overtighten. Line up and install the main gear into the slot on the bottom of the fuselage. Make sure the landing gear angle forward. Secure using two flat straps and (4)M3x8 screws.
- Page 5 10. Connect the aileron servos to the Y-harness Attach the clevis to the rudder and elevator coming from the receiver. control surfaces. Use the outer holes of the arms. Slide the clevis retainers up to secure the 11. Place the wing in place making sure you are clevis.
-
Page 6: Propeller Installation
CONTROLS SETUP: Caution! When working on your aircraft with the battery installed, ALWAYS remove the propeller in order to avoid the chance of injury if the motors accidentally turn on. Turn on the transmitter, move the throttle to high and then back to low. a. - Page 7 FLOAT CONVERSION: Remove the wing from the fuselage. Attach the floats to the main gear. Remove the wheels from the main landing gear. Make sure the floats are lined up straight with the fuselage. When satisfied, secure the main Remove the tail wheel and tail wheel wire gear to the floats using (4)M3x8 screws.
-
Page 8: Center Of Gravity (Cg)
CENTER OF GRAVITY (CG): IMPORTANT! DO NOT SKIP THIS STEP. Having a properly balanced aircraft is critical for proper flight. Too nose heavy and the plane will want to dive and be hard to take off and land. Too tail heavy and the plane will feel unstable and out of control. - Page 9 FLYING: Caution: As a rule of thumb “always” assume the propeller could spin at any time. Whenever a battery is installed, stay clear of the propeller! • Choose a wide-open area away from people, buildings, and power lines. • You can take off and fly in any of the three flight modes. •...
- Page 10 When ready to land, point the plane into the wind and keep the wings as level as possible. Lower the throttle so the plane will descend. When the plane is ready to touch down, reduce the throttle to zero and add in a little elevator to flare the nose right before touching down.
-
Page 11: Care And Maintenance
c. Push and hold any one of the trim buttons on the transmitter while simultaneously turning on the power. Hold until the transmitter beeps. d. Move the throttle from low to high and back to low. The flashing will stop, and you will now be linked e. -
Page 12: Service And Support
--Connect the device into an outlet on a circuit different from that to which the receiver is connected. --Consult the dealer or an experienced radio/TV technician for help Changes or modifications not expressly approved by the party responsible for compliance could void the user's authority to operate the equipment Copyright 2020 ZT Model. All rights reserved.
Need help?
Do you have a question about the Global Hawk EP Airplane and is the answer not in the manual?
Questions and answers
My battery is faulty and has no physical damage the cells are unbalance and I don’t know how to fix it