Table of Contents
Advertisement
Available languages
Available languages
Quick Links
Advertisement
Table of Contents

Subscribe to Our Youtube Channel
Related Manuals for Steren MUL-280


Summary of Contents for Steren MUL-280
-
Page 2: Special Information
Before using your new Digital Multimeter, please read this Before using your new Digital Multimeter, please read this instruction manual to prevent any damage. Put them away instruction manual to prevent any damage. Put them away in a safe place for future references. in a safe place for future references. -
Page 3: Specifications
CAUTION DO not exceed the maximum limits of the meter, in order to prevent damages to it RANGES AND CHARACTERISTICS Range Resolution Accuracy DCV / ACV 1000VCD or 750Vrms 250VCD or rms CA 250VCD or rms CA μA/mA mA/Cx& COM 300mA CD or rms CA nF/μF mA/Cx&... - Page 4 AC AMPERE METER (Auto range for μA and mA) Range Resolution Accuracy 326μA 0,1μA 3260μA 1μA ±1,5% ±5 digits 32,6mA 10μA 326mA 0,1mA 10mA ±3,0% ±7 digits Protection against overcharge: 0,3A/250V and 10A/250V fuses FREQUENCY METER (Auto range) Range Resolution Accuracy 32,6kHz 10Hz...
-
Page 5: Range Selector
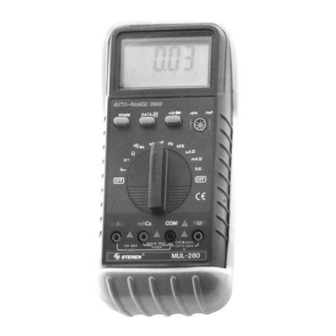
APPEREANCE AND PART LIST 1.- Range selector 2.- Hold button 3.- DC / AC / selector 4.- Transistor tester 5.- Function dial 6.- “V/ΩF” Jack 7.- “Common” jack 8.- “mA/Cx” jack 9.- “10A” jack 5.1. RANGE SELECTOR DC / AC voltage range selector, DC/AC current (only for μA and mA), the ohmmeter and frequency meter functions can be selected manually or using the auto range key. -
Page 6: Hold Button
Power on / Change of function Press once, “R-H” Autorange will be displayed in the screen Press the button for more than 3 seconds Manual Change of range Pres the button for less than 1 second 5.2. HOLD BUTTON When this button is pressed, the “D-H” symbol displays in the screen, and the reading value will be showed until you press the hold button once again. -
Page 7: Measuring Frequency
b) Set the dial to the VDC / VAC setting. Select the ΩA, mA or A function, and the range. c) Connect the testing points to the equipment to be measured. d) Read the polarity in the screen, in AC measures. 6.3 OHMMETER a) Connect the black testing point to COM and the red testing point to V/ Ω... -
Page 8: Transistor Measurement
b) Set the dial to the right position. Connect the testing points to the circuit to be measured. Must be between 200mV and 10V rms of AC, if is higher than those, the accurate of the reading may be less. 6.7. -
Page 9: Warranty
3.- The repairing time will not exceed 30 natural days, from the day the claim was received. 4.- Steren sell parts, components, consumables and accesories to costumer, as well as warranty service, at any of the addresses mentioned later. THIS WARRANTY IS VOID IN THE NEXT CASES:... - Page 11 Antes de utilizar su nuevo Multímetro Digital con Display Antes de utilizar su nuevo Multímetro Digital con Display Grande lea este instructivo para evitar cualquier mal Grande lea este instructivo para evitar cualquier mal funcionamiento. Guárdelo para futuras referencias. funcionamiento. Guárdelo para futuras referencias. 1.
-
Page 12: Especificaciones
PRECAUCION Para prevenir daños al instrumento no exceder los limites del mismo, cuales se encuentran en la pagina 2. RANGOS Y CARACTERÍSTICAS Range Resolution Accuracy DCV / ACV 1000VCD or 750Vrms 250VCD or rms CA 250VCD or rms CA μA/mA mA/Cx&... - Page 13 AMPERIMETRO DE CA (~) (Auto rango para μA y mA) Range Resolution Accuracy 326μA 0,1μA 3260μA 1μA ±1,5% ±5 digits 32,6mA 10μA 326mA 0,1mA 10mA ±3,0% ±7 digits Protección por sobre carga: Fusibles de 0,3A/250V y 10A/250V FRECUENCIMETRO (Auto rango) Range Resolution Accuracy...
- Page 14 APARIENCIA Y LISTA DE PARTES 1. Selector de rangos 2. Botón de retención de lectura 3. Botón de selección CA/CD / 4. Probador de Transistores 5. Perilla de Funciones 6. Jack “V/ΩF” 7. Jack “Común” 8. Jack “mA/Cx” 9. Jack “10A” 5.1 SELECTOR DE RANGOS Selector de rangos de voltaje CD/CA, corriente de CD/CA (solo para μA y mA), las funciones de Ohmmetro y frecuenciómetro...
- Page 15 Encendido o Cambio de funciones Oprima una vez y Autorango aparecerá en la pantalla “R-H” Oprima el botón por más de 3 segundos Manual Cambio de rango Oprima el botón por menos de 1 segundo 5.2 BOTON DE PERSISTENCIA DE LECTURA Cuando se oprime esta tecla, aparecerá...
- Page 16 C) Conectar las puntas en serie al circuito a ser medido. D) En el display aparecerá la polaridad en lecturas de ACA. 6.3 OHMMETRO A) Conectar la punta negra a COM y la roja a V/Ω/ F. La polaridad de la punta roja es “+”. B) Seleccionar la función de Ω, en el rango y proceda a realizar las mediciones.
-
Page 17: Mantenimiento
B) Colocar la perilla en la posición hFE y realizar la medición de la señal a medir debe de estar entre 200mV y 10V ms de CA, si es mayor puede dañar la precisión de la lectura. 6.7 PROBADOR DE TRANSISTORES A) Colocar la perilla en la posición hFE. -
Page 18: Póliza De Garantía
1.- Para hacer efectiva la garantía, presente ésta póliza y el producto, en donde fue adquirido o en Electrónica Steren S.A. de C.V. 2.- Electrónica Steren S.A de C.V. se compromete a reparar el producto en caso de estar defectuoso sin ningún cargo al consumidor. Los gastos de transportación serán cubiertos por el proveedor.
Need help?
Do you have a question about the MUL-280 and is the answer not in the manual?
Questions and answers