Advertisement
Advertisement
Table of Contents

Summary of Contents for Onkyo GR-PS100
- Page 1 Speaker Bracket GR-PS100 取扱説明書 Instruction Manual Ja En...
- Page 2 安全上のご注意 取り付け方法 0 本機を強度の足りないぐらついた台や丸棒に スピーカー取り付け部がロッド固定つまみより 設置しないでください。また、スピーカー取 も下に位置しないように設置してください。 り付け以外の目的で使用しないでください。 テーブルや棚板に取り付ける 破損やけがをする場合があります。 0 本機取り付け後は、定期的に安全点検を実施 し、落下・転倒・回転の危険性が無いことを 確認してください。経年変化や振動等によ り、ネジが緩んだり、取り付け強度が低下す ることがあります。 0 ネジや固定具の緩みによるガタツキが生じた 場合は締め直してください。締め直してもガ タツキが直らない場合は、使用を中止してく 最大 51 mm 最大 51 mm ださい。ガタツキがあるまま使用しますと、 落下や転倒などを引き起こす原因になりま す。 0 取り付けの不備、誤使用、天災などによる事 故や損傷、または、スピーカーおよびクラン プ取り付け部の傷や破損に対しては、当社は 一切責任を負いません。 ロッ ド固定つまみ 0 配線ケーブルに気をつけてください。配線さ れた位置によっては、つまずいたり引っかけ 丸棒に取り付ける たりして、落下や転倒など事故の原因となる ことがあります。 0 本機に乗ったりぶら下がったりしないでくだ さい。特にお子様が、ぶら下がったり、周辺...
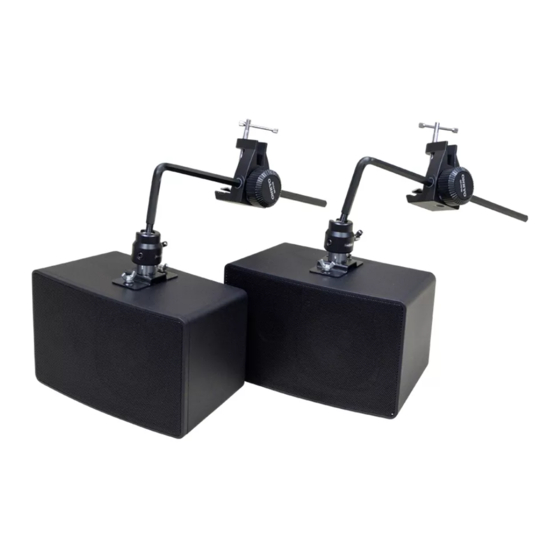
- Page 3 主な仕様 この他、取扱説明書 ( 本書 ) が付属しています。 1 アングルロッド差込穴 2 ロッド固定つまみ 3 クランプハンドル 4 スピーカー固定ネジ 5 落下防止ワイヤー取付用穴 6 ロックハンドル 本製品は、M5 用ネジ穴を 2 個 ( ピッチ 60 mm) 設けたスピーカーを取り付けることができます。 ※アングルロッドは、4 方向からクランプに差し込んで使用できます。 寸法 60 mm 〜51 mm 10 mm (丸棒の場合 (※) 〜Φ30 mm)...
- Page 4 取り付け手順 1. まず、スピーカーにアングルロッドを取り付 けます。 スピーカー固定ネジはしっかり締めてくださ い。またロックハンドルが緩んでいる場合は 締め直してください。 2. クランプをテーブルや棚板、丸棒に挟み、ク ランプハンドルを回してクランプがぐらつか ないよう固定します。棚板の場合は、クラン プを奥までしっかり挿入してください。 3. スピーカーを取り付けたアングルロッドをク ランプに挿入します。 このとき、アングルロッドの先端がクランプ から必ず 10 mm 以上出るように挿入してく ださい。 10 mm以上 10 mm 以上 4. 挿入したアングルロッドの平面の部分が、 ロッド固定つまみのネジの先端にあたるよう に向きを調整した後、ロッド固定つまみを回 してアングルロッドを固定します。 0取り付け後、ネジやハンドルが緩むことが あります。そのときは、必ず締め直してく ださい。...
- Page 5 Using the unit while there is still movement can cause falling or toppling. 0 Onkyo accepts no responsibility for damage or injury that arises due to incorrect fitting, Dial for fixing rod incorrect use, or acts of nature; nor will we...
- Page 6 Specifications Additionally, the unit is supplied with an instruction manual (this document). Clamp (2) Angled rod (2) 1 Hole for inserting angled rod 2 Dial for fixing rod 3 Clamp handle 4 Screws for attaching speaker 5 Hole for attaching fall prevention 6 Lock handle wire...
- Page 7 Attaching procedure 1. First attach the angled rod to the speaker. Tighten the screws for attaching the speaker firmly. Also, if the lock handle is loose, tighten it again. 2. Put the clamp over the table, shelf, or pole, then turn the clamp handle until the clamp is fixed and does not move.
- Page 8 The above-mentioned information is subject to change without prior notice. Visit the Onkyo web site for the latest update. F1802-0 SN 29403452 * 2 9 4 0 3 4 5 2 * (C) Copyright 2018 Onkyo & Pioneer Corporation Japan. All rights reserved.
Need help?
Do you have a question about the GR-PS100 and is the answer not in the manual?
Questions and answers