Table of Contents
Advertisement
Quick Links
Preface
Dear Customer,
Thank you for purchasing a product from our company.
To get the most enjoyment from your viewing experience, our products constantly strict quality and
safety are subject to (GS).
With your choice of this product you have chosen for the new technologies of digital reception. These
new technologies offer a variety of features and possibilities.
Before starting to make themselves thoroughly familiar with your device. Please read this manual
carefully so that you can exhaust all the options offered on this receiver full.
This manual will help you intended, safe and beneficial use of digital satellite receiver, hereinafter called
the receiver.
Keep this manual always close to the receiver. Enter the manual even further if you sell or pass on your
receiver.
We hope you enjoy your new receiver.
Your team SetOne
Seite 1
Advertisement
Table of Contents

Related Manuals for SetOne TX-8300


Summary of Contents for SetOne TX-8300
-
Page 1: Preface
This manual will help you intended, safe and beneficial use of digital satellite receiver, hereinafter called the receiver. Keep this manual always close to the receiver. Enter the manual even further if you sell or pass on your receiver. We hope you enjoy your new receiver. Your team SetOne Seite 1... -
Page 2: Design Features
Design features Various elements of the manual are provided with set design aspects. So you can easily distinguish whether it is normal text, • / ►Enumerations / action steps Warnings General Notes Information Art-Nr.: 10-01-000-083 EAN: 4260141713122 Illustrations, subject to technical changes and corrections. For printing errors, we assume no liability. -
Page 3: Table Of Contents
Contents Preface Design features Information Contents General Introductions INTRODUCTION 1. Safety Instructions a) MAIN SUPPLY b) OVERLOADING c) LIQUIDS d) CLEANING e) VENTILATION f) ATTACHMENTS g) CONNECTION TO THE SATELLITE h) CONNECTION TO THE TV i) EARTHING j) LOCATION k) Battery handling l) Protection classes 2. - Page 4 5.1.1 Selecting your Satellite 5.1.2 Selecting your SCAN Options 5.1.3 Scanning 6. Channel Manager Menu 6.1 Channel Edit 6.2 Delete Channel 6,3 Set Favourite 7. System Setting 7.1 AV Setting 7.2 Local Time Setting 7.3 Timer 7.4 System Information 8. System Setting 8.1 OSD Setting 8.2 Parental Control 8.3 Private Setting...
- Page 5 14. Trouble Shooting 15. Discard Receiver 16. Technical data 17. Service 18. Guarantee 19. Declaration of Conformity 20. Sercive Hotline Seite 5...
-
Page 6: General Introductions
General Introductions INTRODUCTION WARNING!!! This manual will help you learn basic functions Any problems can be caused by the use of such as installation, selecting channels and many unofficial software. The use of software versions other functions of the STB. All functions can be other than dealers or distributors official software operated by the remote control. -
Page 7: H) Connection To The Tv
h) CONNECTION TO THE TV Disconnect the STB from the main supply before connecting or disconnecting the cable from TV. FAILURE TO DO SO CAN DAMAGE THE TV i) EARTHING The LNB cable MUST BE EARTHED to the system earth for the satellite dish. j) LOCATION Place the STB indoor in order not to expose to lightening , rain or Sunlight. -
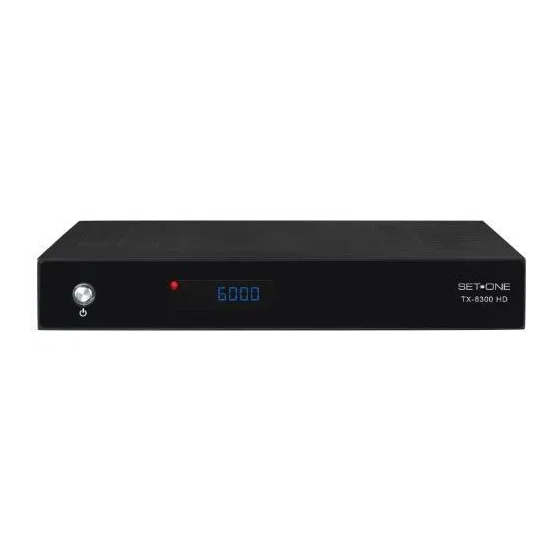
Page 8: Product Overview
2. Product Overview 2.1 Front Panel Symbol Function Switch to full off the receiver. ▲/▼ Channel Select, marking in menus. LED-DISPLAY 4-digit LED display (7 segment). USB-Port Behind the flap is a USB Port For connecting external storage devices. Seite 8... -
Page 9: Rear Panel
2.2 Rear Panel Symbol Function IF IN Use to connect an antenna. IF OUT Use it when connecting to another STB. S/PDiF SPDIF format sound by coaxial and optical output HDMI Digitaler HDMI-Ausgang zum Anschluss Ihres digitalen HDTV- Fernsehgerätes. To connect the high definition media interface output to HDTV. Power cord AC 100 –... -
Page 10: Remote Control
2.3 Remote control I/O: Switches between Operation and Standby modes. SLEEP: To display the sleep timer 0-9: Changes channels or selects the menu options. EXIT: Press to exit the current menu. You can adjust the volume with this button. VOL +/-: ▲/▼: Changes channels or items from top to bottom on the menu. - Page 11 Seite 11...
-
Page 12: Connectivity
3. Connectivity Here describes how to connect your receiver to your existing equipment to ensure proper image and sound reproduction. SAT-Anlage Sat-Receiver (optional) TV-Geräte HiFi-Anlage mit HDMI-Anschluss TV-Gerät (Digitalton, 5.1) Symbol Notes IF IN LNB input for cable from your satellite antenna or from your satellite connection box. -
Page 13: Installation
4. Installation This manual wil help you learn the basic features NOTE: The TV may flicker or the picture dis- and operation of your receiver such as instal ati- appear briefly when changing resolution on, channel selection and many other functions •... -
Page 14: Fast Channel Set-Up Astra 2A/B/D/Eurobird
4.5 Fast Channel Set-Up Astra 2A/B/D/ 4.6 Chosen Satellite Scan Eurobird 1 Should you wish to obtain channels from a satel- lite other than Astra2A/B/D and Eurobird The HD Satellite Receiver is pre-programmed 1, follow 4.2.4 to check your chosen satellite with the most popular English Language signal reception strength, then press the RED channels from the Astra2A/B/D and Eurobird 1... -
Page 15: Menu System
5. Menu System 5.1 Installation Menu remove encrypted programmes. This will make the task of editing / sorting programmes In this part of the manual only the basic easier. installation is covered. If you wish to set up your receiver to work with a motorised dish then please refer to SECTION 6, “Advanced 5.1.3 Scanning Installation”.The MENU provides access to many... -
Page 16: Channel Manager Menu
6. Channel Manager Menu This section describes how you can manage SETTINGS / PARENTAL CONTROL Menu. your programmes, carrying out EDITING, a • Move -Select the channel you want to move Channel MOVE or setting FAVOURITES. Press using the VOL+- buttons, then press the RED the MENU button and use the CH- button “Setting”... -
Page 17: System Setting
7. System Setting The features in this section enable you to set up TING), S_Video, YUV/YCbCr or RGB. Use the options within AV SETTING to match your TV, ad- VOL+- buttons to select your preference. You just PRIVATE SETTINGS, set the LOCAL TIME, will be prompted to save your new settings on configure and setup the timers for timed recor- exiting. -
Page 18: Timer
7.3 Timer When you have completed your settings press NOTE: You can press TIMER button to enter OK, you can then review your timer settings and directly into the TIMER menu from the remote make sure they are valid (indicated by ENABLED control. -
Page 19: System Setting
8. System Setting This section allows the setting of OSD settings, • Installation Lock: To lock the installation PRIVATE SETTINGS, PARENTAL CONTROL menu to prevent unauthorised Adjustment preferences and finally FACTORY DEFAULT of the Installation. Use the VOL+- buttons to (resets the whole receiver back to how it left the select your preference. -
Page 20: Private Setting
8.3 Private Setting 8.4 Factory Default This feature allows control of various items such This enables the User to return the receiver to as STANDBY MODE AUTO PMT OPEN, AUTO the settings that were made in the Factory. It is STANDBY and STANDBY DISPLAY. -
Page 21: Usb
9. USB A USB Device can be connected to either the OK to jump to your chosen point in the file. front mounted USB Port located on the front of The REPEAT A-B function only works in full your Receiver or to the second Port on the rear screen playback. -
Page 22: Database Update
9.4 Database Update 9.6 PVR Preview NOTE: You can access this feature directly When you have created a Database Backup file by pressing the PVR button on the remote then this feature can be used to update your Control. Channel Information with your backup data. Press CH+- to select DATABASE UPDATE hen This facility enables you to quickly select press OK. -
Page 23: Advanced Installation
10. Advanced Installation This section is aimed at the more experienced • ALL: To Search for all the Free Channels Satellite Receiver (Set Top Box) user.Specifically, + Scrambled Channels available with the it describes how to add additional Satellites that selected Satellite orTransponders. -
Page 24: Satellite List
10.2 Satellite List 10.3 Transponder List This feature provides a listing of all the stored This feature lists all the Transponders on the Satellites and enables the user to SCAN, EDIT, currently selected Satellite and enables the ADD or DELETE them. In addition there are user to SCAN, EDIT, ADD or DELETE them. -
Page 25: Setup Motor(Diseqc)
10.4 Setup Motor(DiSEqC) 1.5 USALS (DiSEqC) Setup NOTE: In order to make adjustments in the This Menu is used to setup the USALS system SETUP MOTOR section of the menu the on your set top box to match with your motorised DiSEqC setting in the ANTENNA SETTING dish system. - Page 26 Time-Shift Manual Add Service: According to the satellite, You will not lose any wonderful program with TP and PID of the channel which is known, you the powerful function of Time-shift. It switches can add this channel manually under this menu. to other time periods, and showing the program you wish to access.
-
Page 27: Software Update
11. Software Update NOTE: This function MUST be used with EXTREME CAUTION. ONLY Software provided by the Ross Service Centre or downloaded from the Ross.co.uk Website can be used. Use of other Software may damage your device and invalidate your warranty. During the UPDATE process DO NOT press any buttons or switch the unit off. -
Page 28: Dismantle And Store
12. Dismantle and store • Pull the plug on the receiver and the connected devices from the electrical outlet. • Screw the antenna or the cable from the receiver. • Disconnect the other cable from the receiver and the other connected devices. •... -
Page 29: Trouble Shooting
14. Trouble Shooting Seite 29... -
Page 30: Discard Receiver
15. Discard Receiver The environmentally sound disposal of equipment, electronic components, recyclable materials and other equipment components is governed by national and regional laws. Check with the local competent authority in order to obtain precise information on disposal. • Check with the local competent authority in order to obtain precise information on disposal. -
Page 31: Technical Data
16. Technical data Dimensions and weight Dimensions (B x T x H) 290 x 185 x 30 mm Weight ca. 1,3 Kg Environmental conditions Operating temperature 0° C – +45° C Storage –10° C – +70° C Power Supply Power Voltage 90 –... - Page 32 System MS 7828 FLASH 128MB DDR200 SDRAM 32 MB Remot contol Infrared Battery 2×1.5V, Typ AAA Tuner / LNB F-Socket 1 Port IEC 169-24 (INPUT) 1 Port IEC 169-24 (OUTPUT) Frequency Range 950 MHz bis 2.150 MHz Input impedance 75 Ohm Input level range -65 dBm ~ -25 dBm LNB-Supply Current...
-
Page 33: Service
Video Demultiplex MPEG-2 ISO/IEC 13818-1 Speed bis zu 100Mbit/s Format 4:3, 16:9 , LetterBox Video-Output 1080i, 720p, 576i, 576p, 480i, 480p MPEG-Audio (MPEG 1 Layer 1 und 2) Dekoder MPEG/MusiCam Layer 1 und 2 Mono, Dual Mono, Stereo, Joint Stereo 17. -
Page 34: Declaration Of Conformity
Device / Type: Digital Satellite Receiver Your device bears the CE mark. DiSEqC is a trademark of Eutelsat. DVB is a registered trademark of Digital Broadcasting DVB Project. SetOne GmbH Rebgartenweg 27 D-79576 Weil am Rhein 20. Sercive Hotline Dear Customer! We offer you with our telephone HOTLINE professional help.
Need help?
Do you have a question about the TX-8300 and is the answer not in the manual?
Questions and answers