Table of Contents
Advertisement
Quick Links
dido.dmg.it
Home
Electric Systems
Pitagora 4.0
Pitagora 4.0
Contents
Safety and usage cautions
Description of PB 4.0 motherboard
Main functions
Specifications and descriptions of inputs and outputs
Integrated Programming Module
Remote programming module
Fusion APP
Mother Board 4.0
Firefighters maneuvers
Oil/Motor Temperature Control
Weight Load Control
Position/Speed Control with DMG Encoder
Elevator car Position/Speed Control with Motor Encoder
Door Command
Protection Against Electrical Interference
Main Connections and Temporary Operations
Learning Procedure of floors
Normal Service Mode
Shaft: Access
EN81-20 Configuration
EN81-21 Installation with door's Bistable contacts
Installation with door's Monostable contacts
Changing system parameters
V3 Screen Menu map
"System Status" Menu
"Faults" Menu
"I/O Status" Menu
"Configuration" Menu
"Doors" Menu
"Signalisation" Menu
"Special Features" Menu
"System Positioning" Menu
"VVVF" Menu
"Rec Parameters" Menu
"Clock" Menu
Troubleshooting
Elevator car Positioning System and Stopping Accuracy
ELGO LIMAX 33 CP Absolute Encoder Counting System
Advertisement
Table of Contents

Related Manuals for DMG Pitagora 4.0

Summary of Contents for DMG Pitagora 4.0
- Page 1 Fusion APP Mother Board 4.0 Firefighters maneuvers Oil/Motor Temperature Control Weight Load Control Position/Speed Control with DMG Encoder Elevator car Position/Speed Control with Motor Encoder Door Command Protection Against Electrical Interference Main Connections and Temporary Operations Learning Procedure of floors...
- Page 2 DMG Encoder based Counting System Lift speed and Deceleration distance Annexs Annex 1 - Multiplex Parameters Setting Annex 2 - Test and measures Annex 3 - Instructions for Software update Annex 4 - VVVF Frenic Lift Setting Annex 5 - Rollback control and ride comfort...
-
Page 3: Main Functions
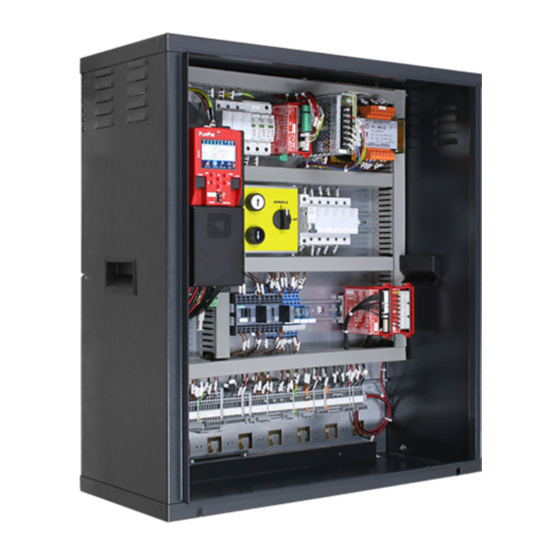
Description of PB 4.0 motherboard The control board of the Pitagora 4.0 system is based on 32-bit electronic technology and operates all types of electric and hydraulic lifts. Serial and/or parallel connections to pushbutton panels (cabin and floor) may be added. It is particularly suitable for VVVF electrical installations, also those equipped with the elevator car uncontrolled movement system (Amendment A3 or EN81-20 / 50). - Page 4 Connected directly Connected by a dedicated extension cable directly on the board (in the engine room) Connected to the board on the elevator car roof (TOC) in the case of lifts with DMG pre-wired serial devices. Fusion APP An alternative way to access the controller is based on Fusion App.
-
Page 5: Mother Board
Mother Board 4.0 On mother board are present 6 leds for a easy diagnostic: LED1: (Green led) CAN Multiplex termination active: led switch off when MULX board is connected (termination automatically moves on MULX board of first and last multiplex controller). - Page 6 LED2: (Green led) CAN Cabine termination active: led switch off when an optional board (PIT8 / 16IO / 16RL) is connected inside controller (termination automatically moves on last optional board). LED3: (RGB led) color of this led gives info on the internal status of lift according following table: Color Status Led off...
- Page 7 Internal Clock power supply: Super Capacitor (autonomy of 5 days without power supply). Encoder Position Positioning system based on an incremental encoder: DMG Shaft Encoder or Motor Encoder (only for VVVF Gearless Motor Lift) In case of Absolute Encoder Positioning system this connector is not used.
- Page 8 Connection to the Environmental Temperature Sensor. To use the Environment Temperature Control function the DMG temperature sensor module (Cod. Q40.SND). This function stops the system when the temperature of the engine room drops below the minimum or increases above the maximum set threshold.
- Page 9 Connection to the circuit for UCM solution. For further information on connections and parameters see ANNEX VIII Batteries Test Connection to the CHAR Board. It includes the signals for: Low Batteries Phase sequence (only Hydro) Backup mode Output Spare Generic Output used for special functions. Safety Chain Connection to the SECU Board.
- Page 10 If floor counting is carried out by DMG incremental encoder, position, deceleration and stop are controlled by counting the pulses coming from the DMG encoder. The counting of the pulses is suitably corrected (reset) by the signals at the top and bottom (AGB / AGH) and from the signal of the door zone (ISO1).
- Page 11 Location, stop and deceleration are controlled by counting the pulses coming from the encoder of the motor. The counting of the pulses is suitably corrected (reset) by the reset signals at the top and bottom (AGB / AGH) and from the signal of door zone (ISO1).
- Page 12 Learning Procedure of floors If the Controller is equipped with Absolute Encoder or DMG Encoder or Motor Encoder it is possible to take advantage of the floor position learning feature, which allows for a faster system configuration and fine tuning. The procedure is different...
- Page 13 Once the self learning procedure is completed, it is possible to manually fine tune the stopping accuracy at each floor by using the PLAYPAD programming module, without having to access the shaft. Regulation of stopping accuracy: 1. Make sure the installation is in the “NORMAL SERVICE” mode 2.
- Page 14 This condition activates the Fault RSP (code 20) and prevents the movement of the elevator car in normal operation (Movement is now possible only in Inspection mode). After the end of the Inspection manoeuvre the personnel must: Return the selector switch and any STOP buttons to ‘Normal’ and exit the shaft of lift. Close the landing doors (check the safety chain) and carry out the reset using one of the following methods: From lowest floor with three quick opening / closing of the release key or.
- Page 15 Parameter: See Annex X Access to the Pit Is detected by operating the pit stop switch or by switching the pit control panel on to ‘inspection’. (both conditions open the safety chain on point SE1). This condition activates the Fault RSP (code 20) and prevents the movement of the elevator car in normal operation. After the end of the Inspection manoeuvre the personnel must: •...
- Page 16 Reduced Pit Configuration Parameter: See Annex X Access in the Pit Access to the shaft is detected by opening a contact using the release key which activates the RSP fault (code 21), preventing the elevator car from moving in normal operation (a run is only possible in ‘Inspection’ mode). Before entering the shaft, wait for the traffic light to indicate the safe condition (green light).
- Page 17 – From floor with three quick opening / closing of the reset key (optional). – From the panel with three quick presses of button. – From the PlayPad with specific reset (RSP reset). If controller detects an automatic contact reset (contact close before reset procedure) it gives again a Fault RSP (Cod 121) as a fault on coil’s reset circuit.
- Page 18 • Monostable NC contact (does not open during normal door operation). The auxiliary contact is electrically connected to the DOOR Contact input of BDU of the lowest floor. Access on the Car roof Access to the shaft is detected by opening a contact using the release key which activates the RSP fault (code 21), preventing the elevator car from moving in normal operation (a run is only possible in ‘Inspection’...
-
Page 19: Changing System Parameters
Changing system parameters V3 Screen Menu map V3 Screen Menu map Language? LIFT CONTROL BOARD French, English, Portuguese, Italian, Russian, German, Dutch DMG S.p.A. ENTER: confirm / ESC: exit ▲ ▼ ▲ Code? ** Password ** ----- ENTER ----> System Status ▲... -
Page 20: "System Status" Menu
Doors ▲ ▼ Signals ▲ ▼ Special functions ▲ ▼ Positioning ▲ ▼ VVVF ▲ ▼ Rec.Parameters ▲ ▼ Clock After selecting the desired language Is necessary to perform the software Upgrade (Annex III) “System Status” Menu It is easily accessed from the main window of the PlayPad, by pressing once the ENTER key. Reference table Visualization System Status... -
Page 21: "Faults" Menu
Visualization System Status Description Serial display High speed The system is running in high speed mode Low speed The system is running in low speed mode Door close The door is completely closed Door open The door is opened (or opening/closing) Car full load The elevator car has been fully loaded Photocell A... -
Page 22: "I/O Status" Menu
Reset Limit switch fault; you can clear it only after closing Safety chain. Reset Drift control 82212 Reset RSP fault; for reduced pit and headroom. Reset UCM fault; for A3 amendment Reset ISO fault; problem detection in the operation monitoring of safety module for advanced door opening / re- leveling. - Page 23 Field Description Navigation Values (group of 12) CPOM IEME OEME 511B GNGM 212B 511L GNGD E511 IN_A ENAB IN_D BYPL BYPC TISO CISO REM1 RED1 REV1 REM2 RED2 REV2 L-RED GPIO1 L-GREEN GPIO2 BUZZER GPIO3 GROUPS 0,0 V Y5A/C A/B/C BUSY ▲▼...
- Page 24 Field Description Navigation Values (group of 12) Push button down side Push button down side Upward side A Upward side B ▲▼ (Change Status of fire inputs group) Fire Sensors □ = Fire inputs off ENTER (Exit) ■ = Fire inputs on ESC (Exit) ▲▼...
- Page 25 Field Description Navigation Values (group of 12) ▲▼ (Change Error: Communications error number MULTIPLEX page) MTPX Line FER: Frame Error Rate Communication Line ENTER (Reset) Date and hour of last reset ESC (Exit) ELGO model: ELGO’s Diagnostic PLAYBOARD IN-OUT table description parameters Input Description Safety chain Start...
- Page 26 Input Description IEME Emergency (power supply failure) PME selector (emergency evacuation) Top deceleration switch Bottom deceleration switch Position Sensors (no encoder positioning system) E511 Optional input for Shaft Access BYPL Door’s safety Bypass selector BYPC Door open button (entrance A) Photocell entrance A Door open limit switch entrance A Door close limit switch entrance A...
- Page 27 Output Description 511B Output - Norm 511 Buzzer 511L Output - Norm 511 Light 212B Output - Norm 212 Buzzer Output - down arrows command Output - up arrows command GNGD Output - upward gong command GNGM Output - downward gong command Output –...
-
Page 28: Configuration Menu
Signal Description Digital output (terminal Y4) Y5A/C Brake command relays (terminal Y5) 30 A/B/C Relè (terminal 30 A/B/C) Alarm VVVF signalisation Reset VVVF Acceleration Deceleration Fout Output Frequency Vout Output Voltage Iout Output current Imax Maximum output current “Configuration” Menu ----->>>>>... - Page 29 Default Parameter Description Navigation Values Value Car & Fl. Type of wiring configuration: STD; -) Standard wire terminals (Car and floors); Car SER. / -) Serial comm. in the elevator car, 1 line/floor Fl. RJ45; Car SER Configuration connectors at floors; ◄►...
- Page 30 Default Parameter Description Navigation Values Value Not present: No Re-levelling Type 1: (open or close door). This setting is indicated for traction installations for good stopping accuracy. Re-levelling is triggered when the elevator car leaves its position "perfectally at floor” that’s to say when one of the two beams interrupted.
- Page 31 Default Parameter Description Navigation Values Value - Floors: 2 <- > 16 [32] Flrs. : 2 - Ofst 0 <-> Ofst : 0 N° floors In multiplex installations a floor call can be differentiated with a long push-button pressure (more than 3 seconds) calling: a) The installation with lower "Lift No (LN)"...
- Page 32 Default Parameter Description Navigation Values Value Closing Time (in sec.) before door closes in case of ▲▼ time with 1 s <-> 60 s registered calls (Increase/Decrease) calls -1 door -2 doors simult. Doors Nb. Number and type of doors ◄►...
- Page 33 Default Parameter Description Navigation Values Value Configuration of door A for each floor: set access Pkg. Door Select door ◄► (Selection) Pkg. Door to each floor and open or close door parking at close; B at floor ▲▼ (Change floor) close floor (for automatic doors) Pkg.
- Page 34 Default Parameter Description Navigation Values Value Time of elevator car at floor without direction before taking landing calls. In case of combined ▲▼ 2 s <-> 30 Car priority automatic doors, timing starts when doors have 10 s (Increase/Decrease) closed and the shock, photocell and re-opening contacts are not activated Permanent;...
-
Page 35: "Special Features" Menu
“Special Features” Menu ----->>>>> ----->>>>> Floor 0 - 12:30:56 ----->>>>> ----->>>>> < Special Features > Table of Parameters Table of Parameters: Default Parameter Description Navigation Values Value 2 s <-> 30 Reset in Direction of travel during reset procedure ◄► (Selection) 10 s Valid only for FAI/FAS positioning system. - Page 36 Default Parameter Description Navigation Values Value Temperature sensor Indicates whether the car can be blocked by the ◄► (Selection) during motor temperature sensor also during travel operation Anti- Parameter for the detection of the anti-nuisance ◄► (Selection) No; Yes nuisance fault (number of stops without photocell activation ▲▼...
- Page 37 Default Parameter Description Navigation Values Value It allows you to program a 4-digit code for elevator car calls. A 4-digit code may be assigned to each BCx elevator car button input, corresponding to the elevator car pushbutton inputs. Example: if the BC0 pushbutton is associated with the 0123 code, to reserv floor 0 from Cabin you can: Push-button...
- Page 38 OPEN DOOR button; if this does not happen, the ◄► (Choice) lift moves to the previous floor and then stops the protected floor mode (this operating mode is only possible with DMG’s monitoring system). ▲▼ Enabling the floor priority call function. pairing Lop priority...
- Page 39 Default Default Parameter Parameter Description Description Navigation Navigation Values Values Value Value Type of positioning system: with Encoder or FAI/FAS; traditional. Can only be modified in Temporary Oper. Encoder Mode Clockwise; Positioning Encoder ◄► (Selection) FAI/FAS system Note: in case of absolute Encoder and shaft lengths Counter longer than 65 meters change the resolution of clockwise...
- Page 40 Default Default Parameter Parameter Description Description Navigation Navigation Values Values Value Value Encoder Type of positioning system: with Encoder or Clockwise; Positioning Encoder traditional. Note: Can only be modified in Temporary ◄► (Selection) Encoder system Clockwise Oper. mode Counter clockwise Start of floor position self-learning procedure.
- Page 41 Default Parameter Description Navigation Values Value Contains information on: Encoder features, reading of slowdown heights (R1D / R1S), re-levelling (RRIPD / RRIPS) and stop of the cabin (RLD / RLS) where D indicates down while S means up; finally it contains info on reading AGB / Monitor AGH and ZP heights.
- Page 42 Cod. Parameter Description Navigation Values Default Value ◄► (Selection) 0,00- Acceleration ramp (Only with FAI/FAS 1,8 sec (FAI/FAS) Acc T1 ▲▼ 99,9 positioning system) 0,01 sec (Encoder) (Change value) ◄► (Selection) 0,00- Acceleration ramp (Only with FAI/FAS 1,8 sec (FAI/FAS) Dec T2 ▲▼...
- Page 43 Cod. Parameter Description Navigation Values Default Value ◄► (Selection) High High speed for multistep speed change ▲▼ 50 Hz Speed (Only with FAI/FAS positioning system) (Change value) ◄► (Selection) Motor Number of poles of the motor ▲▼ 4 (see motor data) Poles (Change value)
- Page 44 Cod. Parameter Description Navigation Values Default Value ◄► (Selection) 30 % (FAI/FAS) S-Curve 1 S-Curve – 1 ▲▼ 20 % (Encoder) (Change value) ◄► (Selection) 25 % (FAI/FAS) S-Curve 6 S-Curve – 6 ▲▼ 20 % (Encoder) (Change value) ◄► (Selection) 30 % (FAI/FAS) S-Curve 7...
- Page 45 Default Cod. Parameter Description Navigation Values Value ◄► (Selection) Maximum Max speed of the motor ▲▼ 150-3600 RPM 1500 RPM speed (Change value) ◄► (Selection) Rated Rated speed of the motor (Frequency) ▲▼ 50 Hz speed (Change value) ◄► (Selection) Rated Rated voltage of the motor driven by ▲▼...
- Page 46 Default Cod. Parameter Description Navigation Values Value ◄► (Selection) DC Brake Frequency threshold for DC ▲▼ 1,0 Hz speed INJECTION (Change value) ◄► (Selection) DC Brake Intensity threshold for DC INJECTION ▲▼ 45 % level (Change value) ◄► (Selection) DC Brake DC INJECTION time ▲▼...
- Page 47 Default Cod. Parameter Description Navigation Values Value ◄► (Selection) Current Activation level of the current limiter. If % to the rated current ▲▼ 200 % Limiter 999, value means no current limitation of the inverter (Change value) ◄► (Selection) Command Input X4 not used ▲▼...
- Page 48 Default Cod. Parameter Description Navigation Values Value ◄► 1,8 sec (Selection) Acc/dec (FAI/FAS) ▲▼ 0,0 sec (Change (Encoder) value) ◄► 1,8 sec (Selection) Acc/dec (FAI/FAS) ▲▼ 0,0 sec (Change (Encoder) value) ◄► 1,8 sec (Selection) Acc/dec (FAI/FAS) ▲▼ 0,0 sec (Change (Encoder) value)
- Page 49 Default Cod. Parameter Description Navigation Values Value ◄► (Selection) Speed Not used ▲▼ 50,00 Det.Lev (Change value) ◄► (Selection) Speed Det Not used ▲▼ 0,51 Hyst (Change value) ◄► (Selection) Recommended direction in emergency RRD Level ▲▼ (Not used) (Change value) ◄►...
- Page 50 Default Cod. Parameter Description Navigation Values Value ◄► (Selection) Battery Speed during emergency run ▲▼ Speed (Change value) ◄► (Selection) Creep Creeping speed (only with FAI/FAS positioning system) ▲▼ Speed (Change value) ◄► (Selection) Middle System speed under inspection mode (only with FAI/FAS ▲▼...
- Page 51 Default Cod. Parameter Description Navigation Values Value ◄► (Selection) M-%R1 Motor (%R1) ▲▼ (Change value) ◄► (Selection) M-%X Motor (%X) ▲▼ (Change value) M-Slip Slip compensation gain in percentage to the rated slip (P12) driving at the driving sides ◄► (Selection) M-Slip Slip compensation gain in percentage to the rated slip (P12)
- Page 52 Default Cod. Parameter Description Navigation Values Value ◄► (Selection) S-Curve Curve to S-12 ▲▼ (Change value) ◄► (Selection) Zero Hold ▲▼ Time (Change value) ◄► (Selection) Soft Start ▲▼ Time (Change value) ◄► (Selection) Stop Hold ▲▼ Time (Change value) ◄►...
- Page 53 Default Cod. Parameter Description Navigation Values Value ◄► (Selection) P.P.Tuning annex IV ▲▼ (Change value) ◄► Automatically (Selection) Magnetic Pole Position Offset (Offset angle) for set during P.P.Offset ▲▼ gearless drives Auto tuning (Change (L03) value) ◄► (Selection) ACR P ▲▼...
- Page 54 Default Cod. Parameter Description Navigation Values Value 30 % (FAI/FAS) S-Curve 9 20 % (Encoder) 30 % S-Curve (FAI/FAS) 20 % (Encoder) ◄► (Selection) SFO Hold Short Floor Operation (Holding time) – NOT USED ▲▼ 0,00 sec (Change value) ◄► (Selection) Short Floor Operation (Allowable speed) –...
- Page 55 Default Cod. Parameter Description Navigation Values Value ◄► (Selection) Switch 10 (FAI/FAS) Not used ▲▼ Speed 2 10 (Encoder) (Change value) ◄► (Selection) 0.000 – ASR-FF ▲▼ 10.000 0.000 sec Gain (Change value) ◄► (Selection) TB Start 0.00 – ▲▼ 0.20 sec time 1.00 sec...
- Page 56 Default Cod. Parameter Description Navigation Values Value ◄► (Selection) APR P 0 (FAI/FAS) annex V ▲▼ gain zero 0 (Encoder) (Change value) ◄► (Selection) APR D ▲▼ Gain (Change value) ◄► (Selection) Filter Time ▲▼ 0.000 sec (Change value) ◄► (Selection) ACR P ▲▼...
-
Page 57: Clock Menu
Default Cod. Parameter Description Navigation Values Value ◄► (Selection) ACTION Not used ▲▼ (Change value) “Rec Parameters” Menu Note: data saving is not required only for emulation of PBV3 controllers. Floor 0 - 12:30:56 ----->>>>> ----->>>>> < Rec Parameters > Reference table Floor 0 12:30:56 Floor 0 12:30:56... -
Page 58: Troubleshooting
Floor 0 - 12:30:56 ----->>>>> ----->>>>> < Clock > Da = Day Mo = Month Yr = Year D = Weekday (1=Mon) Hr = Hours Mn = Minutes WARNING: In case of system shutdown, the time is saved by means of a Super Capacitor (for up to 5 days without power supply). - Page 59 Fault Type Description Remedy Check: 1- Check parameter “Low Speed fault time” (§ 5.5) and increase time if necessary Car moving at low speed for too 2- the elevator speed to a low speed (in Low speed too long. In case of VVVF may be too the case of VVVF);...
- Page 60 Fault Type Description Remedy Only doors with limit switch: door Check: does not open within the planned 1- Door open limit switch (FOA) and its Door A opening time. In case of slippage during wiring; slippage door opening, the door is 2- door operator power supply and fuses;...
- Page 61 Fault Type Description Remedy Safety chain open before Input Check all contacts between the terminals SE6 while car travelling. SD2 and SD3 (floor locks). landing calls and the car Safety 6 open movements are cancelled Check all contacts between the terminals during travel On the PlayPad Led SE6 is off.
- Page 62 Fault Type Description Remedy The expected operation of AGB (NC) contact is not checked. Check the condition of the Cod 100: contact is not closed at floor contact AGB (mechanical switch 23 AGB blocked different from bottom floor (downward or magnetic sensor) and the AGB calls erased).
- Page 63 Fault Type Description Remedy Simultaneous variation of FAI/FAS positioning sensors. Simultaneous variation of FAI/FAS POS [n] indicates positioning sensors. POS [n] indicates Check power supply to sensors; that the error that the error occurred at floor [n]. Check sensors and magnets occurred at floor [n].
- Page 64 Fault Type Description Remedy Safety chain open. Landing calls and the Check DIS Switch car movements are cancelled. Playpad SE2 led is off. Check all contacts between the terminals SP3 and SP4 (STOP in Cod 0: DIS switch open (SE0 led off) the pit, pit ladder, Inspection box, 38 SE2 open etc.).
- Page 65 Fault Type Description Remedy Problem detected in the operation monitoring of safety module for advanced door opening / re-leveling. If activated, the installation goes into “out of service” mode at the top floor (electric) or bottom Check the alignment of ISO1 and 41 Fault ISO floor (hydro).
- Page 66 Fault Type Description Remedy In multiplex systems, this fault indicates that the link between two or more controllers in the multiplex loop is Check the connection between the Multiplex link missing. Every controller switch to controllers (MULX board); interrupted SIMPLEX-like functioning. Check all multiplex settings.
- Page 67 Fault Type Description Remedy UCM Circuit Fault: Cod 2: Brakes open Cod 3: Brakes closed in travel Cod 100: UCM Detection Cod 201: RUCM1 Stucked Open Cod 202: RUCM2 Stucked Open Reset UCM in the menu Faults (§ 53 Fault UCM Cod 203: RUCM3 Stucked Open 5.3).
- Page 68 Fault Type Description Remedy Unintended Shaft Access Function enabled by “Shaft Monitor” parameter. Must be used BDU with additional door input (could be NO or NC). System detect a manually floor door Reset UAS in the menu Faults (§ 56 Fault UAS opening monitoring the auxiliary door 5.3).
- Page 69 Fault Type Description Remedy ELGO Fault. Cod 4: Pre-triggered Stopping system Cod 5: Pre-triggered Stopping system Bottom Cod 8: Normal mode overspeed (pre tripping) Cod 9: Normal mode overspeed (final tripping) Cod 11: Inspection mode overspeed (final tripping) Cod 13: Teach mode overspeed (final tripping) Check ELGO configuration data.
- Page 70 – Extra limit switches – Inspection limit switches – Overspeed Governor (combined with an electronic safety gear – Door bypass circuit (movement with doors open) – UCM (in case of certified double brake) • EU approved, SIL3 (TÜV) Magnetic Tape Remove all the magnets in the compartment before installing the magnetic tape.
- Page 71 A) – Tape touches the guide with the magnetized side. B) – Tape touches the guide with the steel side. LED Signal DESCRIPTION...
- Page 72 DESCRIPTION Normal mode Slow Flashing (1 s) MODE Pre-Commissioning Mode Fast Flashing (0,1 s) Teach Mode Lights permanently No Error Led OFF ERROR Generic Error Led ON Emergency Error Flashing TAPE Magnetic Tape not detected Led ON eSGC Contact close Led ON eSGC eSGC Contact Open...
- Page 73 Sufficient Head and Pit clearance Reduced Head and/or Reduced PIT Installation according EN81-20 §5.2.5.7 / § 5.2.5.8 Normal Mode A) - TOP floor Inspection Mode B) - BOTTOM floor Safety contacts status C1) - Upper reference position Inspection UP button C2) - Lower reference position Inspection DOWN button...
- Page 74 Lower Pre-Triggered Stopping System limit (from Lower Reference Position) TRIPS and TRIPD values are used only if ELGO is part of Safety System for Reduced Head and/or Pit (ELGO + eSGC). DMG Encoder based Counting System DMG Encoder based Counting System...
- Page 75 B) – Pulley C) – Symbols DMG’s rope and pulley Encoder provides the Playboard controller with a reliable, accurate and easy to install elevator car position detection system. The encoder calculates elevator car position by detecting the movement of the rope fixed to the cabin and checks this information with reference positions (detected during the initial self learning procedure).
- Page 76 D) – Terminal Top Floor E) – Floor N F) – Floor 0 H) – Deceleration distance ZP) – Door Zone AGB) – Limit switch for bottom deceleration or reset AGH) – Limit switch for top deceleration or reset Inspection limit position...
- Page 77 Normal Mode A) - TOP floor Inspection Mode B) - BOTTOM floor Inspection UP button F1) - Upper inspection limit switch Inspection DOWN button F2) - Lower inspection limit switch Inspection limit position Up G1) - Moving enable Inspection limit position Down G2) - Moving not enabled For manual adjustment of the positions of the indicated is possible from menu <Positioning>...
- Page 78 Lift speed and Deceleration distance Lift speed and Deceleration distance In table is showed recommended values for deceleration distance and acceleration time according the lift’s speed. Speed [m/s] Deceleration [mm] Acceleration time [s] 1050 1200 1350 1500 1750 2000 2250 2500 2750 3000...
- Page 79 Speed [m/s] Deceleration [mm] Acceleration time [s] 11000 11500 12000 Annexs Annex 1 – Multiplex Parameters Setting Duplex elevator (example 1) – Example 1 – Floors in Multiplex Controller A floors Controller B floors Controller A Controller B Number of floors Multiplex configuration Lift number Floors in Multiplex...
- Page 80 Floors in Multiplex Controller A floors Controller B floors Controller A Controller B Number of floors Multiplex configuration Lift number Floors in Multiplex OFFSET NOTE : please refer to examples 5 and 6 for the configuration of the button wiring indicated with X –...
- Page 81 NOTE : please refer to examples 5 and 6 for the configuration of the button wiring indicated with X – Example 4 – Floors in Multiplex Controller A floors Controller B floors Controller A Controller B Number of floors Multiplex configuration Lift number Floors in Multiplex OFFSET...
- Page 82 Controller A Push-buttons Controller B Controller A Controller B Number of floors Multiplex configuration Lift number Floors in Multiplex OFFSET NOTE : each button must be connected to all controllers Independent button wiring (example 6) – Example 6 – Controller A Push-buttons Push-buttons Controller B...
- Page 83 Controller A Push-buttons Push-buttons Controller B Controller A Controller B Number of floors Multiplex configuration Lift number Floors in Multiplex OFFSET NOTE : each button is only connected to its controller and must NOT be connected in parallel Multiplex call (example 7/8) –...
- Page 84 ENTER to start it. The test procedure can be stopped by switching the installation to inspection mode. Test 1: Measure of the stopping space and time in UP direction, DMG UCM module in acceleration out of the door zone Before starting the test, move the empty elevator car to the floor where you want to take the measure.
- Page 85 Test 2: Measure of the stopping space and time in DOWN direction, DMG UCM module Before starting the test, move the empty elevator car to the floor where you want to take the measure. During the test, the elevator car will move downwards until the end of that floor door zone; now the forced intervention of the UCM module is activated and the elevator car will thus stop.
- Page 86 evaluation purposes. Test 10: ELGO UCM in UP direction (ELGO-CP) Before starting put the empty elevator car to the floor where you want to make the test (excluded top floor). During the test the lift starts in UP direction up to the end of door zone; at this point ELGO will give a fault (Fault ELGO Cod.
- Page 87 Test and measures (fourth part) Test 16: Reduced Pit Safety test (EN 81-21 – ELGO-CP+eSGC) Test for Reduced Pit and Protection system based on ELGO+eSGC. Protection intervention is after a shaft access, in the point given by distance TRIPD (Monitor Encoder, pag 8) from the Lower Reference position (Cabine on the buffer).
- Page 88 (Figure 1) Select “Put a file into PlayPad” (default), press OK button. Window changes into Figure 2. (Figure 2) Follow the instruction on screen and select the .PP2 file (in the example PLP2_2.PP2) and press OK. Window changes into Figure 3...
- Page 89 (Figure 3) Press OK to confirm the update process. Window changes into Figure 4 (Figure 4) At the end of Procedure you have to remove the USB (Figure 5 or Figure 6 will be appear). (Figure 5)
- Page 90 (Figure 6) Devices SW update procedure Insert the USB device into the slot, waiting for the message as in the Figure 7 and Select “Put a file into PlayPad” (default) and press OK button. (Figure 7) Window changes into Figure 8. (Figure 8) Follow the instruction on screen and select the *.bin file and press OK.
- Page 91 (Figure 9) Press OK to confirm the update process. Window changes into Figure 10, wait for a while. (Figure 10) Select the Device (or device group) to update and press OK (Figure 11) (Figure 11)
- Page 92 Window changes into Figure 12: wait until the process is completed. If you need to press any arrow button to switch on the backlight. (Figure 12) When the process ends (Figure 13) press Esc button until the windowshows “Please remove USB Device” (Figure 14).
- Page 93 (Figure 14) Device Time needed for updating SW Mother board (Playboard Controller) 3 minutes PlayPad 4.0 1 minute TOC Board (Car TOP Interface) 1 minute DMCPIT Board (Car COP Interface) 1 minute Serial Pushbittons Intarfaces (BDU Devices) 30 seconds Expansion boards (PIT8 / 16RL / 16IO) 30 seconds (Table III.1 –...
- Page 94 Insert the requested parameter and move on to the next one by pressing the Right Arrow. The list of VVVF Parameter is: Parameter Description Gearless Motor Geared Motor P01 - Motor Poles Insert Motor Pole's number F03 – Maximum Speed Insert max motor Speed [RPM] (Motor Plate) Insert Rated motor speed [Hz] F04 –...
- Page 95 Select 4 : Static Tuning Select 5 : Dynamic tuning (only if free from ropes) GEARED motor: Select 3 In case of any problem go to the Fault menu to identify the Problem (§ Motor Tuning Errors) At the end of the procedure, press the up/down button and check the correct elevator car movement direction; if not correct, invert values of parameters E98 and E99.
- Page 96 L01 A/B Output channel Absolute Signal Note Sinusoidal Differential EnDat 2.1 Required optional board OPC-LM1-PS Voltage 1 Vp-p (ECN1313 compatible) Sinusoidal Differential Sinusoidal Differential Voltage 1 Vp-p Required optional board OPC-LM1-PR Voltage 1 Vp-p (ERN1387 compatible) VVVF Fault Table Code Description Overcurrent during acceleration Overcurrent during deceleration The inverter momentary output current exceeded the...
- Page 97 Code Description A communications error has occurred between the key and the inverter. Keypad communications error CPU error A CPU error or LSI error has occurred. A communications error has occurred between the connected Option communications error option card and the inverter. An error was detected by the connected option card (not by Option error the inverter).
- Page 98 GEARED motor In old motors the auto-tuning may fail: in these cases the auto-tuning type 1 (at point 10 select P04 = 1) can be executed but in this case the values P06 and P12 must be manually entered. Typical values of P06 are between 30% and 70% of P03. F.r.
- Page 99 Parameter Description Default Suggested Adjustments Set value between 0,7 and 0,8 then increase to soften start phase ramp Zero speed control time Important: In “Positioning” Menu : Delay DIR-BRK <= 0,2 s Delay BRK-S > H64 Motor overshoots: RBC Proportional Gain (P constant) increase value by 0,25 (specifies the P constant of the Automatic Speed Regulator to be used during RBC calculation time)
- Page 100 Notes: Increasing the P constant makes response from machinery faster but may cause overshooting or hunting in motor. Furthermore, due to resonance of machinery or overamplified noise, machinery or motor may produce vibration noise. On the contrary, decreasing the P constant excessively delays response and may cause speed fluctuation in a long cycle, taking time to stabilize the speed.
- Page 101 Parameter Description Default Suggested Adjustments Starting speed Set value between 0,7 and 0,8 holding time Zero speed Set value to 0 control time Acceleration at high Speed fluctuations: increase value by 0,25 speed Acceleration at low Motor stops: increase value by 0,25 speed Creep Speed (5-...
- Page 102 4) – Push BEB and Up buttons. NOTE: Door safety chain contacts are completely bypassed. Brakes will be powered, Cabine should move for unbalance (direction according to the load in the cabine). In case of over speed (> 0,3 m/s) Cabine will stop and need to release buttons and press them again to restart.
- Page 103 Bypass door’s Safety contacts Turn BYPASS Selector to the required position: a) With any BYPASS the RED light will switch ON. b) Controller gives the Bypass fault. c) Movement of lift will be possible only in Inspection or from PME. PRE-LOCK = Preliminary contacts (Manual floor doors) LOCK = Floor door Locks CAR = Car door contacts...
- Page 104 3...17 Do not use Brake monitor for Door opening enable (door opens only if brake 1,5 s is fall) DMG UCM Circuit 4.0 (no brake monitor) 1,5 s Only for temporarly disabling of Brake switches monitor A3 Certified 1,5 s DMG UCM Circuit 4.0 and Brake monitor...
- Page 105 Monitor Device / Hydraulic Control Unit Actuator Solution Hydro Central Unit with Electromechanical valves + A3 valve Without 1,5 s (test) Hydro Central Unit with Electromechanical valves + A3 valve Yes = OSG 1,5 s Safety Gear (test) Hydro Central Unit with Electromechanical valves + A3 valve Yes = UCM 1,5 s Two valves...
- Page 106 Monitor Device / Hydraulic Control Unit Actuator Solution 1,5 s Bucher Electronic unit LRV + NTA-2 + DSV A3 (test) 1,5 s Bucher Electronic unit LRV + NTA-2 + DSV A3 (test) Without 1,5 s Bucher Electronic unit i-Valve / iCON-2 (SMA monitor signal) Yes = OSG 1,5 s Bucher Electronic unit i-Valve / iCON-2 (SMA monitor signal)
- Page 107 Valves Monitor Control Unit Note valve command CV1 = UP CV2 = DOWN CV3 = HIGH GMV NGV SPEED Monitor signals 45 ... 49 CV4 = RDY / RUN MIDDLE SPEED CV5 = INSPECTION Bucher LRV CV1 = UP Need one 16RL board configured as Bucher NTA- CV2 = 50 ...
- Page 108 Installation Type Reduced Door Contacts EN 81.20 / 21 with bistable contacts 1,5 s X(*) Manual Protection Device in PIT EN 81.20 / 21 with bistable contacts 1,5 s X(*) Manual Protection Device in PIT EN 81.20 / 21 with bistable contacts 1,5 s Manual Protection Device in PIT EN 81.20 / 21 with bistable contacts...
- Page 109 Installation Type Reduced Door Contacts EN 81.20 / 21 with monostable contacts 1,5 s Protection Device AMI 100 CMF EN 81.20 / 21 with monostable contacts 1,5 s X(*) Protection Device AMI 100 CMF EN 81.20 / 21 with monostable contacts 1,5 s Protection Device AMI 100 CMF X(*) = Means that contact is needed only at the lowest floor door.
- Page 110 Enter the menu “SPECIAL FUNCTIONS” submenu “FIREFIGHTERS” and set: • The floor where the fire-fighters key is located • The Access (if there are multiple doors) •The stand-by state of the key switch contact (NO or NC); in case of NC contact the CPOM input of TOC box must be shunted.
- Page 111 to the input CPOM of the TOC box. The activation of this input will start PHASE 1 of the operation (also called evacuation) and will not allow elevator car calls without the activation of the fire-fighters key-switch. Using these settings and once the contact has been activated by the external fire contact, the elevator will go to the programmed floor, open the doors and remain stopped (PHASE 1).
- Page 112 Hydraulic Lifts – Motor contactors Direct...
- Page 113 (T on) = Contactor’s Time Activation, check on cco feedbacks (*) Signal feedback for start Valve UP command Soft Starter (T on) = Contactor’s Time Activation, check on cco feedbacks (*) Signal feedback for start Valve UP command...
- Page 114 (**) Signal feedback from Soft Starter Deceleration (Soft Stop) Start Delta (T on) = Contactor’s Time Activation, check on cco feedbacks (T on) = Contactor’s Time Disactivation, check on cco feedbacks (*) Signal feedback for start Valve UP command Hydraulic Lift – Valves Contactors / Valve commands Monitor UCM = 30…39 (2 Valves / 3 Valves / BLAIN EV100 / GMV T3010 / MORIS CM 320)
- Page 115 (*) In case of Soft Stop use CV1 for UP Valve’s Contactor (*) in case of no Soft Stop use CV4 for UP Valve’s Contactor – Tstop = BRK-DIR + 1,5s 3 Valve => No Double Valve Down test (A3 Valve Down couldn’t be present) 3 Valves + A3 =>...
- Page 116 No Double Valve Down test Monitor UCM = 45…49 (GMV NGV A3) (*) Valve commands starts only if RDY signal is active Note: Motor Contactors Starts Only With RUN Feedback Signal...
- Page 117 (*) Valve commands starts only if RDY signal is active Monitor UCM = 50…59 (BUCHER LRV / BUCHER NTA-2 / BUCHER NTA-2 + DSV A3) LRV1 + NTA-2 ► No Double Valve Down test (A3 Valve Down couldn’t be present) LRV1 + NTA-2 + A3 ►...
- Page 118 Monitor UCM = 60…64 (BUCHER i-VALVE / BUCHER iCON-2) Monitor of Signal + SMA...
- Page 119 Monitor of Signal + SMA Download You can download the PDF of this page DIDO-Pitagora-4.0-English Download DIDO-Pitagora-4.0-Italiano Download DIDO-Pitagora-4.0-Deutsch Download DIDO-Pitagora-4.0-Francais Download Updated on 18 Giugno 2021...
Need help?
Do you have a question about the Pitagora 4.0 and is the answer not in the manual?
Questions and answers