Cognisys SCOUT REMOTE Owner's Manual
Hide thumbs
Also See for SCOUT REMOTE:
- Owner's manual (50 pages) ,
- Owner's manual (45 pages) ,
- Owner's manual (20 pages)
Table of Contents
Advertisement
Quick Links
Advertisement
Table of Contents

Related Manuals for Cognisys SCOUT REMOTE

Summary of Contents for Cognisys SCOUT REMOTE
- Page 1 Owner’s Manual Revision 1.0 Copyright 2021 Cognisys, Inc.
-
Page 2: Table Of Contents
Table of Contents SAFETY INSTRUCTIONS ..........................3 GETTING STARTED ............................3 ? ..........................4 HAT IS THE COUT EMOTE ............................4 HAT IS NCLUDED ............................5 ATTERY NSTALLATION ............................6 UICK TART UIDE ............................7 LEANING AND 2.5.1 Cleaning ..............................7 2.5.2 Care and storage ............................ -
Page 3: Safety Instructions
CAUTION: Only use approved power sources for Scout equipment. Use of other power adapters or batteries may damage the controller and/or attached equipment. CAUTION: Misuse of Scout equipment could potentially damage your equipment. Cognisys, Inc. will not be held liable for damage to your equipment. If you have questions about safety please contact us! 2. -
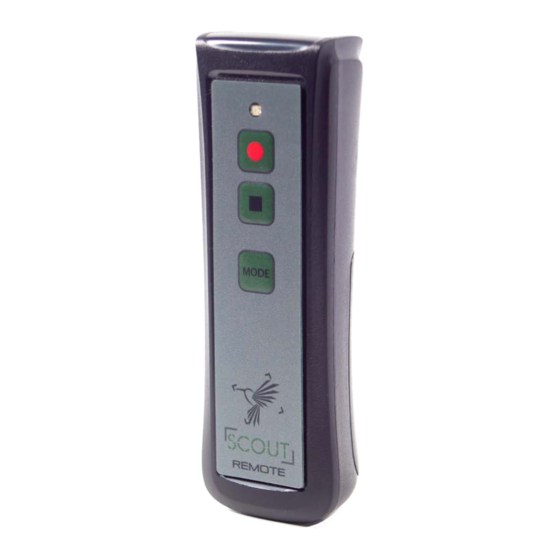
Page 4: What Is The Scout Remote
2.1 What is the Scout Remote? The Scout Remote is an accessory for the Scout Camera Box. It allows you to manually activate the camera inside the Scout Camera Box. The Scout Remote has several features: Wireless communication to the Camera Box •... -
Page 5: Battery Installation
2.3 Battery Installation Battery installation is a simple process and because the Remote has excellent battery life – you won’t have to do it often! The Remote is designed to use AA/R6 batteries of any chemistry. To install the battery: 1. -
Page 6: Quick Start Guide
2.4 Quick Start Guide Want to be up and running in two minutes or less? Here’s the quick-start guide in case you misplaced it:... -
Page 7: Cleaning And Care
2.5 Cleaning and Care We want your Scout equipment to last – so here are some brief steps to keep it happy! 2.5.1 Cleaning For cleaning we recommend a slightly dampened (not wet) micro-fiber cloth. Do not spray water directly into the inside of the equipment. Any liquid that goes into the remote may cause an electrical failure of the device. -
Page 8: Usb Connector
2.6 USB Connector There is one internal USB-B connector on the Scout Remote for updating software. The four Philips screws holding the remote together can be removed to get access to this USB port. Your remote shipped with the latest available software. -
Page 9: Record Button
stop button will send the pulse programmed in the Camera Box to stop recording. Use this mode for recording video on Canon or Nikon cameras. Mode 3: Follow the Camera Box internal programming. If the camera box is set for “# pics: 2” then you’ll get two pictures every time you press the record button. -
Page 10: Pairing" To Your Camera Box
2.11 “Pairing” to your Camera Box The Scout Remote needs to know which Camera Box you would like to use it with. This pairing process only needs to be done once. The process is easy: 1. Turn on your camera box (it’s okay if it goes back to sleep). -
Page 11: Example
3. Example In the following section we will walk you through a real-world setup/example using your Scout Camera Box and Remote. Be sure to check out our website and follow us on YouTube (http://www.youtube.com/user/CognisysInc/) for video examples. Sometimes watching a video makes the whole process much easier to understand! 3.1 Video Recording using Sony Cameras In this example we’ll walk through the Remote’s behavior and camera box settings to record... - Page 12 With the Remote in Mode 2: 1. Press the record button to start recording. 2. When happy with the video length, press the stop button. In “Mode 2” the Remote will tell the camera box to follow its programming for the first picture when you press the record button (delay time and the on time).
-
Page 13: The Camera Trapping Cardinal Rule
3.3 The Camera Trapping Cardinal Rule The final step as with all camera trapping is to test-test-TEST. Make sure that the Remote’s range is acceptable. Try getting some fantastic video of yourself (pretending to be an animal) before you consider everything done. -
Page 14: Installing The Reflash Software (Optional)
4.1 Windows Installation Windows installations should automatically detect and download the USB drivers required. Once the installation is complete you will have a “Start Menu” folder called Cognisys. Underneath that you will find the Reflash icon. 4.2 OS X Installation Reflash requires Java 1.7 or later from Oracle. -
Page 15: Troubleshooting
“mode” button until you see the red LED flash. Release the mode button. If you cannot resolve a problem with your Scout Remote, please contact us at support@cognisys-inc.com. We want to make sure that you are completely satisfied! -
Page 16: Specifications
6. Specifications Specifications are intended for reference only. The design may be modified to improve features or functionality without notice. Specifications UNITS Dimensions (including cover flange) 146 x 46 x 33 Dimensions (including cover flange) 4.7 x 1.8 x 1.3 inches Input Voltage Battery Style... -
Page 17: Warranty
All electronic products are warranted to be free from defects in materials or workmanship for two (2) years from the date of purchase. Within this period, Cognisys Inc. will, at its sole option, repair or replace any components which fail in normal use. Such repairs or replacement will be made at no charge to the customer for parts or labor, provided that the customer shall be responsible for any transportation cost. -
Page 18: Revision History
8. Revision History Revision Date Change 6/24/2021 Initial Release...
Need help?
Do you have a question about the SCOUT REMOTE and is the answer not in the manual?
Questions and answers