Advertisement
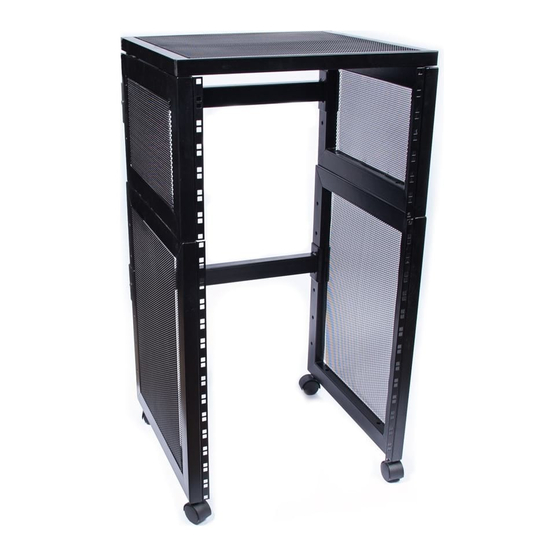
Included Parts:
1. Left Bottom Panel (1)
2. Right Bottom Panel (1)
3. Left Top Panel (3)
4. Right Top Panel (3)
5. 2x Support Bar (2 + 4) (bolts included)
6. Top Panel (3)
7. 4x Bolts (Top Panel to Left and Right Top Side Panels)
8. 4x 'Long Bolts' (Top Left and Right to Bottom Left and Right Side Panels)
9. 4x Wheels
1. Attach t he rear support bar ( Piece 2) , to both 'bottom' side panels ( Piece/s 1)
( u ser may select which height level to attach support bar to)
Though do not tighten the bolts all the way up, leave them a tad loose.
2. Attach t he rear support bar ( Piece 4) , to both 'top' side panels ( Piece/s 3)
( u ser may select which height level to attach support bar to)
Though do not tighten the bolts all the way up, leave them a tad loose.
3. Sit t he 'top' side panel section ( Piece 3 + 4), on top of the 'bottom' side panel section ( Piece 1 +
SWAMP Setup Guide
XR402--XR-406
Advertisement
Table of Contents

Summary of Contents for swamp XR402
- Page 1 SWAMP Setup Guide XR402--XR-406 Included Parts: 1. Left Bottom Panel (1) 2. Right Bottom Panel (1) 3. Left Top Panel (3) 4. Right Top Panel (3) 5. 2x Support Bar (2 + 4) (bolts included) 6. Top Panel (3) 7. 4x Bolts (Top Panel to Left and Right Top Side Panels) 8.
- Page 2 2) , lining up the bolt holes on the side panels. 4. Push the 4x ‘long bolts’ through the holes in ( Piece 3 + 4) and ( Piece 1 + 2) . Slip on the washer ,then the nut on the underside of ( Piece 1 + 2) . Start by turning the nut by hand, and tighten all 4 nuts so they just start to grip, but to not tighten up fully.
Need help?
Do you have a question about the XR402 and is the answer not in the manual?
Questions and answers