
Related Manuals for PCM SMART 1000

Summary of Contents for PCM SMART 1000
- Page 1 SMART 1000 1500 2000 3000 VA LINE – INTERACTIVE SINUSOIDALE MANUALE D’USO - 1 -...
- Page 2 Istruzioni per la sicurezza LEGGERE SCRUPOLOSAMENTE LE ISTRUZIONI ! CONSERVARE QUESTE ISTRUZIONI quando si installa il cavo di interfaccia per RS 232 assicurarsi che l’ups non sia ATTENZIONE : collegato alla rete con l’apposito cavo. l’ups ha una risorsa di energia interna, le batterie. Quindi, le prese di uscita potrebbero ATTENZIONE : essere in tensione anche quando l’ups è...
- Page 3 Indice Istruzioni per la sicurezza Introduzione 1. Presentazione 2. Installazione 3. Funzionamento 4. Allarmi 5. Software e porta interfaccia 6. Manutenzione e stoccaggio Appendice A ricerca guasti Appendice B specifiche tecniche - 3 -...
- Page 4 Introduzione Leggere e conservare il manuale ! La ringraziamo per la scelta di questo ups, che dal punto di vista tecnologico rappresenta la miglior protezione che per le sue apparecchiature. Il manuale contiene le istruzioni per il funzionamento e uso dell’ups nonché tutte le informazioni riguardanti la sicurezza dell’utilizzatore.
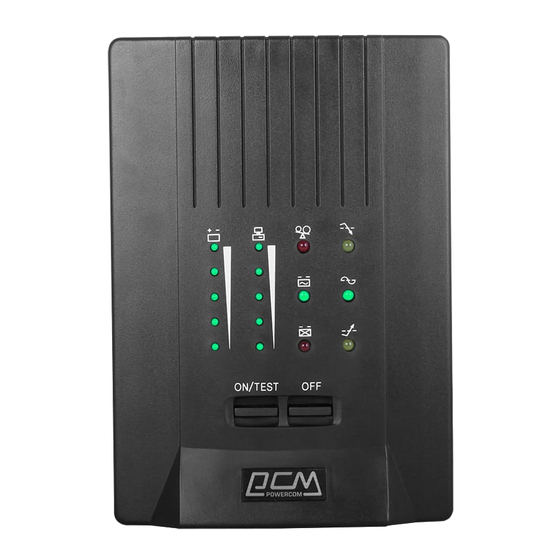
- Page 5 1. Presentazione Pannello frontale SMART 700 1000 1500 2000 SMART 3000 tasto ON/TEST : Premendo il tasto ON-TEST per circa 3-4 sec l’ups si accende. Successivamente esegue il test di batteria in sicurezza, cioè...
- Page 6 SMART 1000/1500/2000 SMART 3000 Connettore RS232 : Permette di connettersi con tutti i computer attraverso una seriale RS 232. Protezione TEL./ MODEM : Connettore per linea telefonica, protegge dalle sovratensioni che potrebbero danneggiare il modem o il sistema telefonico.
- Page 7 2. Installazione Verificare l’integrità dell’imballo dell’ups. Esso può essere stato danneggiato durante il trasporto. Conservare l’imballo per l’eventuale spedizione in caso di riparazione. L’imballo è completamente riciclabile. Luogo di installazione: posizionare l’ups in un luogo dove ci sia circolazione d’aria e preferibilmente poca polvere. Non usare l’ups in luoghi dove la temperatura e l’umidità...
- Page 8 3. Funzionamento Accensione : Con l’ups collegato alla rete elettrica, premere il pulsante ON / TEST per 2 secondi così l’ups dopo aver eseguito il test di funzionamento si accende. Attenzione: quando l’ups è spento il carica batterie è in funzione. In questa condizione è c possibile accendere l'ups utilizzando il software di gestione.
- Page 9 Barra led batterie : La barra led è formata da 5 led (vedi sezione 3.9.) che indicano il livello di carica della batteria. Quando tutti i 5 led sono accesi, la batteria è carica. Quando il led vicino al simbolo di batteria lampeggia, la batteria può...
- Page 10 5. software e porta interfaccia 5.1 Software di monitoraggio Il software UPSMON consente di monitorare le molteplici funzioni dell’UPS e provvede anche ad effettuare lo shut-down del computer nel caso di mancanza della rete elettrica. Inoltre è possibile ottenere un grafico relativo all’andamento nel tempo dei seguenti parametri: tensione, frequenza, stato di batteria. Il software è...
- Page 11 4. Leggere e seguire le istruzioni che seguono per completare l’installazione. 5.3 Collegamento del cavo di interfaccia Gli ups ad eccezione dello SMART 700VA, hanno la doppia porta di collegamento con il computer. Si può usare infatti sia la RS232 che la USB. In entrambi i casi usare solo i cavi in dotazione. Nel caso si preferisca usare la RS232 è...
- Page 12 Attenzione: il software UPSMON e le caratteristiche della porte di connessione dell’ups sono già predisposte per l’utilizzo dei modelli tipo “P”. Il cavo RS232 standard deve essere connesso tra la porta dell’ups e quella del computer utilizzando il software di serie UPSMON. Si puo scaricare il software UPSMON e gli aggiornamenti collegandosi al sito http:// www.
- Page 13 Appendice A ricerca guasti Problemi Cause possibili Soluzione L’ups non si accende e non Mancanza di alimentazione di Verificare la presenza rete a 230V e funzione dopo è rete l’inserimento del cavo di connessione premuto il tasto ON/TEST. Pulsante accensione Premere il pulsante ON/TEST per più...
- Page 14 Appendice B specifiche tecniche Modello 1000VA 1500VA 2000VA 3000VA potenza 600W 900W 1200W 1800W tensione 220V, 230V, 240V Input Frequenza 50 or 60Hz +/-10% (selezione automatica) Tensione (da batteria) Sinusoidale, valore nominale +/-5% Frequenza (da Output 50 or 60Hz tolleranza +/-0.5 % batteria) AVR aumenta la tensione di uscita 15% con tensione di stabilizzatore di...
- Page 15 SMART 1000 1500 2000 3000 VA LINE – INTERACTIVE SINUSOIDALE ■USER‘S MANUALS■ - 15 -...
-
Page 16: Important Safety Instructions
Important Safety Instructions IMPORTANT SAFETY INSTRUCTIONS SAVE THESE INSTRUCTIONS ● CAUTION (UPS Having Internal Batteries): Risk of electric shock - Hazardous live parts inside this unit are energized from the battery supply even when the input AC power is disconnected. ●... -
Page 17: Table Of Contents
Table of contents Table of contents Important Safety instructions Introduction 1. Presentation 2. Installation 3. Operation 4. Alarm 5. Software installation and interface port 6. maintenance and storage Appendix A troubleshooting Appendix B specifications... -
Page 18: Introduction
Introduction SAVE THESE INSTRUCTIONS Please read and save this manual! Thank you for selecting this uninterruptible power system (UPS). It provides you with a perfect protection for connected equipment. The manual is a guide to install and use the UPS. It includes important safety instructions for operation and correct installation of the UPS. If you should have any problems with the UPS, please refer to this manual before calling customer service. -
Page 19: Presentation
1. Presentation Front Panel SMART 1000 1500 2000 SMART 3000 “ON/TEST” button: With the UPS plugged in, press the ON/TEST button to turn on the UPS and power the loads. - Page 20 CONVENIENCE OUTLET : The CONVENIENCE outlet is pass from the utility power with voltage spike filtering function. SNMP SLOT ADAPTER (only SMART 1000, 1500, 2000 VA) : is possible instead the SNMP internal card USB port : use for connect the ups from USB port of computer.
-
Page 21: Installation
2. Installation Inspect the UPS upon receipt. The packaging is recyclable; keep it for reuse or be disposed of properly. 2.1 Placement: : Install the UPS in a protected area with adequate flowing air and free of excessive dust. Do not operate the UPS where the temperature and humidity is out of the specified limits. -
Page 22: Operation
3. Operation 3.1 Switch on: While utility input is connected to the UPS, press the "ON/TEST" button and keep pressing over than 2 seconds. After that, connect the electrical cords of the equipment that is going to be used such as computer or monitor with the UPS outlets on the rear panel of UPS. -
Page 23: Alarm
4. Alarm 4.1 “BACKUP”(slow alarm): When the UPS is working under “BACKUP” mode, the UPS would emit audible alarm. The alarm stops when the UPS is return to “LINE” mode operation. Anyone can stop the alarm by press the “ON/TEST” button during backup mode. Attention: The alarm of “BACKUP”... - Page 24 6. A windows labeled Welcome appears, please read and follow instruction written in the widow and click “Next”. (see Fig 5.3) Fig 5.3 7. Select a location for installing program. Please read and follow instruction written in the widow and click Next. (see Fig 5.4) Fig 5.4 8.
-
Page 25: Maintenance And Storage
Then main menu of UPSMON appears as shown in Fig 5.6 Fig 5.6 The main menu contains tools and feather for monitoring UPS operation and controlling UPS. For details on each tool and function of UPS MON, please click on Help button on main menu of UPS MON as shown in Fig. 5.7 Fig. -
Page 26: Appendix A Troubleshooting
Appendix A Troubleshooting PROBLEM POSSIBLE CAUSE Solutions Input power source mistake Check out the power source Time of pressing the button Keep pressing the “ON/TEST” UPS can't operate is too short button over 2 seconds after pressing “ON/TEST” switch Turn off UPS, take off all load to make sure there are no ... -
Page 27: Appendix B Specifications
Appendix B Specifications Model 1000VA 1500VA 2000VA 3000VA Capacity 600W 900W 1200W 1800W Voltage 100V, 110V, 115V, 120V/ 220V, 230V, 240V Input Frequency 50 or 60Hz +/-10% (auto sensing) Voltage (on Pure sine wave output at nominal +/-5% battery) Output Frequency (on 50 or 60Hz +/-0.5% battery)
Need help?
Do you have a question about the SMART 1000 and is the answer not in the manual?
Questions and answers