
Related Manuals for Infinite Show Me WM8-4G-4GP+EC

Summary of Contents for Infinite Show Me WM8-4G-4GP+EC
- Page 1 Industrial 8-port 10/100/1000T Wall-mounted Industrial Gigabit Ethernet Switch with 4-Port PoE+ Model: WM8-4G-4GP+EC User's Manual...
-
Page 2: Package Contents
1. Package Contents Thank you for purchasing WM8-4G-4GP+EC industrial 8-port 10/100/1000T Wall-mounted Gigabit Ethernet Switch. Model Name 10/100/1000T 802.3at PoE+ Power Adapter Copper Ports Ports WM8-4G-4GP+EC DC 54V, 1.33A In the following section, unless specified, the term “Wall-mount Gigabit Switch” mentioned in this user’s manual refers to the above mode Open the box of the Wall-mount Gigabit Switch and carefully unpack it. -
Page 3: Hardware Description
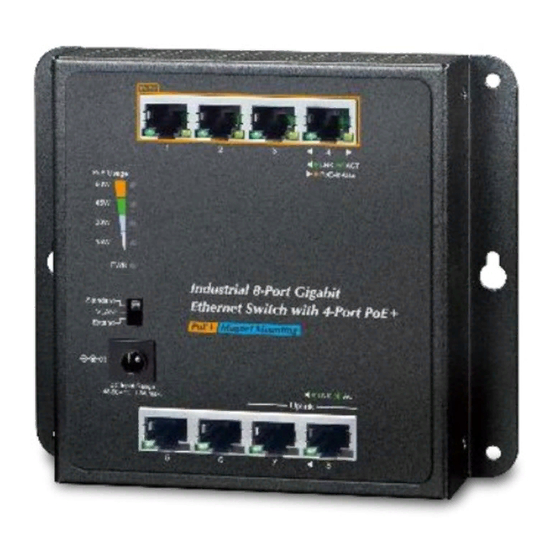
2. Hardware Description 2.1 Switch Front View The front panel of the Wall-mount Gigabit Switch consists of 8 Auto-Sensing 10/100/1000Mbps Ethernet RJ45 Ports. The LED Indicators are also located on the RJ45 ports of the Wall-mount Gigabit Switch. WM8-4G-4GP+EC Front View ◼... -
Page 4: Dip Switch
■ PoE Power Usage (Unit: Watt) Color Function To indicate the PoE usage is less than 7W. Blinks To indicate the PoE usage is around 8W to 14W. Amber To indicate the PoE usage is over 15-watt PoE Lights power budget. Blinks To indicate the PoE usage is around 23W to 29W. -
Page 5: Physical Dimensions
2.4 Physical Dimensions WxDxH: 148 x 24.2 x 134 mm Model number may or may not be permanently screen printed on front of unit. -
Page 6: Wall Mount Installation
3. Installation 3.1 Wall-mount Installation To install the Wall-mount Gigabit Switch on the wall, simply follow the following steps: Step 1: Place the Wall-mount Gigabit Switch on the wall and mark the four holes with a pencil. Step 2-1: Hammer the anchors provided into the four holes and use the four screws to tightly fix the switch onto the wall by screwing them in. -
Page 7: Din-Rail Mounting Installation
Step 2-2: Or the Switch, as shown in the picture below, can be hung on the wall by screwing the two screws leaving a space of 2mm apart after the anchors are hammered in. 3.2 DIN-rail Mounting Installation The DIN-rail kit is included in the Wall-mount Gigabit Switch package. To hang up the Wall-mount Gigabit Switch, follow the steps below: Step 1: Screw the DIN-rail bracket on the Wall-mount Gigabit Switch. - Page 8 3.3 Magnet Installation To install the Wall-mount Gigabit Switch on a magnetic surface, simply follow the following diagram:...
-
Page 9: Customer Support
4. Customer Support Thank you for purchasing ShowMeCables products. You can browse our online resources and User’s Manuals on www.ShowMeCables.com. If you require sales or support information, please contact the ShowMeCables support team using the information found below or using ShowMeCables’ online chat tool. ShowMeCables 115 Chesterfield Industrial Blvd Chesterfield, Missouri 63005... -
Page 10: Appendix: Product Specifications
Appendix: Product Specifications Model WM8-4G-4GP+EC Hardware Specifications 8x RJ45 with 10/100/1000BASE-T Network Port Type Auto-negotiation and auto MDI/MDI-X PoE Capable Ports Power Requirements 48~56V DC, 1.5A max. 70 watts/ Power Consumption 239 BTU ESD Protection 4KV DC Surge Protection 6KV DC Selectable operation mode DIP Switch Options Standard / VLAN / Extend... - Page 11 IEEE 802.3az Energy Efficient Ethernet (EEE) Regulatory Compliance FCC Part 15 Class A, CE Environment Temperature: -10 ~ 60 degrees C Operating Relative Humidity: 5 ~ 95% (non-condensing) Temperature: -20 ~ 70 degrees C Storage Relative Humidity: 5 ~ 95% (non-condensing) Energy Saving Note of the Device –...
Need help?
Do you have a question about the Show Me WM8-4G-4GP+EC and is the answer not in the manual?
Questions and answers