
Related Manuals for Nexxt NHB-S610


Summary of Contents for Nexxt NHB-S610
- Page 1 YEAR WARRANTY nexxtsolutions.com/warranty Smart Wi-Fi LED light strip starter kit...
-
Page 2: Package Content
Thank you for purchasing the Smart Wi-Fi LED light strip • 4-pin male header connector from Nexxt Solutions. We are excited to be part of making • 4-pin termination connector your life easier, safer and bringing peace of mind into your •... - Page 3 4. Plug the strip into a standard wall outlet. Connector Light strip Termination connector 4-PIN male connectors Maximum run length: 16.4ft. 5. The LED strip will automatically turn on and enter into Note: Make sure that markings on the strip match the pairing mode (blinking LEDs).
- Page 4 6. Clean the installation surface. Peel o the adhesive tape 3. Use the supplied 4-pin termination connector (must be and apply. Make sure the area is dry and smooth for fully open) to attach the additional length needed to long-lasting results. complete the desired run.
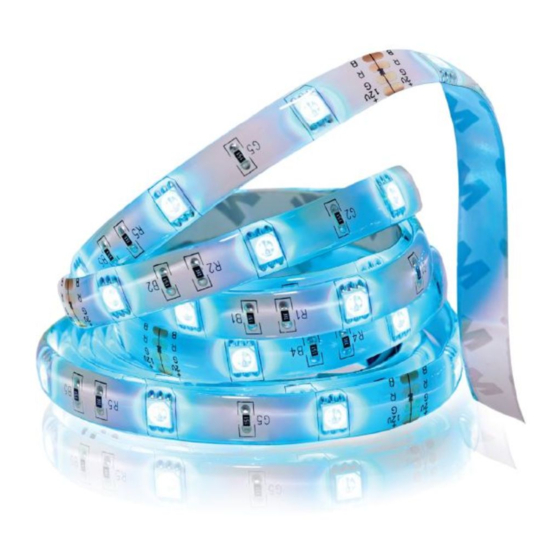
- Page 5 Accent lighting solution Lightweight and exible, the LED lights can be installed under bars, entertainment consoles, ceilings, cabinets or even behind your TV, with the included adhesive tape.
- Page 6 S O L U T I O N S Create New Account Crear Cuenta Nueva Log in with existing account Iniciar sesión con cuenta existente Get authentication code Register by email. Fill in the required elds. Download Nexxt Home app on Google Play or the Apple App Store.
-
Page 7: Set Password
Step 3 Step 2 9:41 AM 60 % 9:41 AM 60 % Enter veri cation code Set Password 6-20 characters, including letters and numbers Completed Veri cation code has been sent to your Create a new password and then select Completed. Enter the veri cation code you received. -
Page 8: Add Device
Add device Step 4 Step 1 9:41 AM 60 % 9:41 AM 60 % The Nexxt Solutions Home App account has been Select Add device, followed by the smart light strip. successfully con gured. - Page 9 Step 2 Step 3 9:41 AM 60 % 9:41 AM 60 % 9:41 AM 60 % Power on the smart light strip. If it fails to blink, reset the Power on the smart light strip. You must connect to a smart light strip.
- Page 10 Step 4 Functions 9:41 AM 60 % 9:41 AM 60 % Light strip: Turns the strip LEDs on and o . Color: Changes the color, brightness, and saturation of the LED lights. Scene: Gives you several preselected scenes and four scenes you can con gure.
- Page 11 Schedule setup Step 2 Step 1 9:41 AM 60 % 9:41 AM 60 % 9:41 AM 60 % Set the time you wish to schedule. Select Repeat to set Click on the schedule icon to access the Add schedule days of the week. Select Switch to schedule on/o status. Click on Save on the upper right-hand corner to save a screen.
- Page 12 Delete setup Settings Click on the pencil icon on the upper right-hand corner. Device name: changes the name of the LED strip. 9:41 AM 60 % Device Information: will show the information related to the light strip. Tap-To-Run and Automation: links the LED strip with other smart products to automatically control them through a customized command.
- Page 13 Amazon, Alexa and all related logos are trademarks of Amazon.com, Inc. or its a liates. Google, Android and Google Play are trademarks of Note: family or friends will need their own Nexxt Solutions Google Inc. All other brand names and trademarks are the property of Home Account to access the device.
-
Page 14: Contenido Del Empaque
Gracias por adquirir la Cinta de luces inteligentes con • Conector macho de 4 alfileres conexión Wi-Fi de Nexxt Solutions. Nos complace ser parte • Conector de terminación de 4 alfileres de la solución destinada no sólo a simpli car su vida, sino •... - Page 15 4. Enchufe la cinta en un tomacorriente estándar de la Conector Cinta de luces pared. Conector de terminación Conector macho de 4 alfileres Extensión máxima por tramo: 5m 5. La cinta de luces se debe encender e iniciar en forma automática el emparejamiento de la unidad (los LEDs se Nota: Cerciórese de que las marcas en la cinta coincidan iluminan intermitentemente).
- Page 16 6. Limpie la super cie de instalación. Retire el protector de 3. Utilice el conector para terminación de 4 al leres la cinta adhesiva antes de aplicar. Asegúrese de que el área suministrado (debe estar abierto completamente) para esté seca y uniforme con el n de garantizar la máxima unir las tiras adicionales que se necesitan para completar el sujeción por largo tiempo.
- Page 17 Solución de iluminación ornamental Liviana y exible, las luces LED se pueden instalar debajo de mesas para bar, consolas de entretenimiento, techos, gabinetes e incluso detrás del televisor, con el adhesivo incluido en la cara posterior de la cinta.
- Page 18 Create New Account Crear Cuenta Nueva Log in with existing account Iniciar sesión con cuenta existente Get authentication code Registro por email. Complete los campos requeridos. Descargue la aplicación Nexxt Solutions Home de Google Play o de Apple App Store.
- Page 19 Paso 3 Paso 2 9:41 AM 60 % 9:41 AM 60 % Enter veri cation code Set Password 6-20 characters, including letters and numbers Completed Veri cation code has been sent to your Cree una contraseña nueva y seleccione Completo. Ingrese el código de veri cación que recibió.
- Page 20 Agregar dispositivo Paso 4 Paso 1 9:41 AM 60 % 9:41 AM 60 % Seleccione Agregar dispositivo y a continuación, la cinta La cuenta Nexxt Solutions Home ha sido con gurada de luces inteligentes. satisfactoriamente.
- Page 21 Paso 2 Paso 3 9:41 AM 60 % 9:41 AM 60 % 9:41 AM 60 % Encienda la cinta de luces inteligentes. Debe conectarse a Verifique que el LED del dispositivo parpadea rápidamente. una red Wi-Fi de 2.4GHz. Ingrese la contraseña de la red. Si la luz no aparece intermitente, reinicie la cinta de luces.
- Page 22 Funciones Paso 4 9:41 AM 60 % 9:41 AM 60 % Cinta de luces: Enciende y apaga el dispositivo. Color: Cambia el color, el brillo y la saturación de las luces LED. Escena: Incluye varias escenas preprogramadas, más cuatro con gurables por el usuario. Música: Sincroniza dinámicamente las luces iluminando la cinta al ritmo de la música.
- Page 23 Configuración del horario Paso 2 Paso 1 9:41 AM 60 % 9:41 AM 60 % 9:41 AM 60 % De na el horario que desea programar. Seleccione Repetir Haga clic en el ícono del horario para abrir la pantalla para programar los días de la semana. Seleccione Cambiar Agregar horario.
- Page 24 Configuración Borrar horario Pulse el ícono del lápiz ubicado en el borde superior derecho de la pantalla. Denominación del dispositivo: cambia el nombre de la cinta de luces. 9:41 AM 60 % Información del dispositivo: muestra la información relacionada con la cinta de luces. Activación rápida y automatización: enlaza la cinta de luces con otros productos inteligentes para controlarlos en forma...
- Page 25 FCC ID: X4YHABS610 ahora van a tener acceso a la cinta de luces inteligentes. Nexxt Solutions® es marca registrada. Todos los derechos reservados. Amazon, Alexa y todos los logos relacionados son marcas registradas Nota: familiares o amigos necesitan establecer su propia de Amazon.com, Inc.
- Page 26 Smart Wi-Fi LED light strip starter kit...
Need help?
Do you have a question about the NHB-S610 and is the answer not in the manual?
Questions and answers