Advertisement
Quick Links
Advertisement

Related Manuals for AuthenTrend ATWallet

Summary of Contents for AuthenTrend ATWallet
- Page 1 Quickstart Guide...
- Page 2 Check your box contents USB Docking Recovery Sheets USB Cable AT.Wallet...
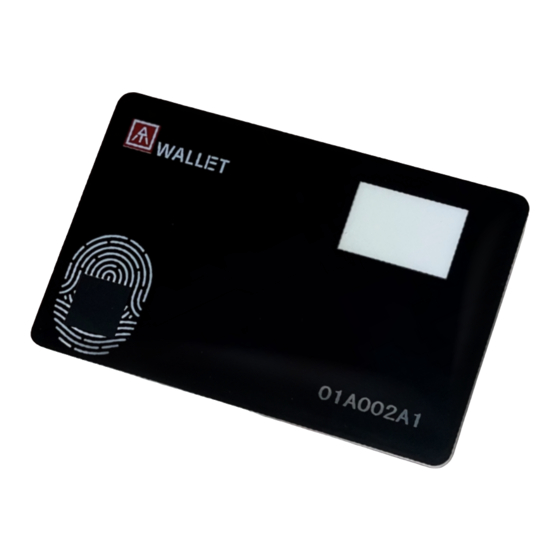
- Page 3 E-ink Display Charge your AT.Wallet first. Insert your AT.Wallet card into the docking to connect to the USB port or any adaptor. LED #1 #2 Serial Number Fingerprint Sensor...
- Page 4 Contents Wallet Creation or Recovery Transactions Wallet's Features & Settings...
- Page 5 Wallet Setup -Wallet creation...
- Page 6 Download the AT.Wallet app from the App Store, Google Play or Windows Scan the QR code directly and the link will take you to the store page for your OS, very convenient !...
- Page 7 Set up your AT.Wallet with either Bluetooth or USB It's much easier to pair your AT.Wallet with your phone in BLE mode. Press the power button to turn on AT.Wallet. Double-press the power button to start Bluetooth secure pairing mode. >>> LED#2 is in Cyan! You can see your AT.Wallet is on the app.
- Page 8 Bluretooth pairing request Click 'Pairing' on the app. Check the codes shown on your card and the app are the same. Touch the fingerprint sensor to start pairing. 481854...
- Page 9 Enroll your fingerprint Touch the sensor with a wide range of your finger around 14-16 times until 100% enrollment. Enroll FP...
- Page 10 Verify the enrolled fingerprint LED#2 shows GREEN when you finish enrollment. Verify the enrolled fingerprint to log into AT.Wallet app. Verify FP Pass...
- Page 11 Initialize Wallet Once your AT.Wallet is paired with the app, name your wallet first. Choose 'Create a new wallet' or 'Recover you wallet' to start. Let's start by creating a new wallet.
- Page 12 Create a new wallet Select language Select length of Mnemonic. Write down Mnemonic words to the “Recovery Sheet” inside the box, and carefully keep it in a safe place.
- Page 13 Your wallet is set up! Answer questionnaires following the “Recovery Sheet” that you wrote down. (option) For better security, you can assign “Passphrase” for those “Mnemonic words” for recovery, so that when you do “recover wallet base on Mnemonic words”, it requires you to type correct “Passphrase”...
- Page 14 Add cryptocurrencies / tokens Congratulations! You have successfully created your wallet. Now you can click the '+' icon located on the bottom to add supported cryptocurrencies or tokens.
- Page 15 Wallet Setup -Wallet Recovery...
- Page 16 Choose 'Recover your wallet' Please take out your recovery sheet or recovery phrase, paste them spaces in order. Whether AT.Wallet you have used before or other wallets can be recovered here.
- Page 17 Recover cryptocurrency Add your cryptocurrency that you would like to recover. If you have set a passphrase while creating the wallet before, please enter it!
- Page 18 Add cryptocurrencies / tokens Congratulations! You have successfully recovered your wallet. Now you can click the '+' icon located on the bottom to add supported cryptocurrencies or tokens.
- Page 19 Transaction -Sending Crypto...
- Page 20 Click your preferred cryptocurrency Before you doing any transaction, you have to click on the preferred Coin / Token first!
- Page 21 Click 'Send' Click the Send button on the Bitcoin page of the app.
- Page 22 Input the transaction info To: Paste address or scan address QR code Amount: Enter the transaction amount Fee: Transaction fee Note Once complete, click 'Send' to proceed. Verify FP Pass...
- Page 23 Confirm and verify your fingerprint! Please double-check the transaction details, you will be able to visually inspect the transaction details on your AT.Wallet card. Click 'Confirm' and verify your fingerprint on your AT.Wallet right away. 2NGZrVvZG 92qGYqzTLj CAewv... Verify FP Pass...
- Page 24 Transaction -Receiving Crypto...
- Page 25 Click your preferred cryptocurrency Before you doing any transaction, you have to click on the preferred Coin / Token first!
- Page 26 Click 'Receive' Click the Receive button on the Bitcoin page of the app.
- Page 27 Share your address with the app You may share the address or the QR code with 'Copy' or you can share directly to other apps. Fingerprint verification is NOT neccessary for receiving payments.
- Page 28 Share your address with the AT.Wallet You can directly show your receiving address on the Verify FP Pass AT.Wallet Card with our patented Standalone Mode. Press the power button. Double-press the power button to enter the standalone mode. Verify your fingerprint. Press the button repeatedly to open the wallet information in the order of currency.
- Page 29 Settings...
- Page 30 Delete cryptocurrency You can add new cryptocurrency here; if you want to enable BIP84 for Bitcoin or Litecoin, here is the only place to set up. And here is the only place to delete created cryptocurrency.
-
Page 31: Firmware Update
Firmware Update The power and the app can not be turned off until the software update is complete. - Page 32 Download the user manual from here: Powered by...
- Page 33 Questions? www.authentrend.com/at-wallet Let us know! contact@authentrend.com...
Need help?
Do you have a question about the ATWallet and is the answer not in the manual?
Questions and answers