Advertisement
Quick Links
Advertisement

Summary of Contents for Haiwei V1-W
- Page 1 USER MANUAL FOR V1-W IP CAMERA 2021.1.5...
- Page 2 Contents Ⅰ Interfaces Ⅱ Connection Ⅲ Web GUI 1-Status 11- Time code 6- TS code 2- Network 12- Recording 7- Audio 3- Protocols 13- P2P- Lens 8- OSD 4- RTMP/ RTMPS 9- Image optimize 14- System 5- SRT 10- ONVIF Ⅳ...
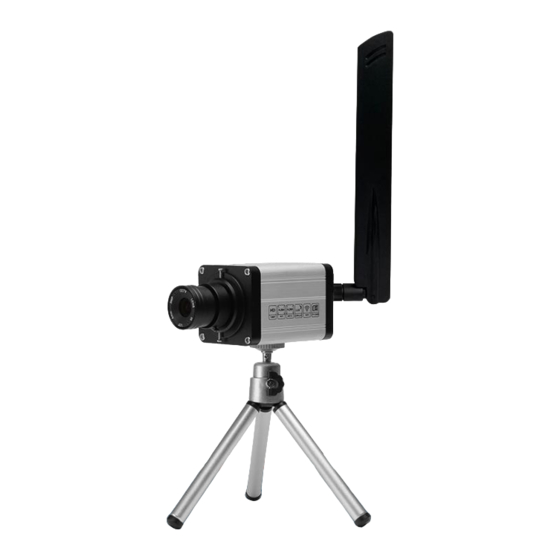
- Page 3 Interfaces Audio out Line-in Wifi antenna Red: Power Yellow: Streaming RS485 port USB Port Power In Factory reset * Dismountable lens Network port Start recording...
- Page 4 Connection ③ ① ② ① Connect the IP camera to router ② Connect the PC to the router that connected to the IPC ③ Send feeds to platforms or software...
- Page 5 Web GUI 1- Status The status of the processing and the streaming URL displaying here (1 and 2 RTSP, HTTP, UDP, RTP, HLS here). In this sector, the statistics of the encoded information will keep going if it works correctly; besides that, it provides overall view for current encoding information.
- Page 6 2- Network Network configuration can be adapted by configuring the IP address/ gateway/ DNS here. ** If streaming via RTMP/ RTMPs required, the first step should adapt the network to your local network, check the subsequent page** * Getting the WiFi connection If WiFi connection required, amount the WiFi antenna in advance, then click to get WiFi APs and input password , then click...
- Page 7 Get current IP Windows+ R → cmd Enter Network1 Enter Properties Enter Advanced, then Add and IP with 192.168.1.** Enter IPV4 and enter current IP Network ** enter an available IP address, DNS, IP gateway, adaptive for your network. Reboot the IPC to For example, if your local IP gateway is 192.168.0.1, input any 192.168.0.xxx get configuration took effect...
- Page 8 APP—LiveX, control the encoder and record the video at anywhere, any network, any device. Android/ IOS: download it on its apple/ Google play store Or scan the QR code to get the APP downloaded from our website Video about LiveX on YouTube: https://www.youtube.com/watch?v=GyAD7EhDvAc=210s...
- Page 9 3- Protocols Protocols display on the Following protocols can be configured here HTTP/ RTSP/ Unicast/ Multicast relevant protocol then Fill the server/ destination IP and port then...
-
Page 10: Network Configuration
RTMP/S Get the stream URL and stream key on the platform (use Facebook as instance ) Fill rtmps://live-api-s.facebook.com:443/rtmp/2541… on the URL option the RTMPs then Network configuration required before streaming to platform... - Page 11 Caller mode Listener mode Encoder Decoder Caller server Enter the Server/ destination IP and its Port then SRT stream URL srt://current IP:port...
- Page 12 TS Code Current TS info Video ID= Stream ID Audio ID= video ID+1...
- Page 13 Audio Set up the audio encoding information here Set up OSD (On Screen Display) here, the logo should be named logo.bmp ( at 24bit), the size of the file should not exceed 100kb. The logo for 2 stream should be named as logo_ext.bmp...
- Page 14 Color Those features would be of help under some different environment, different figures should be considered if the video is dim or over bright and other video performance related issues. ONVIF Time Code The server could be time.windows.com, or national NTP server...
- Page 15 Recording More • This function is for remote control or P2P transmission, explained its steps to get connected in THIS page • LDC Correction This function is designed for adapting different type of lenses if the video distorted Here are some suggestion for different lenses 4mm- 400, 6mm- 200.
- Page 16 System System • Timing reboot If the streaming is connection based (except UDP and RTSP over UDP), setting up 168 hours is necessary so as to avoid network cache and latency stuck. Version Upgrade...
- Page 17 Contact us 深圳海威视讯技术有限公司 Shenzhen Haiwei vision technology Shenzhen head office(R&D, production): 6th floor, block B, Hua Feng financial port, Xin'an 6th Road, BaoAn District, Shenzhen CN address: 深圳宝安82区新安六路华丰金融港B座6层 Guangzhou (Business center): #403-404, 4th Floor, No100 Ji Xian Hou Jie, YongPing subdistrict, Baiyun district, Guangzhou 510440, PRC...
Need help?
Do you have a question about the V1-W and is the answer not in the manual?
Questions and answers