Table of Contents
Advertisement
Advertisement
Table of Contents

Summary of Contents for QUIGG KM 2017Wi.20
- Page 1 Food processor with WI-FI function KM 2017Wi.20...
-
Page 2: Table Of Contents
CONTENTS Using the food processor Contents General instructions for the use of General the appliance Introduction Integrated kitchen scale EU Declaration of Conformity Left rotation function Proper use Using the mixing/mixing function Components /Contents of the (without heating) package Use of the mixing blade Safety Using the device with the integrated General safety instructions... -
Page 3: General
General EU Declaration of Conformity HUP Ver- triebs-GmbH Introduction hereby declares that the KM 2017Wi.20 radio system type complies with the Thank you for choosing a food processor following directives/regulations. with a WI-FI Quigg. You have just - 2014/53/EU acquired a quality product that meets the... - Page 4 Intended use The appliance is intended exclusively for the preparation of foodstuffs suitable for this purpose. Furthermore, the appliance is not intended for professional use but only for private use only. It may not be used by employees of shops, offices and other industrial establishments, on agricultural properties, or by guests, hotels,...
-
Page 5: Components /Contents Of The Package
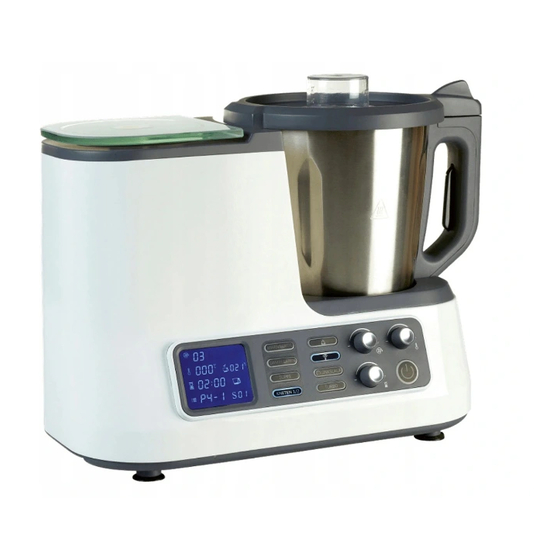
Components / Package contents Main components E) Stainless steel M) Spatula mixing bowl F) Lid N) Mixing paddle G) Filling port cover O) Power cord (not shown) A) Connecting the power H) Glass tray (weighing cord P) Cooking basket B) On/off switch surface) C) Base I ) Screen... - Page 6 Assembly E) Stainless steel mixing bowl 1) Graduation with MAX marker 2) Blades 3) Fixing the mixing blade 4) Sealing ring 5) Fixing the blades I) Écran 6) Symbol for left rotation 7) Symbol for right rotation 8) Display of speed levels / Error message 9) Weight display 10) Display of the current temperature in the mixing bowl in stainless steel...
- Page 7 Control panel 23) Key for turning to the left 24) Programming button "Kneading 1/2" 25) Programming button "Soup” 26) Programming button "Steaming". 16) Button for Wi-Fi function 27) Programming button "Jam” 17) Weighing key 28) Lid 18) Speed control knob 29) Steam compartment 19) Temperature control knob 30) Steam tray...
-
Page 8: Safety
SAFETY Please read and observe the following safety instructions. Failure comply with these instructions may result in accidents and injuries, as well as material damage or malfunction of the appliance. General safety instructions Risks for children and people with limited abilities ... - Page 9 Risks associated with the use of electrical appliances Use this device only as directed in these instructions and keep them in a safe place. safety instructions. Any incorrect use of this product may cause injury. Always switch off the appliance and unplug it from the mains. when you leave it unattended, by in case of malfunctions, before installing or removing the accessories, or before cleaning.
- Page 10 Never place the power cord or appliance on hot surfaces or near heat sources. Place the cord in such a way that it does not come into contact with hot or sharp objects. Risk of electric shock! Never bend the power cord or wrap it around the appliance, otherwise it may break.
-
Page 11: With Wi-Fi Function
Risks of using the food processor with WI-FI function Be careful when handling the blades, as they are very sharp. Do not touch the blades with your bare hands! Keep blades out of the reach of children. Never use blades damaged. Also inform other users of dangers. - Page 12 Make sure that there is sufficient clearance and safety distance between the appliance and all fusible or flammable objects. Danger of fire! CAUTION:Do not open any lids/caps while the contents of the mixing bowl are steaming or during mixing. This may result in injury. The fill opening lid can be removed briefly during use to add more ingredients.
- Page 13 Always wait until all parts of the appliance have come to a complete standstill before mounting or removing accessories. Risk of injury Turn off the power after each use and unplug the unit to prevent accidental start-up. Do not blend hard cores and remove any stems or stalks from the food to be blended before blending.
- Page 14 required. Chopping ice cubes with the appliance is not recommended. Do not disassemble the blades under any circumstances. Do not remove any parts from the blades to avoid the danger of faulty assembly. CAUTION: No liquids may come into contact with or be near the plug-in contacts of the appliance.
-
Page 15: Explanation Of Symbols And Other Information
Explanation of symbols and other information The following warning symbols and terms are used in this manual, on the device or on the packaging, or represent additional information. Please read and observe the operating instructions! Important safety instructions are marked with this symbol. -
Page 16: Installation & Assembly
Installation and assembly Thanks to the various accessories, the controllable Before first use heating function, the steamer, the integrated kitchen scale and the After taking the device left-hand rotation function, your out of its packaging, new food processor offers a wide please check that it is range of functions for a variety of complete and that it... -
Page 17: Preparing The Appliance
one hand, allows you to prepare Preparation of the device other hand, the entry of the desired settings, such as speed, time, Use the appliance only temperature, left-hand rotation or with the supplied power the selection of and the start of pre- cord. - Page 18 Screen (I) E2: The stainless steel mixing bowl (E) is not correctly placed on the base (C). E3: The lid (F) is not placed correctly on the stainless steel mixing bowl (E) or is not locked properly. E4: The motor is blocked/the blade does not turn.
-
Page 19: Control Panel
The bowl symbol lights up (see the section "Preinstalled programs").When preparing the continuously = The bowl and lid are correctly positioned. recipe via the application, the corresponding number is displayed. The recipe's weight is displayed Display of the preparation step (see the application's operating (12): instructions, supplied separately) - Page 20 Key for TURBO function (22): Weighing key (17): A short press of this key activates Pressing the key activates the temporary full power operation. weighing function - the display Maximum speed level. shows the weight (9). Also to be used for the tare Key for rotation to the left function (see section "Integrated...
-
Page 21: Removing/Installing The Blades
To place the stainless steel Risk of injury! Hold the blades only by the upper end mixing bowl (E) correctly on (attachment for the mixing the base (C), hold it by the paddle) when removing or handle and place it over the placing the blades from the hole in the base (C) so that the stainless steel mixing bowl. -
Page 22: Installation/Removal Of The Cover
To loosen the blade attachment Make sure that the sealing ring (5), turn it slightly into the Turn it counter-clockwise and remove it (4) is correctly positioned on the from the bowl. blades up to the stop (2). ... - Page 23 To correctly fit the lid (F) onto the Note: If the lid (F) is correctly stainless steel mixing bowl (E), positioned and turned to the stop, proceed as follows: a safety switch is activated and the appliance is now ready for use. If ...
- Page 24 and pull it out towards the 24 and pull it upwards. For proper installation, place the cover in the cover into (G) the filling so that the pins on the outer the pins on the outer contour are inserted into the recesses between the fasteners on the inner of the filling opening.
-
Page 25: Use
How to Use (thick or solid paste, or Using the food processor diluted broth). Therefore, the Always make sure that filling quantity and speed the stainless steel must always be adapted to mixing bowl is not filled the ingredients used. In this beyond the MAX mark. - Page 26 Turn one of the The food processor has a adjustment knobs. The left-hand blade rotation display lights up function (counter- continuously again and clockwise). With this you can make function, your dishes are adjustments as before. not cut by the blades, as this is only possible when Make sure that the the machine is turned in...
-
Page 27: General Instructions For The Use Of The Appliance
When mixing preparation of large quantities of If you wish to continue with the preparation stage, press the start liquid ingredients In button (20) again. combination with the If you want to reset the current heating function and settings, press the start button (20) when using the cooking for about 3 seconds. -
Page 28: Left Rotation Function
several ingredients successively Proceed as follows to use the in a container, you can use the scale: tare function after weighing the first ingredient by briefly pressing Connect the appliance to a (17) the weighing key. The scale properly installed earthed mains then returns to zero on the weight socket. -
Page 29: Using The Mixing/Mixing Function (Without Heating)
speed level can only be set after is suitable for mixing, grinding, selecting the left rotation function. chopping (e.g. herbs, nuts, meat, If you have selected a speed level, etc.), puréeing, blending/kneading, it is automatically set to "00" when beating e.g. cream and whisking the left rotation function is eggs, or for emulsifying with the activated. - Page 30 The total weight of the 7.Now select the desired speed ingredients used to knead the level (18) from "SL" (mixing) to dough must not exceed 0.8 kg. level 1 (slow) to 10 (fast) with the speed control knob. “SL" levels, 1 Firm ingredients such as and 2 when using the left rotation vegetables or meat should always...
-
Page 31: Use Of The Mixing Blade
Examples: Placing the mixing paddle Grind 150 g of coffee beans (N) in the stainless steel mixing bowl (E): After 30 seconds on speed level 10, distribute the ground coffee evenly in the stainless steel mixing bowl by shaking it lightly, and process the coffee again for about 10 seconds on speed level 10. -
Page 32: Using The Device With The Integrated Heating Function
Whisk 300 g egg white Preparation Observe the following time: approx. 5 minutes Speed characteristics of the appliance in setting: 3 combination with the heating function. TIP: When beating egg whites, it is essential to ensure that the Note: As water evaporates at stainless steel mixing bowl (E), approx. - Page 33 recommend that you select of 60°C), the highest adjustable a temperature slightly speed level for the lower, which you can adapt mixing/blending function is later on if necessary. This speed level 4. prevents sensitive It is not possible to use the ingredients being damaged heating function without the or the bottom of the...
-
Page 34: Using The Steamer
3. Place the cover (F) and make If desired, you can add and sure that it is correctly locked. prepare other ingredients. Make sure that the filler cap 10. Turn off the power and unplug (G) is correctly fitted. the unit. 4. - Page 35 When you lift the lid, steam hot water escapes. Danger of burning! Make sure that the steamer is placed correctly on the mixing bowl. Also make sure that you do not cover all the holes in the bottom of the steamer, steamer ...
- Page 36 7. Connect the appliance to a sufficient. However, we always recommend adding more to properly installed earthed mains avoid possible dry running. socket. Proceed as follows to use the appliance with the steamer (K): 1.Place the stainless steel mixing bowl (E) correctly on the base (C).
-
Page 37: Pre-Installed Programs
The temperature of the bowl should not exceed 100 °C when the bowl is Use the existing handles filled with water or liquid and always wear ingredients. For physical reasons, a heatproof kitchen setting of 120 °C will not make any gloves. - Page 38 The "STEAMING" programme is (JAM) CONFITURE suitable for cooking ingredients in the steamer with approx. 500 - 600 ml of This programme is suitable for the liquid (water or stock) in the bowl. The preparation of jam for approx. 500 g of programme pre-settings are as fruit and the appropriate amount of jelly follows: speed level {SL} The...
- Page 39 The total quantity should not The "Knead 2" programme is exceed one litre. Season to taste suitable for kneading softer doughs (salt, pepper, etc.). or small quantities. Here the The programme lasts 30 minutes quantity of ingredients should not exceed 500 g. and 04 seconds.
-
Page 40: Use Of The Cooking Basket
Using the cooking basket (P) It is also important to not exceed the maximum The cooking basket and its filling quantities after handle can become very setting up and and filling hot during use and remain the cooking basket. so for some time after use. Risk of injury! Observe the Do not use the cooking appropriate protective... - Page 41 This also allows you to TIP: When cooking soup or prepare ingredients that reducing sauces in large need to be chopped during quantities, we recommend that cooking, as well as you remove the filler cap (G) and ingredients that need to be place the cooking basket (P) on cooked whole.
-
Page 42: Problems And Solutions
Faults and solutions Failure Cause Solution The plug is not connected Insert the plug into the earthed mains appliance to the earthed mains socket. does not socket. work. The The on/off switch on the Turn on the on/off switch. device back of the unit is not cannot be switched on. -
Page 43: Maintenance, Cleaning And Maintenance
Maintenance, cleaning and servicing Clean the stainless steel mixing bowl (E) with a mixture of hot water and washing-up Always unplug the liquid. We recommend using a appliance before cleaning brush to clean the containers. and allow the appliance and all accessories to cool ... -
Page 44: Cleaning Of Other Accessories
Note: The sometimes aggressive Alternatively, you can put the detergents used in dishwashers accessories in the dishwasher often attack the (after removing the sealing ring). The sharpness of the blades and knives can be impaired. Therefore, Caution: The sealing ring of the lid do not wash the blades (2) in the (F) of the stainless steel mixing dishwasher. -
Page 45: Technical Specifications
Technical specifications Nominal voltage : 220-240 V~ Wi-Fi module : Nominal frequency: 50 Hz Transmission frequency: Protection class: 2,400 GHz-.2.4835 GHz Power : Transmitter power:16 +/- 2dBm Motor : 800 W Software version : MAX : 1200 W Weighing range : 1g - max. Hardware version : XC- 5000 g IC120... - Page 46 For your notes...
- Page 47 For your notes...
- Page 48 © Copyright Any reproduction or printing in whole or in part is prohibited without the consent of : HUP Vertriebs-GmbH Schlagenhofener Weg 40 82229 Seefeld, Germany 2020 This document and all its contents are protected by copyright. Any use outside the precise framework defined by copyright is prohibited and liable to prosecution unless expressly permitted by HUP Vertriebs-GmbH.
Need help?
Do you have a question about the KM 2017Wi.20 and is the answer not in the manual?
Questions and answers