
Related Manuals for Sanrio Hello Kitty KT2003

Summary of Contents for Sanrio Hello Kitty KT2003
- Page 1 CD KARAOKE SYSTEM / CD PLAYER USER MANUAL KT2003 PLEASE READ THIS MANUAL COMPLETELY BEFORE OPERATING THIS UNIT AND RETAIN THIS MANUAL FOR FUTURE REFERENCE.
- Page 2 IMPORTANT SAFETY INSTRUCTIONS The apparatus and AC/DC adaptor shall not be exposed to dripping and splashing and that no objects filled with liquids, such as vases, shall be placed on the apparatus and AC/DC adaptor. The mains plug of the AC/DC adaptor is used as the disconnect device. The power adaptor should always remain readily operable and should not be obstructed OR should be easily accessed during intended use.
-
Page 3: Table Of Contents
Table of Contents Page No CAUTION …………………………………………………………………………………………………..1 PRECATIONS FOR DISCS …………………………………………………………………………….. 2 WARNING ………………………………………………………………………………………………….2 FUNCTIONS AND CONTROLS …………………………………………………………………………3 PREPARATION ……………………………………………………………………………………………5 BASIC OPERATION ………………………………………………………………………………………6 COMPACT DISC PLAYER OPERATION ……………………………………………………………….6 CD KAROKE OPERATION ……………………………………………………………………………….8 CARE AND MAINTENANCE ……………………………………………………………………………..8 TROUBLESHOOTING GUIGE …………………………………………………………………………...9 SPECIFICATIONS …………………………………………………………………………………………9 LIMITED WARRANTY AND SERVICE …………………………………………………………………10 CAUTION CLASS 1 LASER PRODUCT... -
Page 4: Precations For Discs
PRECAUTIONS FOR DISCS HANDLING DISC To keep the disc clean, do not touch the play sides of the disc. Do not attach paper or ape to the disc. Keep the disc away from direct sunlight or heat sources. Store the disc in a disc case after playback. CLEANING DISC Before playback, wipe the disc with a clean cloth from the center outwards. -
Page 5: Functions And Controls
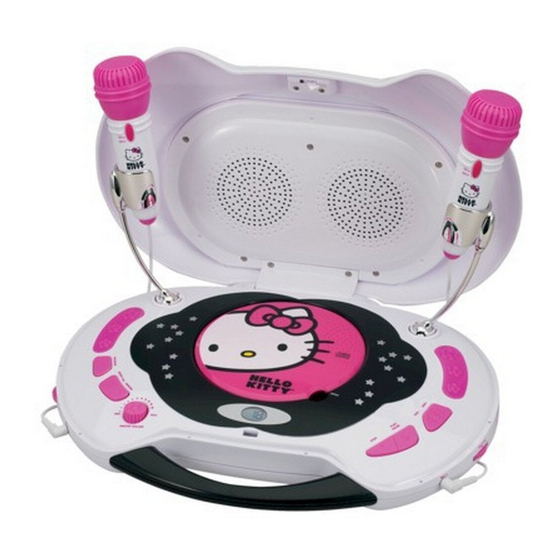
ABOVE ALL NEVER let anyone, especially children, push anything into holes, slots or any other openings in the case this could result in a fatal electric shock. NEVER guess or take chances with electrical equipment of any kind. It is better to be safe than sorry! Note: If the unit was used in a room with energy saving lamps (Fluorescent) erratic operation may occur. - Page 6 TOP VIEW (OPENED TOP COVER) MIC HANDSET TOP SIDE 1. Handle 3. Top Cover 2. Top Cover Release (OPEN / CLOSE) RIGHT SIDE 4. MIC 2 Input Jack 6. DISCO LIGHT Switch 5. MIC 2 VOLUME Knob LEFT SIDE 7. POWER Switch 9.
-
Page 7: Preparation
PREPARATION POWER SOURCE This STEREO CD PLAYER operations on 6 “C” size (UM-2) batteries (Not included) or from an AC-DC 9V adaptor (Not included). A. BATTERY INSTALLATION Turn over the unit and remove the Battery Cover Screw (13) to open the Battery Cover (12). Install 6 “C”... -
Page 8: Basic Operation
BASIC OPERATION To Turn ON the unit Slide the POWER (7) switch to the “ON” position to turn ON the unit. To Turn OFF the unit Slide the POWER (7) switch to the “OFF” position to turn OFF the unit. To LISTEN TO THE HEADPHONES You can use headphones (not included) to listen in privacy. - Page 9 SKIP + (20) and SKIP - (21) button ■ STOP (22) button Press to terminate playback. REPEAT 1/ALL (26) button REPEAT 1: Press once to playback the current track repeatedly and “ ” blinks in the LCD Display (18). Press twice to playback all the tracks on the disc repeatedly and “ALL” appears steadily in the REPEAT ALL: LCD Display (18).
-
Page 10: Cd Karoke Operation
CD KARAOKE OPERATION This unit provided funny feature similar to ENJOYING KARAKOE function 1. Plug in the MIC Handset into the Input Jack MIC 1 (9) or MIC 2 (4) or both. 2. Slide the MIC Switch (14) to the “ON” position. You can now sing together with your favorite artists. 3. -
Page 11: Troubleshooting Guige
TROUBLESHOOTING GUIDE SPECIFICATION CD Player Playback System -------------------------------- Top Load CD mechanism Memory Program -------------------------------- 20 Tracks Audio Section Power Output -------------------------------------- 2 x 500mW Headphone Impedance ------------------------ 8 – 32 ohms Speakers -------------------------------------------- 8 ohms, 3” full range x 2 General Power Source ------------------------------------ DC 9V, UM-2 / “C”... -
Page 12: Limited Warranty And Service
90 DAY LIMITED WARRANTY AND SERVICE VALID IN CANADA ONLY SPECTRA MERCHANDISING INTERNATIONAL, INC. warrants this unit to be free from defective materials or factory workmanship for a period of 90 days from the date of original customer purchase and provided the product is utilized within Canada. This warranty is not assignable or transferable.
Need help?
Do you have a question about the Hello Kitty KT2003 and is the answer not in the manual?
Questions and answers