Table of Contents
Advertisement
Quick Links
CSM(I)-QMTDC Series Motor Replacement
Replacement Motor
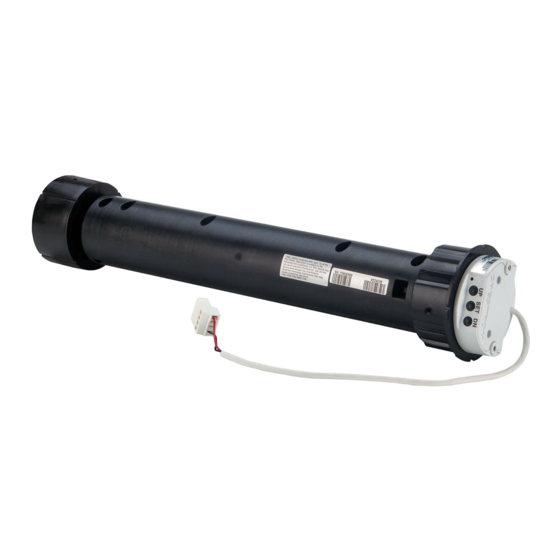
The CSM(I)-QMTDC-163 series, CSM(I)-QMTDC-250 series, and CSM
(I)-QMTDC-275 series Crestron® shade motors can be easily removed and
replaced. The CSM(I)-QMTDC series replacement motors are used to
replace an existing shade motor.
In the Box
1
CSM(I)-QMTDC Series Motor, Replacement Motor
Motor Replacement
CAUTION:
Roll up the fabric to prevent damage while replacing the
motor.
NOTES:
A soft and clean work surface is required to perform this
l
procedure.
Remove the fascia and disconnect the motor cable before
l
performing this procedure.
Remove the Roller Shade Assembly from the
Mounting Brackets
1. Remove the old motor from the motor mounting bracket.
For a CSM(I)-QMTDC-163 series motor, press the release button
l
on the bottom of the shade motor.
For a CSM(I)-QMTDC-250 series or CSM(I)-QMTDC-275 series
l
motor, squeeze the two metal release clips next to the shade
motor.
2. Push the roller shade assembly towards the idler bracket to separate
the motor from the bracket. The idler pin compresses to allow the
motor end to swing out of the bracket.
3. Lift the idler end of the roller shade assembly and remove the idler pin
from the keyhole in the idler bracket.
4. Place the roller shade on a soft, clean surface where it will not be
damaged.
Remove the Old Motor from the Roller Tube
CAUTION:
Do not remove the motor by pulling on the control wire.
Remove a CSM(I)-QMTDC-163 or CSM(I)-QMTDC-250
Series Motor
Pull the motor head to remove it from the tube.
NOTES:
For CSM(I)-QMTDC-250 series motors:
Removing the motor may require a firm, hard pull.
l
If the motor is difficult to remove from the tube, reinstall the
l
motor latch and use it to help pull the motor from the tube.
Quick Start
1
Advertisement
Table of Contents

Summary of Contents for Crestron Electronics CSM-QMTDC Series
- Page 1 Quick Start CSM(I)-QMTDC Series Motor Replacement Replacement Motor Remove the Roller Shade Assembly from the The CSM(I)-QMTDC-163 series, CSM(I)-QMTDC-250 series, and CSM Mounting Brackets (I)-QMTDC-275 series Crestron® shade motors can be easily removed and replaced. The CSM(I)-QMTDC series replacement motors are used to 1.
- Page 2 Quick Start CSM(I)-QMTDC Series Motor Replacement Replacement Motor Remove a CSM(I)-QMTDC-275 Series Motor CSM(I)-QMTDC-275 Series Motors: 1. Remove the motor latch from the motor. Save the motor latch for 1. Insert the motor into the tube. reassembly. 2. Roll the fabric around the hembar to expose the tube. 3.
-
Page 3: Making The Connections
Quick Start CSM(I)-QMTDC Series Motor Replacement Replacement Motor Reinstall the Roller Shade Assembly Making the Connections After the motor has been fully installed, roll the fabric back onto the tube NOTES: (if applicable), and then install the shade assembly according to the mounting bracket’s installation guide. -
Page 4: Controls And Indicators
Quick Start CSM(I)-QMTDC Series Motor Replacement Replacement Motor Wire the inNET EX® Wireless QMT Shade Motor Motor Programming The Crestron® digital CSM(I)-QMTDC shade motors are programmed locally using the buttons on the motor. The information in this guide serves as a detailed programming overview of the Crestron CSM (I)-QMTDC shade motors. - Page 5 Quick Start CSM(I)-QMTDC Series Motor Replacement Replacement Motor Test the Shade Test the Shade Travel Test the travel of the shade fabric to ensure that it does not come in Before the shade is operated, test the motor to ensure that the shade contact with building materials and that the upper and lower shade limits travels in the correct direction when being operated.
- Page 6 Quick Start CSM(I)-QMTDC Series Motor Replacement Replacement Motor Set the Shade Limits Joining an infiNET EX® Network (infiNET EX Interfaces Only) If necessary, set the lower and upper shade limits. If the shade limits are not set, the red LED flashes three times, pauses for 1 second, flashes The device connects to the Crestron network via the infiNET EX once, pauses for 5 seconds, and then repeats this code until the limits are communications protocol.
-
Page 7: Led Diagnostics
Quick Start CSM(I)-QMTDC Series Motor Replacement Replacement Motor LED Diagnostics 3. Once all devices have been acquired, take the gateway out of Acquire mode. Refer to the gateway’s manual for details. The LED flashes to provide a visual reference that the motor is operating normally or if it is in an error state. -
Page 8: Troubleshooting
Quick Start CSM(I)-QMTDC Series Motor Replacement Replacement Motor Error State Troubleshooting Crestron CSM(I)-QMTDC motors display error codes using the red LED The following table provides corrective action for possible trouble on the interface. The LED flashes a pattern to indicate the error. situations. - Page 9 Crestron, the Crestron logo, Cresnet, infiNET EX, QMT, and Quiet Motor Technology are either trademarks or registered trademarks of Crestron Electronics, Inc. in the United States and/or other countries. Other trademarks, registered trademarks, and trade names may be used in this document to refer to either the entities claiming the marks and names or their products.
Need help?
Do you have a question about the CSM-QMTDC Series and is the answer not in the manual?
Questions and answers