Table of Contents
Advertisement
Quick Links
Advertisement
Table of Contents

Summary of Contents for Empower CD334
- Page 1 1/2" 24V MAX CORDLESS DRILL MODEL: CD334 Instruction Manual SAVE THIS MANUAL You will need this manual for safety instructions, operating procedures, and warranty. Put this manual and the original sales receipt in a safe dry place for future reference.
-
Page 2: Table Of Contents
TABLE OF CONTENTS IMPORTANT SAFETY INSTRUCTIONS SAFETY INSTRUCTIONS FOR CORDLESS DRILL/DRIVER SAFETY INSTRUCTIONS FOR BATTERIES AND CHARGER SPECIFICATIONS FUNCTIONAL DESCRIPTION ASSEMBLY OPERATION MAINTENANCE PARTS LIST p.10 SCHEMATIC DRAWING p.11 WARRANTY WARNING! Read and understand all instructions. Failure to follow all instructions listed below may result in serious personal injury. -
Page 3: Important Safety Instructions P
IMPORTANT SAFETY INSTRUCTIONS WORK AREA Keep your work area clean and well lit. Cluttered benches and dark areas invite accidents. Do not operate power tools in explosive atmospheres, such as in the presence of flammable liquids, gases, or dust. Power tools create sparks which may ignite the dust or fumes. - Page 4 IMPORTANT SAFETY INSTRUCTIONS ▪ Avoid accidental starting. Be sure switch is off before plugging in. Carrying tools with your finger on the switch or plugging in tools with the switch on invites accidents. ▪ Remove adjusting keys before turning the tool on. A wrench or a key that is left attached to a rotating part of the tool may result in personal injury.
-
Page 5: Safety Instructions For Cordless Drill/Driver
IMPORTANT SAFETY INSTRUCTIONS ▪ Under abusive conditions, liquid may be ejected from the battery; avoid contact. If contact accidentally occurs, flush with water. If liquid contacts eyes, additionally seek medical help. Liquid ejected from the battery may cause irritation or burns. SERVICE ▪... -
Page 6: Safety Instructions For Batteries And Charger
SAFETY INSTRUCTIONS FOR BATTERIES AND CHARGER BATTERY ▪ Never attempt to open or modify battery for any reason. Released electrolyte is corrosive and may cause damage to eyes and skin. It may be toxic if swallowed. ▪ Under extreme conditions, battery leakage may occur. When you notice liquid on the battery, proceed as follows: •... -
Page 7: Functional Description
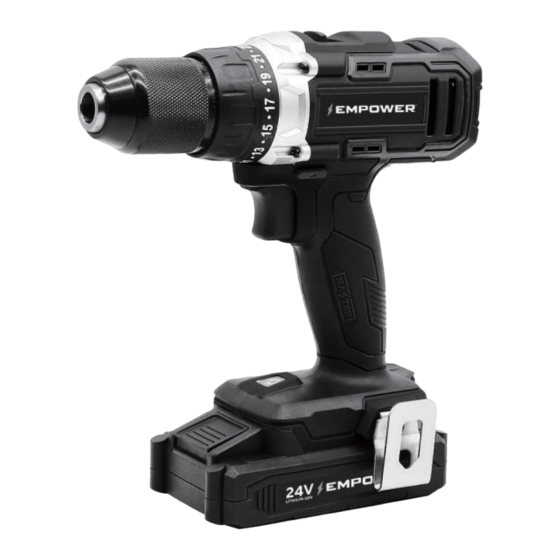
FUNCTIONAL DESCRIPTION 1/2” (13 mm) chuck Double-end driver bit storage Torque regulation ring Torque indicator scale LED work light Fig.1 Forward /self-lock/ reverse switch Variable speed trigger with electric brake Rubber-covered handle 24V Lithium-ion battery Battery lock button Metal belt hook ASSEMBLY TO INSTALL/REMOVE BATTERY PACK (SEE FIG.2) To install:... -
Page 8: Operation
OPERATION BATTERY PACK Fig. 4 Light The green light is the power indicator. When the charger is connected to AC household current, the green light is on.(Fig.4) When the battery is properly inserted into the charger and charging, the red light is on. When the battery is properly full charged, the red light will turn off and the green light is on. -
Page 9: Maintenance
OPERATION MASONRY DRILLING For maximum performance, use carbide-tipped masonry impact bits or designated hammer drill bits when drilling holes in brick, tile, concrete, etc. Select hammer mode. 1. Apply light pressure at medium speed for best results in brick. 2. Apply additional pressure for hard materials such as concrete. 3. -
Page 10: Parts List
PARTS LIST No. Description Qty. No. Description Qty. 1 Screw 30 3 Class planet support 2 Chuck 31 3 Class planet gear 3 Screw 32 3 Class gear ring 4 Plate 33 Washer 02 5 Sounder 34 Compensating gear 6 Torque setting ring 35 2 Class planet support 7 Shaft 36 2 Class planet gear... -
Page 11: Schematic Drawing
SCHEMATIC DRAWING... -
Page 12: Warranty
This Empower limited three year warranty is subject to the following terms: What Is Covered Your product is warranted against original defects in material and workmanship for a period of three years from the date of purchase, when used for private household purposes in accordance with the owner’s manual.
Need help?
Do you have a question about the CD334 and is the answer not in the manual?
Questions and answers