Table of Contents
Advertisement
Available languages
Available languages
Quick Links
Combination Warming and
Combinaison d'armoires de
réchauffement et de refroidissement
Write Model & Serial Numbers here:
Écrivez numéros de modèle et de
série ici:
____________________________
____________________________
Cooling Cabinets
Models/Modèles
RFBW61G
RFBW62D
FRBW52D
INSTRUCTION MANUAL
MODE D'EMPLOI
RFBW64
FRBW51
FELIX STORCH, INC.
770 Garrison Avenue
Bronx, New York 10474
www.summitappliance.com
Advertisement
Chapters
Table of Contents

Summary of Contents for Felix Storch SUMMIT RFBW61G
- Page 1 Models/Modèles RFBW61G RFBW64 RFBW62D FRBW51 FRBW52D INSTRUCTION MANUAL MODE D’EMPLOI Write Model & Serial Numbers here: Écrivez numéros de modèle et de FELIX STORCH, INC. série ici: 770 Garrison Avenue Bronx, New York 10474 ____________________________ www.summitappliance.com ____________________________...
-
Page 2: Table Of Contents
Introduction This appliance combines a refrigerated unit (bottom) with a warming cabinet (top), both powered by the same line cord. Excess heat from the lower unit’s condenser system warms the upper cabinet. A supplemental heating element is turned on as needed for temperature stability. The various models are described on the following page. -
Page 3: Description Of Models
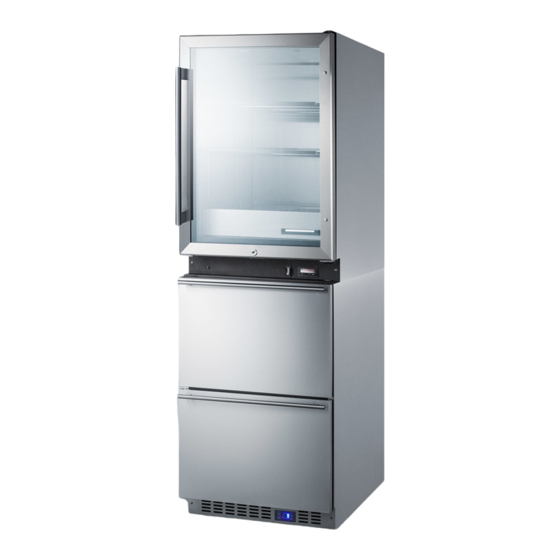
Description of Models Model Upper Cabinet Lower Cabinet RFBW61G Warming compartment Refrigerator with glass door RFBW64 Warming compartment Refrigerator with solid door RFBW62D Warming compartment Refrigerator with 2 drawers FRBW51 Warming compartment Freezer with solid door FRBW52D Warming compartment Freezer with two drawers IMPORTANT SAFEGUARDS Your safety and the safety of others are very important to us. - Page 4 • If the supply cord is damaged, it must be replaced by the manufacturer, its service agent or similarly qualified persons in order to avoid a hazard. • Unplug the appliance before making repairs or cleaning. • To prevent injury or damage, any repairs or adjustments should be done only by a qualified technician.
-
Page 5: Installation
INSTALLATION Before Using This Appliance CAUTION: After unpacking you MUST allow this appliance to stand upright for at least 2 hours to allow the lubricant and refrigerant to drain back into the compressor and stabilize. Failure to do so may adversely affect performance and the lifetime of this unit. - Page 6 • This appliance is equipped with a three-prong plug and is grounded to eliminate electrical hazards. In order to make it effective, the unit must be plugged into a grounded electrical outlet. • A short power-supply cord (either permanently attached or detachable) is provided to reduce risk resulting from becoming entangled in or tripping over a longer cord.
-
Page 7: Operation
OPERATION The Lower Refrigeration Cabinet The lower cabinet may be an all-refrigerator or an all-freezer. It may have a solid door, a glass door or two separate drawers. See page 2 for a brief description of your model. Control Panel Here are typical control panels that can be found on the lower refrigeration cabinet. -
Page 8: Setting The Temperature Control
On freezer models FRBW51 and FRBW52D, press and hold the SuperFreeze key for 5 seconds. On refrigerator models RFBW61G, RFBW64 and RFBW62D, press and hold the Light key for 5 seconds. Setting the Temperature Control • You can set the temperature by pressing the UP and DOWN keys. When you press either of the two keys for the first time, the LED readout will show the original temperature set previously. -
Page 9: The Upper Warming Cabinet
The Upper Warming Cabinet NOTE: This section of the appliance is designed to heat towels and blankets to a temperature no higher than 140°F. When loading items into the cabinet for heating, be sure there is a minimum of 1 inch of space between the items and the walls and fan to allow for proper circulation of air. -
Page 10: Turning Off The Warming Cabinet
The LED display on the control panel normally shows the warming cabinet temperature. When the cabinet reaches 140°F, the heating element will turn off (the red light goes out), then turns on again when the cabinet temperature drops to 135°F. This condition will continue until the equipment is turned off intentionally or: •... -
Page 11: Cleaning And Maintenance
CLEANING AND MAINTENANCE Cleaning Unplug the appliance and remove all contents. Wash the interior liners with a solution of warm water and baking soda (two tablespoonfuls per quart), then rinse and wipe. Do not use soaps, detergents, scouring powder, spray cleaners or the like on the liner, as these may cause odors in the cabinet. -
Page 12: Extended Downtime
Extended Downtime If the appliance will not be used for several months, empty it and unplug the power cord. Clean and dry the interior thoroughly. To prevent odor and mold growth, leave the doors open slightly, blocking them open if necessary. -
Page 13: Wiring Diagram
WIRING DIAGRAM... -
Page 14: Troubleshooting
TROUBLESHOOTING You can easily solve many common problems with your appliance, saving you the cost of a possible service call. Try the suggestions below to see if you can solve the problem before calling a service technician. TROUBLESHOOTING GUIDE Problem Possible Cause Warming cabinet Not plugged in;... - Page 15 NOTES...
-
Page 16: Limited Warranty
For more information, visit: www.summitappliance.com/prop65 Chemicals known by the manufacturer to be present in this product in concentrations higher than threshold limits: NONE. FELIX STORCH, INC. 770 Garrison Avenue Bronx, NY 10474 For parts and accessory ordering,... - Page 17 Introduction Cet appareil combine une unité réfrigérée (en bas) avec une armoire de réchauffement (en haut), tous deux alimentés par le même cordon. L'excès de chaleur du système condenseur inférieure réchauffe l'armoire supérieure. Un élément de chauffage d'appoint est activé si nécessaire pour la stabilité de la température.
-
Page 18: Description Des Modèles
Description des Modèles Modèle Armoire supérieure Armoire inférieure Compartiment de RFBW61G Réfrigérateur avec porte en verre réchauffement RFBW64 “ Réfrigérateur avec porte pleine RFBW62D “ Réfrigérateur avec 2 tiroirs FRBW51 “ Congélateur avec porte pleine FRBW52D “ Congélateur avec 2 tiroirs Mesures de sécurité... - Page 19 • Ne pas pincez, nouez ou pliez le cordon d'alimentation de toute autre manière. • Si le cordon d'alimentation est endommagé, il doit être remplacé par le fabricant, son agent de service ou des personnes qualifiées de la même façon afin d'éviter un danger. •...
-
Page 21: Installation
Installation Avant d'utiliser l'armoire chauffante ATTENTION: Après avoir déballé VOUS DEVEZ permettre cet appareil de se tenir debout pendant au moins deux heures pour permettre le lubrifiant et le réfrigérant de s'écouler dans le compresseur et de stabiliser. Ne pas le faire peut affecter négativement la performance et la durée de vie de cette unité. -
Page 22: Fonctionnement
Fonctionnement L’armoire inférieure de froid L'armoire inférieure peut être un tout-réfrigérateur ou un tout-congélateur. Elle peut avoir une porte solide, une porte de verre ou deux tiroirs séparés. Voir page 17 pour une brève description de votre modèle. Panneau de contrôle Voici les panneaux de contrôle typiques qui peuvent être trouvés sur l'armoire inférieure de réfrigération. -
Page 23: Réglage De La Commande De Température
Sélecteur ºF / ºC Vous pouvez choisir l'affichage de la température pour être en degrés Fahrenheit ou en degrés Celsius. Pour changer la température de Fahrenheit en Celsius ou de Celsius à Fahrenheit: Sur les modèles congélateur FRBW51 et FRBW52D, appuyez et maintenez la touche SuperFreeze pendant 5 secondes. -
Page 24: L'armoire Supérieure De Réchauffement
L’armoire supérieure de réchauffement REMARQUES: Cette section de l'appareil est conçue pour chauffer des serviettes et des couvertures à une température ne dépassant pas 140°F. En chargeant les articles dans l'armoire pour le chauffage, être sûr qu'il y a un minimum de 1 pouce d'espace entre les objets et les murs et le ventilateur pour permettre une bonne circulation de l'air. -
Page 25: Nettoyage Et Entretien
Mise hors tension de l'armoire chauffante Pour éteindre l'appareil, mettez le disjoncteur sur le panneau de commande sur OFF (Éteint). Réduire la température du point de consigne La température de fonctionnement est réglée en usine à 140°F, mais vous pouvez réduire ce «Set Point» (point de consigne) en suivant cette procédure: 1. -
Page 26: Filtre À Peluches
Ne jamais utilisez d'acides, de diluants chimiques, de l'essence, du benzène ou similaires pour nettoyer une partie quelconque de l'appareil. L’eau bouillante et le benzène peut se déformer ou d'endommager les pièces en plastique. Filtre à peluches Pour vous assurer que votre appareil continue de fonctionner correctement, nettoyer le filtre à... -
Page 27: Temps D'arrêt Prolongé
Temps d'arrêt prolongé Si l'appareil ne sera pas utilisé pendant plusieurs mois, videz-le et débranchez le cordon d'alimentation. Nettoyez et séchez soigneusement l'intérieur. Pour éviter les odeurs et les moisissures, laissez les portes légèrement ouvertes, avec blocage si nécessaire. Déplacement de votre appareil 1. -
Page 28: Schéma De Câblage
Schéma de câblage BARRE À MINE CAPTEUR DE TEMPÉRATURE VOYANT ALLUMÉ / ÉTEINT CAPTEUR DE TEMP TERRE VENTILATEUR BLANC À UNITÉ ET RADIATEUR NOIR DE FOND BRUN VERT MODÈLES :... -
Page 29: Dépannage
Dépannage Vous pouvez facilement résoudre nombreux problèmes communs avec votre appareil, vous épargnant le coût d'un appel de service possible. Essayez les suggestions ci-dessous pour voir si vous pouvez résoudre le problème avant d'appeler un technicien de service. Guide de dépannage Problème Cause possible L'armoire chauffante... - Page 30 Notes...
-
Page 31: Garantie Limitée
Produits chimiques reconnus par le fabricant qui sont présents dans ce produit en concentrations supérieures aux limites permises: AUCUNS. FELIX STORCH, INC. 770 Garrison Avenue Bronx, NY 10474 Pour les pièces et la commande des Phone: (718) 893-3900 accessoires, le dépannage et des conseils de...
Need help?
Do you have a question about the SUMMIT RFBW61G and is the answer not in the manual?
Questions and answers