
Related Manuals for Mega Speed HHC X8 Pro

Summary of Contents for Mega Speed HHC X8 Pro
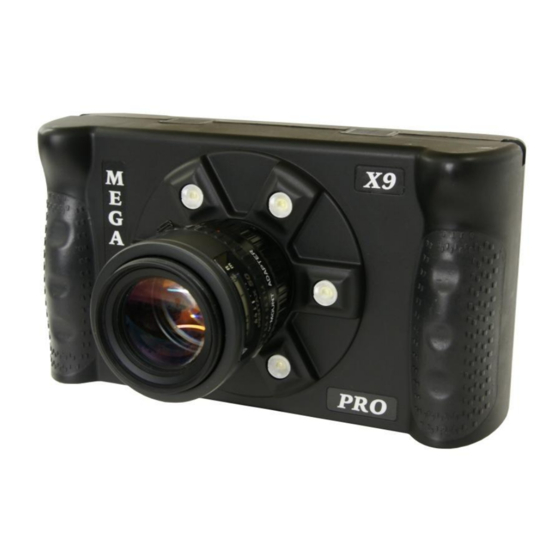
- Page 1 HHC X8 - X9 Pro High Speed Camera With high power LED work lights and SSD option User Guide Version 1.03...
-
Page 2: Table Of Contents
Contents HHC X8 - X9 Including PRO models Hardware details ..................... 5 HHC Main Camera Menu ..............................6 Start ..................................6 LED ..................................6 Image Size Menu ..............................7 Speed Setting ................................7 Exposure Setting ..............................8 Review Menu ................................8 Quicksave RAM to SSD ............................ - Page 3 Save ..................................24 7.11 Save Confirmation ..............................25 MSV / AVI Viewer ................................26 Image Viewer ................................27 USB/SD File Manager Menu ............................28 Recalibrating the Mega Speed HHC Touch Screen ....................29 License Agreement ..............................30 Contact Information ..............................31...
- Page 4 This is a normal to our pre-testing procedure. The Mega Speed HHC (Hand-Held-Camera) camera uses advanced high-speed electronics to record high frame rates. During high-speed image capture, the HHC stores high-speed video in the camera’s internal RAM in a circular buffer while generating live video on the LCD screen.
-
Page 5: Hhc X8 - X9 Including Pro Models Hardware Details
1 HHC X8 - X9 Including PRO models Hardware details To turn on your HHC, hold both the left and the right buttons on the back of the HHC for 3 seconds. The camera will take less than 1 minute to boot up. The camera’s left side red button has two functions depending on how long it is held and what mode the camera is in. -
Page 6: Hhc Main Camera Menu
2 HHC Main Camera Menu This is the main menu screen; from here all submenus and other functions of the camera can be reached. When in a submenu pressing there will be a back button located at the bottom of the options to return towards this screen. -
Page 7: Image Size Menu
2.3 Image Size Menu View or change the resolution the camera will capture frames at. The current capture size will be highlighted. The size presets will vary between camera models. Press on a different button to change to a different preset size, or press Custom Image Size to set your own custom image size. -
Page 8: Exposure Setting
2.5 Exposure Setting A higher exposure times will result in a brighter image but also induces more image blur. Lower exposure times are better for reducing motion blur, but they require more light. In addition to using more light, using a lower F-stop lens ( F0.95 ) and opening the lens iris as much as possible will also help. -
Page 9: Settings Menu
3 Settings Menu Setup multi-camera sync options - See Section 4 Auto Exposure options menu Set the capture mode - See Section 3.1 Change sensor gain, reduce lighting needed at expense of increased noise - See Section 3.2 Options for USB/SD storage - See Section 3.3 Stream to Camera SSD instead of RAM - See Section 3.4... - Page 10 3.1.1 Continuous Mode If Continuous Mode is selected and the Start button is pressed, the camera will start a high-speed capture and save the video in the camera’s RAM until the Stop button is pressed. Once the camera’s RAM is full, it is continuously overwritten (looped through) until the Stop button is pressed.
- Page 11 3.1.7 Enable Auto-Download This feature is only available in Single Sequence Trigger Mode or Pre/Post Trigger Mode. This feature is not available in all camera models. When enabled, after a capture the camera will automatically perform a download to the location selected in the "Auto- Download Settings"...
-
Page 12: Sensor Boost Menu (Optional)
3.2 Sensor Boost Menu (optional) The sensor gain can be changed in this menu. Higher boost values will increase the brightness of the images captured, but there will be additional noise. Normal is the default setting, it is always better to stay on normal and use more light if the captured images are too dark. -
Page 13: Camera Ssd Streaming (Optional)
3.4 Camera SSD Streaming (optional) Streaming to the Camera SSD allows for much longer record times than capturing to Camera RAM at the expense of a lower maximum capture speed. The “Loop When File Full” option will cause the camera to write continuously to the streamed file, until the capture is stopped. -
Page 14: Sync Settings
4 Sync Settings 4.1 Intro To synchronize multiple cameras so they capture frames at the same moment of time, there are a few necessary conditions that must be met for each camera in the sync group: Every camera must be capturing at the same frame rate. ... -
Page 15: Sync Configuration - Hardware
Figure 3 - Multiple cameras with sync, and different exposure times. Cam1 has shorter exposure, Cam2 has longer. 4.3 Sync Configuration – Hardware Typically one camera is used as the master, which will be used to generate the pulses for each of the other cameras to synchronize to. -
Page 16: Sync Configuration - Software
4.4 Sync Configuration – Software Important: Each synchronized camera must be configured to capture at the same frame rate, otherwise it will not be possible to align the frame times with each other. Sync must be enabled in the software for every camera in the group. -
Page 17: External Sync Sources
4.5 External Sync Sources must If using an external signal generator as the sync source cameras, it generate pulses at the frame rate the cameras are configured to capture at. The external signal must have low jitter to sync successfully, especially as the capture rate approaches the maximum frame rate. If the Sync In signal is provided by an external source, then the Sync Out ports are not used. -
Page 18: Advanced Settings Menu
5 Advanced Settings Menu ( see Section 5.1 ( see Section 5.2 Must be pressed before connecting to the PC ( see Section 5.3 Open the SSD menu ( see Section 5.4 Open the time settings menu ( see Section 5.5 ( Color Cameras Only ) –... -
Page 19: Show Status
5.2 Show Status As seen to the left, this displays camera status information. This includes the position in Camera RAM that was last saved to, the camera’s temperature, the battery’s Power Voltage, the camera model, and the software version number. When updating software, it is the second line from the bottom that will show the updated version number. -
Page 20: Time Menu
5.5 Time Menu Use these to set or change the internal date and time of the camera. Show the current date and time on the camera. (Note: This does not display IRIG time) Camera will use its IRIG input for timestamp generation when selected; otherwise the internal clock (set above) is used. -
Page 21: Advanced Settings (More) Menu
6 Advanced Settings (More) Menu Automatically open the review menu after a capture is stopped. Note: Incompatible with Auto-Download Press this button to enable or disable the encoded data shown at the top of the image during a capture. If you have received a software update, this will load it from USB and update your system. -
Page 22: Review Menu
7 Review Menu The review menu is where the high speed capture can be reviewed and saved to permanent storage. On models that support it, files on the Camera SSD can be reviewed here also. Note: Any camera RAM that was not written to in the last capture will be shown hatched. Even if the capture looped through RAM, the earliest frame is always shown at the left most position. -
Page 23: Video From Camera Ram
7.1 Video from Camera RAM This button is automatically activated and highlighted in blue to show you that you are currently reviewing the contents of "Camera RAM." If you are reviewing video in camera SSD you can press this button to return to "Camera RAM". 7.2 Video from Camera SSD - Press on any file to select it, then open - “Open”... -
Page 24: Save
"MSV" this is the "Mega Speed Video" RAW format. This format can be opened by the "Mega Speed AVI player". It gives a great range of editing options and allows for the file to be saved in regular AVI format by using the "AVI Clipper". -
Page 25: Save Confirmation
7.11 Save Confirmation If the settings look right, then press either the "Save, then return to the capture menu" button, or the "Save, then Open" button to start the saving process. Otherwise, press Back to return to the previous screen and change save options. -
Page 26: Msv / Avi Viewer
MSV / AVI Viewer Use the MSV/AVI viewer to review videos that were saved to USB/SD cards on the HHC previously. At the bottom of the window is a scrollbar that you can use to scroll through the frames in the file. Play Backwards Show each frame, in reverse order, starting from the current position Play Forwards... -
Page 27: Image Viewer
9 Image Viewer Use the image viewer to BMP, JPEG and TIFF format images that have been saved to a USB drive or SD card. At the bottom of the window is a scrollbar that you can use to scroll through the other image files that are in the same folder as the image file that you opened. -
Page 28: Usb/Sd File Manager Menu
10 USB/SD File Manager Menu The file manager menu will allow you to delete files and folders from any USB drives or SD cards that are connected to the HHC. Press this button to delete a file from SD or USB storage. A dialog will pop up asking you to select a file to delete. -
Page 29: Recalibrating The Mega Speed Hhc Touch Screen
11 Recalibrating the Mega Speed HHC Touch Screen Use the following procedure if the touch screen needs to be recalibrated. 1. Turn on the HHC by holding both red push buttons for 5 seconds. After 5 seconds stop pressing the right hand button. -
Page 30: License Agreement
ACCEPTS NO RESPONSIBILITY OR LIABILITY FOR YOUR FAILURE TO OBTAIN SUCH LICENSES, IF REQUIRED. 1. License. The software accompanying the License (hereafter “Software”), regardless of the media on which it is distributed, are licensed to you by Mega Speed Corp. (“MS”) for use solely in conjunction with MS hardware products purchased with the Software (MS Hardware”). -
Page 31: Contact Information
13 Contact Information For further product details or if you have any questions, please feel free to contact us at any time. Homepage: www.megaspeedusa.com...
Need help?
Do you have a question about the HHC X8 Pro and is the answer not in the manual?
Questions and answers