Table of Contents
Advertisement
Available languages
Available languages
Quick Links
Advertisement
Table of Contents

Summary of Contents for Soulist Soulist
- Page 1 . The biggest invention since the creation . INSTRUCTION MANUAL...
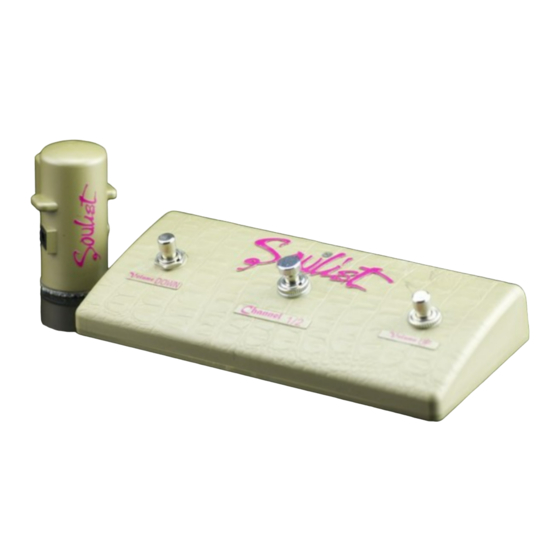
- Page 2 SOULIST COMPONENTS ON/OFF 9 V dc...
-
Page 3: Video Tutorials
INDEX ITALIANO ENGLISH FRANCAIS DEUTSCH JAPANESE VIDEO TUTORIALS Installation and video tutorials available on-line at www.soulist.it... - Page 4 Posizionare il Soulist delicatamente facendo attenzione ad allineare correttamente il perno del potenziometro (in posizione di “0”) con l’adattatore del Soulist. Applicare pressione con le dita sulla sommità del Soulist e fare aderire le superfici velcro fino ad avvertire lo scatto. Alimentare con trasformatore 9V cc ( non incluso ) Accendere la pedaliera wireless (dopo aver inserto pila 9V nell’apposito vano) tramite pulsante “ON - OFF”...
-
Page 5: Prima Installazione
N.B. Prima di spegnere l’amplificatore portare entrambi i livelli del soulist a “0” (nel caso in cui il potenziometro collegato sia quello del volume questa operazione è OBBLIGATORIA ai fini fi non danneggiare il v/s amplificatore). - Page 6 (please refer to our installation video on www.soulist.it) Place the Soulist gently, pay close attention and align the pin of the potentiometer properly (in the “0” position) with the Soulist adapter. Apply pressure with your fingers on the top of the Soulist and the adhere Velcro surfaces until it clicks.
-
Page 7: First Installation
Simultaneously press the “A” and “B” buttons for about 10 seconds, until the LED lights (which turn orange) begin to flash rapidly. Press the “D” button placed next to the Soulist (see photo). When the LED light turns green the Soulist pedals will be coupled. - Page 8 (il est conseillé de regarder la vidéo « Instructions d’Utilisation » dans notre site www.soulist.it) Installez le Soulist à la place de la poignée en faisant bien attention qu’il soit bien aligné (position “0”) avec l’adaptateur du Soulist Appuyez, avec les doigts sur la partie supérieure du Soulist pour accrocher le velcro Connectez le transformateur de 9V cc (pas fourni) Appuyez sur le bouton “ON - OFF”...
-
Page 9: Première Installation
Appuyez simultanément les boutons “A” et “B” pendant 10 sec. Environ, la led commencera à clignoter en orange Appuyez le bouton “D” situé sur le côté du boitier Soulist (voir photo), la led s’allume en vert pour confirmer que la pédale et le Soulist sont bien connectés. - Page 10 Kleben Sie den Klebestift auf und achten Sie dabei darauf, den Stift des Potentiometers in die richtige Öffnung zu stecken (es wird empfohlen, sich das Anleitungsvideo auf www.soulist.it anzusehen). Legen Sie den Soulisten sanft, achten Sie genau auf und richten Sie den Pin des Potentiometers richtig aus (in der Position „0“) mit dem Soulist Adapter.
-
Page 11: Erste Installation
Gleichzeitig die Tasten “A” und “B” für ca. 10 Sekunden drücken, bis die LED orange leuchtet und beginnt, zu blinken. Drücken Sie die Taste “D” neben dem Soulisten (siehe Foto). Wenn das LED-Licht grün wird, werden die Soulist-Pedale eindeutig gekoppelt. Es wird empfohlen, das Handshaking-Verfahren jedes Mal zu wiederholen, wenn der Soulist vom Potentiometer entfernt wird. - Page 12 Soulist (ソーリスト) ------- 使用説明書: ご利用の前に必ずお読みく ださい。 電位差計のノブを慎重に外してく ださい。 電位差計のピンを正しい開口部に置いて接着剤のステッカーを貼ってく ださい (www.soulist.itの 説明ビデオを見るこ とをお勧めし ます) 。 ソーリストを静かに置き、 慎重に電位差計のピンを適切に ( 「0」 の位置に) ソーリストのアダプターに合わせます。 ソーリストの上に指の圧力をかけ、 クリ ックするまでベルクロの表面を接着させます。 電力変圧器9VDCは別売。 (バッテリーコンパートメントに9Vバッテリーを挿入した後に) 「 ON—OFF」 ボタンを使用して (写真参照) ワイヤレスヘッ ドペダルを オンにします。 初めてご利用になる場合に、 ハンドシェイク手順 (下記説明を参照) に従って操作してく ださい。 ( この操作により、 2つのデバイスが接...
- Page 13 <初期インストール> ハンドシェイク手順 LEDがオレンジ色に 点灯するまで 「A」 と 「B」 ボタンを同時に10秒間押してく ださい。 ソーリストの横にある 「D」 ボタンを押します (写真参照) 。 LEDライ トが緑色に変わるとソーリストペダルは結合されます。 電位差計から ソウルティストを取り除く たびに、 ハンドシェーク手順を繰り返すこ とをお勧めします。 ハンドシェーク手順により、 保存されているすべ ての値をリセッ トすされますのでご注意く ださい。 <保守点検レベル設定> これは特にライブパフォーマンスに大変便利です。 「サウンドチェック」 中本のレベルに設定します (操作手順9から11を参照) 。 希望の音が得られたら、 コントロールステーションの横にある 「C」 ボタンを約5秒間押し続けます。 LEDがオレンジ色に変わります。 ソーリ ストに接続された電位差計は 「0」 の位置に戻り、 アンプを消すこ とができます。 V/Sのパフォーマンス 「Live」 を開始する前に電源を入れ 直してから...
- Page 14 DON’T CHANGE YOUR SOUND. SIMPLY MAKE IT BETTER. #soulist #elevateyoursoul...
- Page 15 TECHNICAL PARTNERS: All materials used for SOULIST • CM stampi construction have been designed and • ARTICAD realized in order to avoid wireless • TIPOCROM transmission interferences. • ELIT CAUTION: Avoid places of humidity. • Parma Engineering University Department •...
- Page 16 www.soulist.it...
Need help?
Do you have a question about the Soulist and is the answer not in the manual?
Questions and answers