Advertisement
Quick Links
Models/Modelos/Modèles
76455p
76465p
Series/Series/Seria
Write purchased model number here.
Escriba aquí el número del modelo comprado.
Inscrivez le numéro de modèle ici.
p Specify Finish
Especifíque el Acabado
Précisez le Fini
?
1-800-438-6673
www.peerlessfaucet.com
A.
(86mm)
Recommened
2
The minimum recommended distance from the finished wall
A.
the end of the shower arm
(2)
(3) Verify that there is a gasket in the ball joint.
(4) Hand tighten the shower head onto the shower arm. (Shower arm
and flange sold separately.)
may cause product failure or damage and voids the warranty.
Notice: Removal of or tampering with the flow restrictor may result in
shower head failure and will void the warranty.
La distancia mínima recomendada desde la pared acabada
A.
extremo del brazo de la ducha
(3) Verifique que haya una arandela en la junta esférica.
(4) Apriete con la mano el cabezal de ducha en el brazo de la ducha.
(El brazo y la brida de la ducha se venden por separado). NO USE
HERRAMIENTAS. El uso de herramientas puede causar fallas o daños en
el producto y anular la garantía.
Atención: La eliminación o la alteración del limitador de flujo puede causar
la falla del cabezal de la ducha y anular la garantía.
Il est recommandé que la distance minimale entre le mur fini
A.
l'extrémité du bras de douche
(3) Vérifiez s'il y a un joint dans la rotule.
(4) Serrez la pomme de douche sur le bras de douche. (Bras de douche
et bride vendus séparément.) NE PAS UTILISER D'OUTILS. L'utilisation
d'outils peut entraîner une défaillance ou un endommagement du produit et
annuler la garantie.
Avis: Le retrait ou la modification du limiteur de débit peut entraîner une
défaillance de la tête de douche et annuler la garantie.
3/24/2018
3 3/8"
1
4
is 3-3/8" (86 mm).
DO NOT USE TOOLS. The use of tools
(1)
(2)
es de 3-3/8" (86 mm).
(2)
soit de 3-3/8" (86 mm).
93866
3
(1)
to
(1)
B.
Verify that there is a gasket in
(2) Hand tighten one end of the hose onto the shower head and the other
end to the hand shower. DO NOT USE TOOLS. The use of tools may
cause product failure or damage and voids the warranty.
hasta el
(1)
Verifique que haya una arandela en cada tuerca de la manguera en
B.
los extremos de la manguera.
(2) Apriete con la mano un extremo de la manguera en el cabezal
de la ducha y el otro extremo en la ducha de mano.
HERRAMIENTAS. El uso de herramientas puede causar fallas o daños
en el producto y anular la garantía.
(1)
et
(1)
Assurez-vous qu'il y a un joint dans chaque écrou de tuyau aux
B.
extrémités du tuyau.
(2) Serrez une extrémité du tuyau sur la pomme de douche et l'autre
extrémité sur la douchette. NE PAS UTILISER D'OUTILS. L'utilisation
d'outils peut entraîner une défaillance ou un endommagement du
produit et annuler la garantie.
1
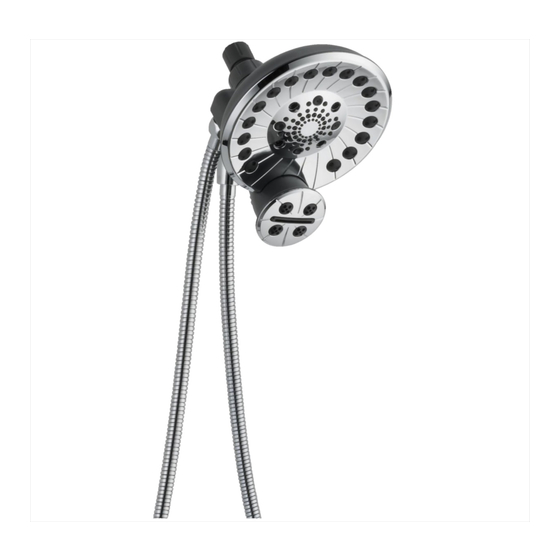
SIDEKICK SHOWER HEAD
CABEZAL DE DUCHA DE SIDEKICK
TÊTE DE DOUCHE ACOLYTE
B.
1
2
each hose nuts on the end of the hose.
NO USE
93866 Rev. B
Advertisement

Related Manuals for PEERLESS 76455


Summary of Contents for PEERLESS 76455
- Page 1 SIDEKICK SHOWER HEAD 93866 CABEZAL DE DUCHA DE SIDEKICK TÊTE DE DOUCHE ACOLYTE Models/Modelos/Modèles 76455p 76465p Series/Series/Seria Write purchased model number here. Escriba aquí el número del modelo comprado. Inscrivez le numéro de modèle ici. p Specify Finish Especifíque el Acabado Précisez le Fini 1-800-438-6673 www.peerlessfaucet.com...
- Page 2 (1) To attach the hand shower to the shower head, make sure that the hand shower controls are facing down and water flow adjustments (2) align with the back of the shower head clasp. Push the hand shower against the shower head clasp until the two parts snap together. (3) To remove the hand shower, pull down on the front of the wand.
- Page 3 Hand Shower Wall Mount (If Applicable) Montaje de Pared con Ducha de Mano (si corresponde) Support mural de douche à main (si applicable) Note: The white paper card is for shipping purposes only; remove and discard before final installation Before installing make sure that the surface is clean, dry and free from steam and moisture. If installing on a smooth surface, skip to step (3).
- Page 4 Remove attachment from hand shower, clean, and dry after use. Sólo para los Modelo 76455 Sólo para los Modelo 76455 (1) Para colocarlo, presione el accesorio de lavado para perros firmemente Para colocarlo, presione el accesorio de limpieza firmemente contra la contra la cara de pulverización de la ducha de mano.
-
Page 5: Cleaning And Care
Backflow Protection Your product is not equipped with backflow protection. In order to make your product backflow compliant, if required by local plumbing code, a vacuum breaker will need to be added. Caution • To avoid injury to a child or pet, aim spray away from eyes, ears, mouth and nose. •... - Page 6 Any labor charges incurred by the purchaser to repair, replace, install or remove this product are not covered by this warranty. Peerless Faucet Company shall not be liable for any damage to the BREACH OF CONTRACT, TORT, OR OTHERWISE. PEERLESS FAUCET COMPANY SHALL...