Table of Contents
Advertisement
Quick Links
AIRBORNE PROJECTS
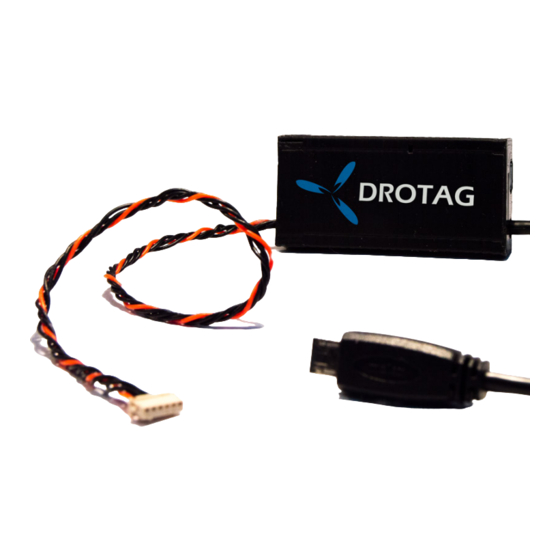
DROTAG - Sony Alpha Series Image Tagging
Airborne Projects specializes in building
drone solutions with emphasis on telemetry
gathering and integration with avionics and
automatic flight systems.
Quick Start Guide
DroTag is a small board that simply sits
between your Sony Alpha Series
camera and your Pixhawk, allowing
you to plan the camera trigger events
and have the pictures taken automati-
cally geo-tagged on the fly.
Upon landing you only need to take out
the card from the DroTag board and
the images are immediately available
and ready to be visualized/used by your
mapping software.
Advertisement
Table of Contents

Summary of Contents for Airborne Projects DROTAG
- Page 1 DROTAG - Sony Alpha Series Image Tagging Quick Start Guide DroTag is a small board that simply sits between your Sony Alpha Series camera and your Pixhawk, allowing you to plan the camera trigger events and have the pictures taken automati- cally geo-tagged on the fly.
-
Page 2: Table Of Contents
9.3 Display is stuck on "Check Connect Device" ......10 Further Information Appendix A How to update DROTAG’s firmware Appendix B Camera compatibility... -
Page 3: Context
1 Context This User Guide’s goal is to get DROTAG working with your tethering camera and your APM based Flight Controller module. DROTAG is a small board that simply sits between your camera and your Flight Controller (like Pixhawk), allowing you to remote trigger the camera (manual or automatically) and have the taken pictures auto- matically geo-tagged. -
Page 4: Sony Alpha 5000 Specifics
Rotate the lens ring until your camera says it is on 4.2 Setup your TELEM Port Parameters This step is required to configure the TELEMETRY Port that you are willing to use your DROTAG board. It only needs to be done once or any time you reset/refactor your parameters. -
Page 5: Preflight Mission Planning
5 Preflight Mission Planning DROTAG relies on APM messages to trigger the camera and add tags to it, so it is worth taking the time to learn how to efficient mission planning. At Airborne Projects we do the planning of the mission and waypoint upload through Mission Planner. -
Page 6: Trigger Method
If you want to know more about the Trigger Methods you should read this page. 6 Flight Checklist Included in the DROTAG package is a checklist to perform before the flight. This checklist is not manda- tory but is a good practice to guarantee that your field work will be flawlessly done. -
Page 7: In Flight Capabilities
Standard guidelines to camera settings are given in the appendix. 5. Power On the UAV general power - This will power all the system as well as the DROTAG board allowing it to take control of the camera. -
Page 8: After Flight Capabilities
The partition that is visible under Windows and that contains the tagged pictures, also contains hidden boot files necessary for DROTAG to boot and start. If you blindly format the card you will also erase this boot files needing to re-image the card, which is a time wasting effort. Reiterating DO NOT FORMAT THE CARD IN WINDOWS. -
Page 9: Display Is Stuck "Camera Usb Connecting
Nothing else should be necessary, unless an amend is published in this manual. Appendix B Camera compatibility This is not an exhaustive list. It serves as a reference for the cameras we guarantee the DROTAG works with. Camera Model... -
Page 10: Appendix C Drotag Camera Configuration
Appendix C DROTAG Camera Configuration DROTAG has the capability of configuring the camera with specific settings when it starts. It is easy to configure this settings. Insert the DROTAG microSD card in your computer and inspect it’s contents. Look for a file called AP1.conf and open it with your favorite text editor. - Page 11 image_size - The size of the image. This a very general setting that may not be available in all cameras. We recommend setting image_size="Large". Possible values for the Image Size of the Sony Alpha Series are: – Large; Medium; Small; shutter_speed - The time the shutter stays open for a given picture trigger and is measured in fractions of a second.
Need help?
Do you have a question about the DROTAG and is the answer not in the manual?
Questions and answers