Table of Contents
Advertisement
Quick Links
Advertisement
Table of Contents

Related Manuals for Omnicomm OKO Light

Summary of Contents for Omnicomm OKO Light
- Page 1 Omnicomm OKO Light Online Video Recorder User Manual 24.08.2021...
-
Page 2: Table Of Contents
Antennas Setting up Video Cameras Network connection setting on the PC Browser setting Omnicomm OKO video camera setting Omnicomm OKO video camera connection and installation Connection to Omnicomm Terminals Adding Video Recorder to Omnicomm Online Sealing LED Indication Firmware Change Log... -
Page 4: General Information
General Information Omnicomm OKO Light Online Video Recorder General Information Omnicomm OKO Light Online video recorder – vehicle equipment designed to record video to the removable media devices and transmit data to Omnicomm Online cloud service. Main functions: video recording from the connected IP cameras... -
Page 5: Technical Specifications
Technical Specifications Technical Specifications Omnicomm OKO Light Communication Data transmission channel FDD LTE B1/B3 TDD LTE B38/B39/B40/B41 TDSCDMA B34/B39 WCDMA CDMA2000 1x/EVDO 900 / 1800 MHz Number of SIM cards Video Number of connected IP video cameras From 1 to 4 Video compression format *.h264... - Page 6 Technical Specifications Omnicomm OKO Light Communication Power supply voltage, V 10…36 Data collection Non-volatile memory capacity, events 150 000 Support of SD cards 2 х 512 Gb Inputs and outputs A/V OUT Interfaces Ethernet Design Dimensions, mm 146,4 х 137 х 40 mm Working temperature range, °С...
-
Page 7: Maximum Recording Time Depending On The Number Of Cameras And Sd Card Capacity
Technical Specifications Maximum recording time depending on the number of cameras and SD card capacity 128 Gb 256 Gb 512 Gb 1 camera 360 hours 720 hours 1440 hours 2 cameras 180 hours 360 hours 720 hours 3 cameras 120 hours 240 hours 480 hours 4 cameras... -
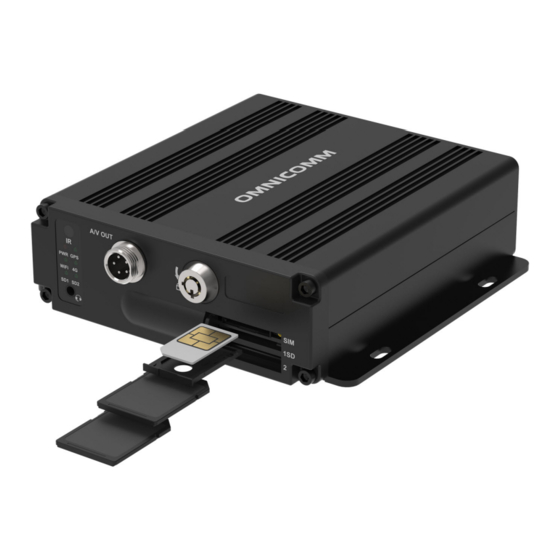
Page 8: Installation
2. Remove the SIM card holder from the connector slots and insert the SIM card into it with contact pieces up 3. Insert the SIM card holder in the connector slots: Insert the SD cards in the respective SD1 and SD2 slots When installing the SD cards, the Omnicomm OKO power must be switched off. -
Page 9: Connector Pin Assignment
Installation Omnicomm OKO Light video recorder supports SD cards up to 512 Gb. A list of recommended SD cards: Kingston SDR/128GB SDXC A1, V30, UHS-I Class 3 , Class 10 Kingston SDR/256GB SDXC A1, V30, UHS-I Class 3 , Class 10... - Page 10 Installation Connectors “CAM1”, “CAM2”, “CAM3”, “CAM4”: No. of pin Name of signal Connector “POWER”:...
- Page 11 Installation No. of pin Name of signal Connector “LAN”:...
- Page 12 Installation No. of pin Name of signal Connector “SENSOR I/O”: No. of pin Name of signal 1-5, 8-20 Not used TX RS-232 RX RS-232...
-
Page 13: Power Supply And Ignition Key
Connection to the power supply circuit and to the ignition key depends on the presence of a ground disconnect switch on the vehicle and the possibility of connecting directly to the ignition key. Connect Omnicomm OKO Light video terminals as per diagrams without a ground disconnect switch: after the ground disconnect switch:... -
Page 14: Terminal
Installation Terminal The video recorder shall be installed inside the vehicle cabin or in specially equipped electrics boxes on the vehicle protected from atmospheric precipitation. The video recorder should be installed on a flat surface. Drill 4 mounting holes Ø5.5 mm. Install the video recorder and fix it with self-tapping screws. -
Page 15: Antennas
Setting up Video Cameras Network connection setting on the PC 1. Switch on the Omnicomm OKO video terminal power 2. Connect the video terminal to a PC via Ethernet interface using a LAN adapter and a patch cord delivered with the video terminal 3. - Page 16 Setting up Video Cameras 4. Open the connection properties window by right-clicking the mouse and selecting “Properties”: 5. Select Internet Protocol Version 4 (TCP/IPv4), press “Properties”, and set the following configuration:...
-
Page 17: Browser Setting
Setting up Video Cameras 6. Press “OK” Browser setting 1. Connect the video camera to any video terminal connector (“CAM1” – “CAM4”) 2. Open Internet Explorer and enter the camera configuration address. By default: 192.168.12.241 3. A window will open to confirm ie.exe installation: 4. -
Page 18: Omnicomm Oko Video Camera Setting
Each video camera is connected and configured individually one by one. Only one camera may be connected at a time. 1. Switch on the Omnicomm OKO video terminal power 2. Connect the video terminal to a PC via Ethernet interface using a LAN adapter and a patch cord delivered with the video terminal 3. -
Page 19: Omnicomm Oko Video Camera Connection And Installation
When several cameras are connected to the video terminal, their IP addresses must be different. Omnicomm OKO video camera connection and installation Perform connection according to the diagram: If necessary, use an extension cord (3, 5, 7, or 10 meters), which can be purchased... -
Page 20: Connection To Omnicomm Terminals
Adding Video Recorder to Omnicomm Online In order to work with Omnicomm Online, Omnicomm OKO Light video recorder have to be connected to the terminal, collected telematics data, installed on a vehicle. To compare video files received from the video recorder with telematics data from the... -
Page 21: Sealing
For more information see Omnicomm Online. Administration Guide Sealing Sealing of a lock is provided for Omnicomm OKO Light terminals. Apply a seal sticker onto the lock so that it is impossible to insert the locking key without breaking the sticker. -
Page 22: Led Indication
LED Indication LED Indication Indicator Indication mode Value Power off (red) Permanently Power on lighted Module power supply off (green) Permanently Within the GSM network coverage, exchange with video server is lighted performed SD1, Video recording is not performed (green) Permanently SD card failure. -
Page 23: Firmware Change Log
Firmware Change Log Firmware Change Log Date Firmware Version Changes... - Page 24 www.omnicomm-world.com...
Need help?
Do you have a question about the OKO Light and is the answer not in the manual?
Questions and answers