Table of Contents
Advertisement
Quick Links
INSTALLATION AND START-UP MANUAL
REGOLATORE
MULTIPROCESSORE
DIGITAL CONTROLLERS
TIPO / TYPE
NX2-00
INDICE
1. Informazioni generali di sicurezza
2. Istruzioni di montaggio
3. Ingressi e uscite informazioni
4. Collegamenti elettrici
5. Tabella dei Parametri
6. Pannello e funzioni
7. Taratura
8. Gruppo di controllo
9. Selezione Ingressi
10. Selezione uscite
11. Ritrasmissione
12. Setup gruppo allarmi
13. Selezione P.I.D.
14. Auto Tuning
15. Impostazione Set Remoto
Dichiarazione di Conformità 2006/95/EC
Certificato UL
Via Lecco, 69/71 - 20864 AGRATE BRIANZA (MB) - ITALY
Servizio Assistenza - Servicing Department
Telefono - Phone : +39 - (0)39 - 651705 / 650397
Fax : +39 - (0)39 – 654018
E-mail:
servicing@conflow.it
Web:
INDEX
1.General and safety information
2.Installation instructions
3.Input & Output information
4.Wiring diagram – terminal arrangement
5.Table of setting items
6.Name and functions of front panel
7.Setting method
8.Control group
9.Input type selection
10.Output group setting
11. Retransmission
12.Alarm setup group
13.P.I.D. Selection
14. Auto Tuning
15.Set value setup group
Declaration of conformity 2006/95/EC
UL Certification
www.conflow.it
M/NX2/I/E
02
2017
Advertisement
Table of Contents

Related Manuals for CONFLOW NX2-00

Summary of Contents for CONFLOW NX2-00
- Page 1 M/NX2/I/E 2017 INSTALLATION AND START-UP MANUAL REGOLATORE MULTIPROCESSORE DIGITAL CONTROLLERS TIPO / TYPE NX2-00 INDICE INDEX 1. Informazioni generali di sicurezza 1.General and safety information 2. Istruzioni di montaggio 2.Installation instructions 3. Ingressi e uscite informazioni 3.Input & Output information 4.
-
Page 2: General And Safety Information
1 - INFORMAZIONI GENERALI E DI SICUREZZA 1 – GENERAL AND SAFETY INFORMATION Prima di installare il regolatore NX2-00 prendere visione delle Before installing digital controller NX2-00 take good notice seguenti informazioni. of following information. WARNING ATTENZIONE Use an external protection circuit if a... -
Page 3: Input & Output Information
3 – INGRESSI E USCITE - INFORMAZIONI 3 – INGRESSI E USCITE - 3 – INPUT & OUTPUT INFORMATION 3 – INPUT & OUTPUT INFORMATION Scegliere il codice e il corrispondete tipo di ingresso Scegliere il codice e il corrispondete tipo di ingresso Choose the code and the correspondent input and output Choose the code and the correspondent input and output e uscita. -
Page 4: Collegamenti Elettrici
4 – COLLEGAMENTI ELETTRICI 4 – WIRING DIAGRAM – TERMINAL ARRANGEMENT Eseguire i collegamenti elettrici secondo lo schema sotto Make the electrical connections according to the following riportato, sul fianco dello strumento è riportato lo stesso diagram, on the side of the instrument it is given the same schema serigrafato. - Page 5 5 – TABELLA DEI PARAMETRI 5 – TABLE OF SETTING ITEMS...
- Page 6 5 – TABELLA DEI PARAMETRI segue 5 – TABLE OF SETTING ITEMS follows...
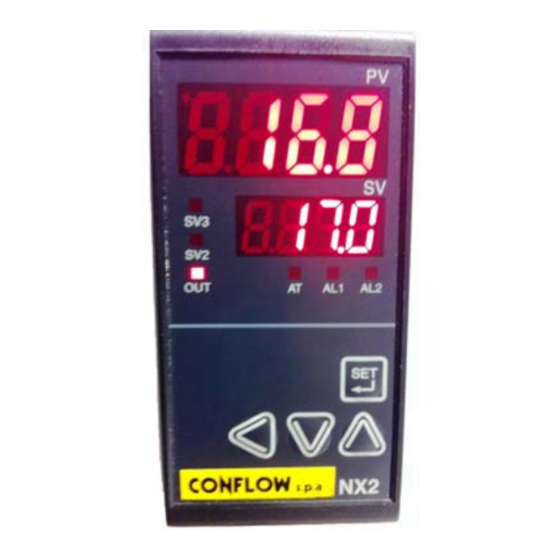
- Page 7 6 – PANNELLO e FUNZIONI 6 – NAME and FUNCTIONS OF FRONT PANEL SV2-SV3 = Si illuminano quando PV = Valore di processo temperatura o vengono visualizzati SV2-SV3 pressione PV = Process value temperature or pressure SV2-SV3 = Lights when the SV2- SV3 is displayed SV = Valore da impostare OUT = Si illumina quando l’uscita è...
- Page 8 7 - TARATURA 7 – SETTING METHOD Per entrare nella programmazione premere To enter inside control group push for 3 seconds, it appears (display per 3 secondi, appare (display valore factory setting3) selection mode, than push second time di fabbrica 3) modalità di selezione, quindi premere una seconda volta Practice Note: Nota pratica :...
-
Page 9: Control Group
8 – GRUPPO DI CONTROLLO 8 – CONTROL GROUP Control group Il gruppo di controllo Prevede il seguente sotto menù It provides the following submenu... -
Page 10: Selezione Ingressi
9 – SELEZIONE INGRESSI 9 – INPUT TYPE SELECTION Una volta entrati nel sotto menù Once in the submenu Selezionare tutti sottopunti, Select all sub-points, per entrare premere To enter push per selezionare premere To select push per confermare premere To confirm push Per quanto riguarda il sottopunto As for the sub... - Page 11 10 – SELEZIONE USCITE 10 – OUTPUT GROUP SETTING Una volta entrati nel sotto menù Once in the submenu Selezionare tutti sottopunti, Select all sub-points, per entrare premere To enter push per selezionare premere To select push per confermare premere To confirm push Per quanto riguarda il sottopunto As for the sub...
- Page 12 11 – RITRASMISSIONE 11 – RETRANSMISSION Una volta entrati nel sotto menù .Once in the submenu Selezionare tutti sottopunti, Select all sub-points, per entrare premere To enter push per selezionare premere To select push per confermare premere To confirm push...
- Page 13 12 – SETUP GRUPPO ALLARMI 12 – ALARM SETUP GROUP Ci sono 2 uscite di allarme disponibili per Regolatore. There are 2 alarm outputs available per controller. Nel gruppo allarmi le impostazioni sono fatti per la modalità, In alarm group, setting are made for mode, dead band and banda morta e il valore di ogni allarme.
- Page 14 12 – SETUP GRUPPO ALLARMI segue 12 – ALARM SETUP GROUP to be continued...
- Page 15 13 – SELEZIONE P.I.D. 13 – P.I.D. SELECTION Una volta entrati nel sotto menù Once in the submenu Selezionare tutti sottopunti, Select all sub-points, per entrare premere To enter push per selezionare premere To select push per confermare premere To confirm push Nell’ambito del parametro Within the parameter è...
-
Page 16: Auto Tuning
14 – AUTO TUNING 14 – AUTO TUNING ATTENZIONE ! WARNING ! Si prega di non usare la funzione Auto tuning nei seguenti Please do not use Auto tuning in following cases : casi : Quick response control process – flow and pressure - Processi con risposta rapida –... - Page 17 15 – IMPOSTAZIONE DEL SET REMOTO (SV) 15 – SET VALUE (SV) SETUP GROUP Nel gruppo di impostazione valori set (SV), è possibile In the set value ( SV) setup group, you can setup 3 kinds in advance (1,2,3 SV) then select each value by external impostare 3 tipi di set remoto (1,2,3 SV) dal pannello frontale, è...
Need help?
Do you have a question about the NX2-00 and is the answer not in the manual?
Questions and answers