Advertisement
Available languages
Available languages
Quick Links
Advertisement

Subscribe to Our Youtube Channel
Related Manuals for habitat et jardin Troti 2


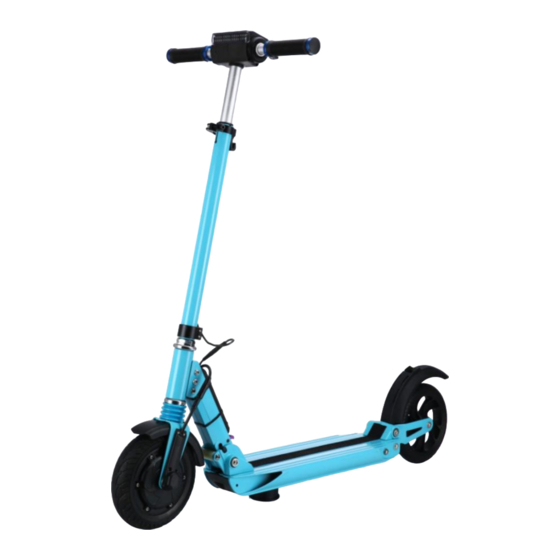
Summary of Contents for habitat et jardin Troti 2
- Page 1 Troti 2 1408_99304...
- Page 2 1408_99304 Responsable de la commercialisation du produit / Company in charge of commercializing the product / Responsable de la comercialización del producto / Responsabile della commercializzazione del prodotto: GECODIS SA 32, rue de paradis 75010, Paris, France Service commercial/ Commercial service/ Servicio comercial / Servizio commerciale : Habitatetjardin.com 32, rue de paradis 75010, Paris, France...
- Page 4 SAFTY WARNING The product is for adults only, limited for one adult, please do not carry two adults at the same time. Is not suitable for minors. Please wear your safety helmet and other protective equipment when riding. Do not ride in traffic lane or unsafe roads and do not break local regulations Please exercise in wide areas, and ride after skilled manipulation, do not ride in traffic lane.
-
Page 5: Using Instruction
USING INSTRUCTION Folding stages A. unfolded B. folding handlebars C. fully folded Folding steps 1.Open the lock lever, in the direction of arrow, as shown in figure (a). 2.Press the red button, figure (b), at the same time press down handlebars as shown in figure (c) and push the lock lever to the lock position. - Page 6 3.Hold the handlebar with both hands, push buttons (1) shown in Figure (d). Pull out the handlebar grips, figure d, up to a maximum and fold downwards to reach that figure B, from previous page. 4.Push the handlebar forward, press folding lever in the direction of the arrow in the figure (f) 5.Continue folding scooter until folding hook reaches and hangs the bolt located on the rear brake Unfolding steps 1.Press the rear brake in the direction of the arrow in the figure (a) until folding hook releases the...
- Page 7 OPERATION ① Accelerator ② Electronic Magnetic Brake ③ Horn ④ Setting ⑤ Power on/off ⑥ Light on/off ⑦ LCD Display ⑧ gearshift Operating Instructions Power on/off: Press the switch for 1 sec, and the display is on. Press for 3 seconds if you want to turn it off.
- Page 8 LED Headlight:Press the Light button there will be a sign in display which indicates the light is turned on. Press the button again, and the light will be turned off. Mileage: There are three modes: total, trip and time. You can press the settings button to change it. When it displays the 'trip' mode, press the setting button for 3 seconds and it will clear the mileage and accumulate it again.
-
Page 9: Maintenance
MAINTENANCE If the car body surface stains, use toothpaste with soft cloth to wipe, and then clean them with a damp cloth. Do not use alcohol gasoline, kerosene or other corrosive, volatile chemical substance for the cleaning, otherwise the surface of the body and internal structure will be seriously damaged. Do not use pressure washer to wash. - Page 10 PIECES PRINCIPALES...
-
Page 11: Guide Utilisateur
GUIDE UTILISATEUR SÉCURITÉ Le produit est réservé aux adultes, limité à un adulte. Ne pas transporter deux adultes en même temps. Ne convient pas aux mineurs. Le port du casque et autres protections est fortement conseillé pendant l’utilisation de la trottinette. Ne pas utiliser le produit sur les voies de circulation automobile ou sur terrains dangereux. - Page 12 PRODUITS Étapes de pliage A – Déplié B – Guidon plié C-Entièrement plié...
- Page 13 Etapes de pliage 1. Ouvrez le clapet de verrouillage dans le sens de la flèche, comme indiqué sur l’image (a). 2. Appuyez sur le bouton rouge, image (b), et poussez en même temps le guidon comme indiqué sur l’image (c) . Poussez ensuite le levier de verrouillage vers la position de verrouillage.
- Page 14 Etapes de dépliage Pousser Presser 1. Appuyez sur le frein arrière dans le sens de la flèche sur l’image (a) jusqu'à ce que le crochet libère le boulon situé sur le frein arrière. Ensuite, soulevez le guidon jusqu’à ce qu’il atteigne la position de travail et que le boulon de verrouillage se mette en place, comme dans l’image (b).
- Page 15 FONCTIONNEMENT Introduction au guidon 1. Gâchette d’accélération 2. Gâchette de freinage 3. Klaxon 4. Bouton de réglage 5. Bouton d’allumage 6. Bouton d’éclairage 7. Afficheur LCD 8. Mode pour la vitesse Instructions d’utilisation Interrupteur: Pour mettre sous tension, appuyer le bouton interrupteur pendant 1 sec. Appuyer sur le bouton pendant 3 sec pour l’éteindre.
- Page 16 existe trois niveaux de vitesse et appuyez sur le bouton de vitesse pour le régler : faible,moyenne, rapide Contrôle du freinage: Appuyer sur la gâchette de freinage de gauche pour ralentir. L’intensité de freinage dépend de la pression exercée sur la gâchette Klaxon: Mettre sous tension la trottinette et appuyer sur le bouton de klaxon pour klaxonner.
-
Page 17: Entretien
Batterie Veuillez ne pas utiliser le chargeur d'autres marques. Il est fortement recommandé de charger complètement la batterie de la trottinette électrique avant la première utilisation. Si la trottinette n’est pas utilisée pendant une période prolongée, veuillez recharger la batterie tous les 3 mois. Instruction pour la charge de la batterie Pour recharger la batterie veuillez suivre les instructions suivantes : 1) ouvrir le couvercle et insérer le connecteur du chargeur dans le trou prévu à... - Page 18 A température ambiante, la batterie peut fournir une performance plus élevée. La performance de la batterie diminuera sous les 0 ° Celsius. Ainsi à -15 ° Celsius, la batterie n’affichera que la moitié de la performance standard. Une batterie pleine sera complètement déchargée après environ 90 jours d’inutilisation. Si la batterie n'est pas rechargée dans les temps, elle risque d'être endommagée de façon irréversible en raison d’une décharge excessive.
- Page 19 Only for children’s product: Attention ! Ne convient pas aux enfants de moins 3 ans. Petites parties – Danger d’étouffement. Présence de cordes – Danger de strangulation. Warning! Not suitable for kids under 3 years hold. Tiny pieces – Danger of suffocation. Presence of rope –...
Need help?
Do you have a question about the Troti 2 and is the answer not in the manual?
Questions and answers