Table of Contents
Advertisement
Advertisement
Table of Contents

Summary of Contents for Metrohm Optrode
- Page 1 Optrode Manual 8.109.8054EN / 2015-10-06...
- Page 3 Metrohm AG CH-9100 Herisau Switzerland Phone +41 71 353 85 85 Fax +41 71 353 89 01 info@metrohm.com www.metrohm.com Optrode Manual 8.109.8054EN / 2015-10-06 dm/ebe...
- Page 4 Technische Dokumentation Metrohm AG CH-9100 Herisau techdoc@metrohm.com This documentation is protected by copyright. All rights reserved. This documentation has been prepared with great care. However, errors can never be entirely ruled out. Please send comments regarding possible errors to the address above.
-
Page 5: Table Of Contents
Connecting to a Ti-Touch ............. 6 Connecting to a Titrino plus ..........6 Power supply with USB power supply unit ......7 Installing the Optrode ............7 4 Operation and maintenance Setting the wavelength ............10 Sensor care ................12 5 Troubleshooting ..................... - Page 6 Figure 6 Power supply at the USB connector of a Titrino plus ......6 Figure 7 Connecting the Optrode to a Titrino plus ........... 7 Figure 8 Diagrams showing propeller stirrer, sensor and titration tip during a titration. a) clockwise stirring direction, b) counterclockwise stirring direction.
-
Page 7: Introduction
Optrode to be used for titration like other sensors. Intended use The Optrode is designed for use with a titrator in analytical laboratories. It is intended solely as an optical sensor for photometric titrations. This sensor can be used in chemicals and flammable solvents. Usage of the Optrode therefore requires the user to have basic knowledge and experience in handling toxic and caustic substances. -
Page 8: Symbols And Conventions
This symbol draws attention to a possible hazard due to heat or hot instrument parts. WARNING This symbol draws attention to a possible biological hazard. CAUTION This symbol draws attention to possible damage to instruments or instrument parts. NOTE This symbol highlights additional information and tips. ■■■■■■■■ Optrode... -
Page 9: Recycling And Disposal
The correct disposal of your old equipment will help to prevent negative effects on the environment and public health. More details about the disposal of your old equipment can be obtained from your local authorities, from waste disposal companies or from your local dealer. ■■■■■■■■ Optrode... -
Page 10: Overview
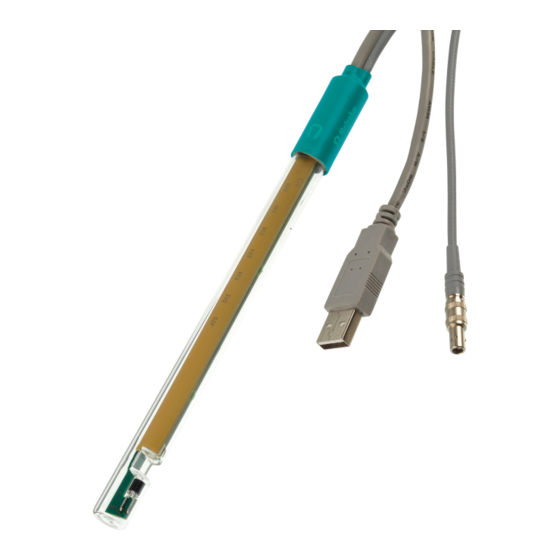
■■■■■■■■■■■■■■■■■■■■■■ 2 Overview Figure 1 Optrode – Overview USB plug SGJ sleeve For supplying the sensor with power. Storage vessel (6.2008.040) Sensor F plug For connecting to a titrator (connector Ind.). Magnetic switch Optical circuit board For switching between the LEDs. -
Page 11: Installation
3 Installation 3 Installation The Optrode's USB cable is used to supply power to the electronics and the sensor's light source. The actual sensor cable (measuring signal) has a conventional F plug for connecting to the indicator measuring input (Ind.) on a titrator. -
Page 12: Connecting To A Ti-Touch
Connecting to a Ti-Touch Figure 4 Power supply at the USB connector of a Ti-Touch Figure 5 Connecting the Optrode to a Ti-Touch Connecting to a Titrino plus 6.2151.100 Figure 6 Power supply at the USB connector of a Titrino plus ■■■■■■■■... -
Page 13: Power Supply With Usb Power Supply Unit
■■■■■■■■■■■■■■■■■■■■■■ 3 Installation In order to connect the Optrode's USB cable to a Titrino plus, a USB Mini (OTG) - USB A (6.2151.100) adapter is required (see figure). Figure 7 Connecting the Optrode to a Titrino plus Power supply with USB power supply unit A 6.2166.000 USB power supply unit is available if power to the Optrode... - Page 14 ■■■■■■■■■■■■■■■■■■■■■■ 3.5 Installing the Optrode The sensor must be firmly installed on the titration head. Particularly when automation is used, you have to account for the cable movement. During the titration, it is important that the solution is well mixed. The stir- ring rate should be high enough to form a small vortex.
-
Page 15: Figure 8 Diagrams Showing Propeller Stirrer, Sensor And Titration Tip During A
■■■■■■■■■■■■■■■■■■■■■■ 3 Installation Figure 8 Diagrams showing propeller stirrer, sensor and titration tip during a titration. a) clockwise stirring direction, b) counter- clockwise stirring direction. Propeller stirrer Sensor Titration tip ■■■■■■■■ Optrode... -
Page 16: Operation And Maintenance
4 Operation and maintenance Setting the wavelength The Optrode has eight LEDs (LED = light-emitting diode) on its optical cir- cuit board that serve as light sources. Each LED emits light in a different wavelength range. The LEDs are labeled with their primary wavelength on the optical circuit board. -
Page 17: Figure 10 Switching The Led
Switching between LEDs via tiamo The Optrode is recognized automatically by the control software tiamo (version 2.5 and higher). However, this only works if the Optrode is con- nected directly to the titrator or control instrument via USB. The wavelength is changed as follows in tiamo: 1 Double-click on the command in the method run. -
Page 18: Sensor Care
The wavelength remains set even if the Optrode is switched off or the power supply is interrupted (USB connection). Sensor care The Optrode does not require any special care. Store the sensor dry in the storage vessel provided. If it becomes dirty, the Optrode's glass shaft can be cleaned with warm water and a small amount of detergent or ethanol. -
Page 19: Troubleshooting
■ ple amount / fill volume. No light. None of There is no power supply Connect the Optrode to a USB port on a ■ the LEDs are lit up. to the Optrode. titrator or a USB power supply unit. - Page 20 ■ sured value is con- Dilute the solution. ■ stant at approxi- The Optrode is dirty. Clean the sensor, particularly the smooth sur- mately 0 mV. faces in the measuring gap (see Chapter 4.2, page 12). Signal is too high.
-
Page 21: Technical Specifications
■■■■■■■■■■■■■■■■■■■■■■ 6 Technical specifications 6 Technical specifications Optrode 6.1.1 Measuring mode Measured quan- Absorption tity (For titration only) 6.1.2 Resolution Potential 0.1 mV 6.1.3 Measuring interval Measuring cycle 3 ms 6.1.4 Ambient conditions Operating temper- 0 - 40 °C ature... -
Page 22: Safety Specifications
■■■■■■■■■■■■■■■■■■■■■■ 6.1 Optrode 6.1.8 Safety specifications This instrument fulfills the following electrical safety requirements: CE marking in accordance with the EU directives: 2004/108/EC (EMC Directive, EMC) ■ Design and testing According to EN/IEC/UL61010-1, protection class III. Safety instructions This document contains safety instructions which have to be followed by the user in order to ensure safe operation of the instrument. -
Page 23: Index
Light sources ......10 Sunlight ........7 wavelength ......10 Switch ........4 Wavelength ....4, 10, 11, 15 Switch LED ......10, 11 Wavelength ranges ....10 Magnet ........10 Symbol ........10 Magnet symbol ......10 ■■■■■■■■ Optrode...
Need help?
Do you have a question about the Optrode and is the answer not in the manual?
Questions and answers