
Subscribe to Our Youtube Channel
Summary of Contents for Ravenna Luisi Air H950100006
- Page 1 INSTALLATION, USE AND MAINTENANCE INSTRUCTION INSTRUCTION D’INSTALLATION ET D’UTILISATION RAVENNA SLT966...
- Page 2 The symbol on the product or on its packaging indicates that this product may not be treated as household waste. Instead it shall be handed over to the applicable collection point for the recycling of electrical and electronic equipment. By ensuring this product is disposed of correctly, you will help prevent potential negative consequences for the environment and human health, which could otherwise be caused by inappropriate waste handling of this product. For more detailed information about recycling of this product, please contact your local city office, your household waste disposal service or the shop where you purchased the product.
- Page 3 CONTENTS Warnings Uses Free standing installation Built-in installation Working Maintenance...
- Page 4 If the rating lable in the coo- WARNINGS ker-hood does not show the symbol, the appliance is bu- ilt in class I° and it needs the earth connection. The appliance is not inten- ded for use by young chil- dren or infirm persons wi- When performing the elec- thout supervision. Young trical connections on the ap- children should be super- pliance, please make sure that...
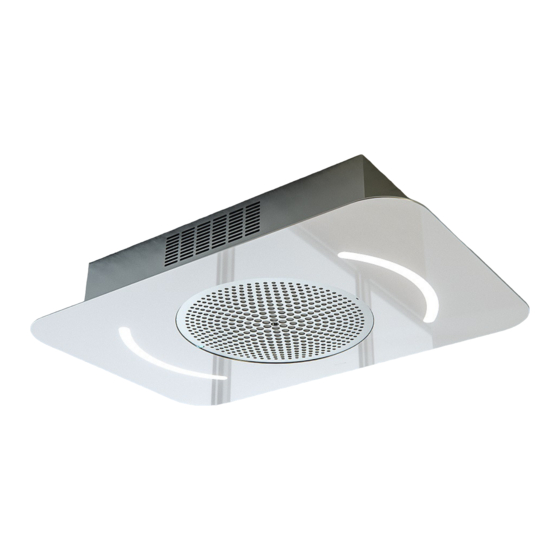
- Page 5 The use of materials which USES can burst into flames should be avoided in close proxi- mity of the appliance. When PANELS OPENING frying, please pay particular The grease filters cover panels are opened by attention to fire risk due to slightly pulling them , as shown in fig. 1. oil grease.
- Page 6 SLT966 SLT967 SLT966 SLT967 FREE STANDING – FILTERING BUILT IN – SUCKING VERSION VERSION INSTALLATION BUILT IN Take the product out of the packaging and Take the product out of the packaging and pla- place it on a suitable surface: we suggest to ce it on a suitable surface: we suggest to use a use a soft material, such as a sponge or a soft material, such as a sponge or a cloth.
- Page 7 SLT966-EM SLT967-EM DIMMABLE LIGHTS FUNCTION EXTERNAL MOTOR This function provides for lights dimmability, BUILT-IN INSTALLATION ranging from 20% to 100% , by continuously pressing the light key on the remote control. The product SLT966 SLT967 EXTERNAL MO- Functions are the following: TOR version can be installed by following the same instruction of SLT966 SLT967 BUILT-IN - Hood light off shortly press the key light DUCTING (as described on the previous page).
- Page 8 for two seconds. When Leds light on, press WARNIING buttons: The battery should be replaced every year to guarantee the optimal range of the transmitter. To replace the exhausted battery, take the (within 5 seconds). Leds flashing 3 times in- plastic lid off, remove the battery and re- dicate place it with a new one, observing the cor- the procedure is completed. rect battery polarities.
-
Page 9: Maintenance
TIMING MAINTENANCE As a result of the new EU65 “Energy label” and EU66 “ Ecodesign” regulations issued by the European Commission, which came into force as from January 1st, 2015 , our products have An accurate maintenance guarantees good been adapted to comply with these new re- functioning and long-lasting performance. quirements. - Page 10 INDEX Avertissements Emploi Installation freestanding Installation encastrable Fonctionnement Entretien...
- Page 11 pièce de prises d’air alimen- ATTENTION tant un flux d’air frais con- stant. * Lors du raccordement élec- * Les enfants, les personnes trique assurez-vous que la dépendantes ou handicapée prise de courant soit munie de ne peuvent utiliser l’appareil mise à...
- Page 12 * Evitez d’utiliser des ma- EMPLOI tériaux qui causent des flam- bées à proximité de l’appa- reil. Dans le cas de fritures, faites tout particulièrement OUVERTURE DES PANNEAUX attention au danger d’incen- Ouvrez les panneaux qui recouvrent les filtres die que représentent les hui- à graisse en les tirant doucement, comme in- diqué...
- Page 13 INSTALLATION VERSION FREE INSTALLATION VERSION STANDING - RECYCLAGE BUILT IN Sortez le produit de son emballage et posi- Sortez le produit de son emballage et posi- tionnez-le dans un endroit approprié ; nous tionnez-le dans un endroit approprié ; nous conseillons d’utiliser un matériel doux tel conseillons d’utiliser un matériel doux tel qu’une éponge ou un chiffon sur lequel placer...
- Page 14 Il est possible de choisir l’une des trois sor- FONCTION ÉCLAIRAGE DIMMABLE ties d’air indiquées dans la Fig. 6. Sur la sortie Cette fonction permet de régler l’intensité choisie installez la bride en plastique ; fermez d’éclairage de 20% à 100% en gardant ap- les deux autres sorties par les bouchons en puyée la touche d’éclairage de la télécom- métal appropriés Fig. 6.
- Page 15 MODE DE FONCTIONNEMENT dans les 5 secondes), 6 clignotements des Configuration standard: leds indiqueront que l’opération a été com- La configuration d’usine prévoit que tous les plétée. systèmes “ hotte - radiocommande “ aient le ATTENTION! Cette opération efface défini- même code de transmission. Si deux systè- tivement les codes préexistants. mes “hotte – radiocom- mande” sont installés dans la même pièce ou à...
-
Page 16: Entretien
TEMPORISATEUR ENTRETIEN Nos produits ont été adaptés pour se con- former aux nouvelles normes de l’Union Eu- ropéenne en matière de l’EU65 « Étiquette-Énergie » et Un entretien soigné est une garantie de bon l’EU66 « Écoconception » (à partir du 1er fonctionnement et de bon rendement de vo- janvier 2015). tre appareil dans le temps. La nouvelle électronique des produits ayant Un soin particulier doit être porté aux filtres l’...
Need help?
Do you have a question about the Luisi Air H950100006 and is the answer not in the manual?
Questions and answers