Table of Contents
Advertisement
Quick Links
● Please read and understand the product specification before operate instrument.
For adverse consequences caused by wrong operation, our company is not responsible for.
● The contents of the operation manual may make changes and improvement in the future, there
will be not the notice, please understanding.
● If found abnormal phenomenon in the process of use, please do not hesitate to contact our
company.
● Please keep the operation manual, at the same time, please be sure to fill in and send the warranty
card to our after-sales service center.
3, Hagavish st. Israel 58817 Tel: 972 3 5595252, Fax: 972 3 5594529
Vacuum Oven
DVO Series
Operation Manual
MRC.7.21
mrc@mrclab.com
Advertisement
Table of Contents

Summary of Contents for mrclab DVO Series
- Page 1 Vacuum Oven DVO Series Operation Manual ● Please read and understand the product specification before operate instrument. For adverse consequences caused by wrong operation, our company is not responsible for. ● The contents of the operation manual may make changes and improvement in the future, there will be not the notice, please understanding.
-
Page 2: Table Of Contents
Contents 1.Safety instruction 2.Application 3.Structure 4.Working condition 5.Technical parameters 6.Instrument operation 7.Display instructions 8.Wiring 9. Points for attention 10. Maintenance 11. Problem solution... -
Page 3: Safety Instruction
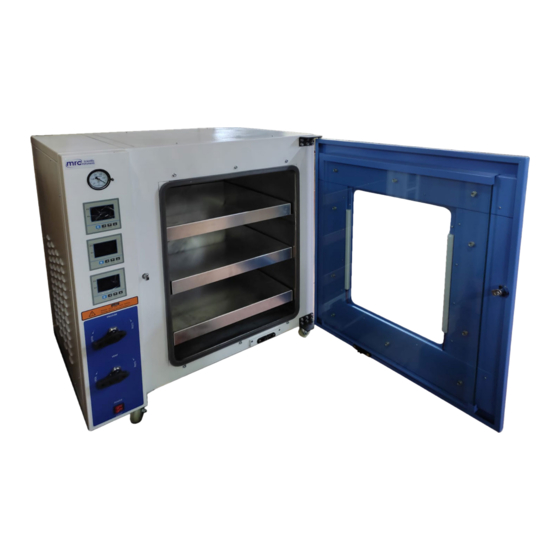
1. Safety instruction Dangerous! 1. Must be connect with the ground. 2. When the instrument is smoking vacuum or heating, do not allow to touch the door and window, must stand at more than one-meter distance from door. 3. Shall not dry inflammable, explosive, volatile and corrosive substances. 4. - Page 4 ensuring sealing between the box door and work room, which improved the vacuum degree greatly. DVO type has square workroom. 1. Vacuum gauge 2. LED light switch 3. PID temperature controller 4. Power switch 5. Vacuum valve 6. Inert gas inlet valve 7.
-
Page 5: Working Condition
4. Working condition (1). Environment temperature: +5~40 (2). Relative humidity: ≤85%RH (3). Atmospheric pressure: 86~106Kpa (4). Around without intense shaking, clearance is more than 50 cm. (5). There are not direct sunlight and heat radiation. (6). There is not a strong airflow blowing straight body. (7). -
Page 6: Instrument Operation
Chamber 300x300x275 415x370x345 450x450x450 560x640x600 size Product size 580x450x450 720x525x535 615x590x635 1050x760x910 Max no. Standard no. Shelf YES(shelf YES(shelf Adjustable heating NO) heating NO) 6. Instrument operation (1). Installation Put the vacuum oven at the place in the room with good air conditions and without succession. There should no inflammable, explosive and corrosive air in the surroundings of instrument. -
Page 7: Display Instructions
time, in this way, you could reduce or stop the overshoot temperature. 4. Different articles with different humidity required different drying time. If longer drying time required and the vacuum degree reduced, exhaust air and make vacuum circumstances again and vacuum pump and then open the vacuum valve. - Page 8 2.Main technical parameters 1) Power: 220V±10%..AC; 2) Environmental temperature: 0~50℃; 3) Relative Humidity: < 85%RH; 4) Range of temperature: RT~250.0℃; 5) Range of time: 1 ~ 9999 minutes; 6) Temp fluctuation: ±1℃ 3. Panel Instructions 1. Function key(SET) 2. Shift key—Press and hold for 5 seconds to self-tuning 3.
- Page 9 (Pt) (2) Press the SET function key for 1 second to enter the first menu, the upper row displays which is the required set temperature, and then press the SET function key, the upper row displays ,which is the required time setting, and then press the SET function key to save. (3) Press the SET function key for 5 seconds to enter the setting parameters required by the second menu (according to Table 1), and then press the SET function key for 5 seconds to save the setting value.
- Page 10 4.5. Internal parameters settings Parameter table 1 Setting Factory First menu Prompt Name Description range default Master Control Press “SET” Full range Random setting Timing when temperature Press “SET” Timing setting 0-9999 reach the set value Second menu Press “SET” key for 5 seconds to enter. After value setting press “SET” key for 5 seconds to log out and save. Setting Factory Serial number...
-
Page 11: Wiring
8. Wiring 72*72 DFD SCR output Relay output ,Voltage output , Zero crossing trigger... - Page 12 48*48 DFG Relay output ,Voltage output...
- Page 13 96*96 DFA...
-
Page 14: Points For Attention
80*160 DFW 9. Points for attention 1. The vacuum dry box must be grounding effectively for ensuring safety. 2. when the vacuum dry box don’t need to connect with air exhausting, close the vacuum valve firstly, then close the power lf vacuum pump, at the same time, open air press valve of vacuum pump, otherwise the pump oil will flow backward to the box. -
Page 15: Problem Solution
and cover the plastic protective cover, put it in a dry room for avoiding the damage of parts and affecting the use result. 11. Problem solution Phenomenon Reassons Treatment No power supply The socket has no power Check the line and change supply the socket The socket isn ’t plug well or...

Need help?
Do you have a question about the DVO Series and is the answer not in the manual?
Questions and answers