Table of Contents
Advertisement
Quick Links
Solar Pool or Water Pump / Water Heater
AC Hybrid Solar Converter
Run your equipment from the Sun / AC Grid even
both at the same time
User Manual
SUN-1K-G, SUN-2K-G, SUN-3K-G
Global Tech China Ltd, 3 Floor, Wai Yip Industrial Building.171 Wai Yip Street,
Kwun Tong, Kowloon, Hong Kong.
Tel: +852 2884 4318 Fax: +8522884 4816
www.sunsynk.com / sales@globaltech-china.com / www.globaltechhk.com
Version 1.1 (10/19/2020)
Advertisement
Table of Contents

Summary of Contents for SunSynk SUN-1K-G
- Page 1 User Manual SUN-1K-G, SUN-2K-G, SUN-3K-G Global Tech China Ltd, 3 Floor, Wai Yip Industrial Building.171 Wai Yip Street, Kwun Tong, Kowloon, Hong Kong. Tel: +852 2884 4318 Fax: +8522884 4816 www.sunsynk.com / sales@globaltech-china.com / www.globaltechhk.com Version 1.1 (10/19/2020)
-
Page 2: Table Of Contents
INDEX 1. PHOTOVOLTAIC HYBRID SOLAR CONVERTER (ZERO EXPORT INVERTER) ......6 1.1. A .........................6 PPEARANCE NTRODUCTION 1.2. P ..............................7 ARTS LIST 2. SAFETY WARNINGS AND INSTRUCTIONS ..................7 2.1. S .............................8 AFETY IGNS 2.2. S ..........................8 AFETY NSTRUCTIONS 2.3. N ............................9 OTES FOR SING 3. - Page 3 7.1. L ......................22 IMITER UNCTION IRING IAGRAM 7.2. U ........................... 23 SE OF IMITER UNCTION 7.3. N ......................24 OTES WHILE USING LIMITER FUNCTION 8. GENERAL OPERATION ........................25 8.1. T ..........................26 NITIAL NTERFACE 8.2. D ..........................27 EVICE NFORMATION 8.3.
- Page 4 LIST OF FIGURES 1 – PV ..............................6 IGURE SYSTEM DESCRIPTION 2 - F )........................6 IGURE RONT VIEW LEFT AND BOTTOM VIEW RIGHT 3 - A ..............................7 IGURE CCESSORIES DRAWING 4 – P .................................... 9 IGURE ANEL 5 - R...
- Page 5 LIST OF TABLES 1 - PV ..............................6 ABLE SYSTEM DESCRIPTION 2 - P ..................................7 ABLE ARTS LIST 3 - I ..................................10 ABLE NDICATORS 4 - DC ..............................16 ABLE CABLE SPECIFICATION 5 - C .
-
Page 6: Photovoltaic Hybrid Solar Converter (Zero Export Inverter)
The Hybrid Converter / Inverter can convert solar panel DC power into AC power, which can directly input to the grid. This manual is used for SUN-1K-G, SUN-2K-G and SUN-3K-G models and the appearance of these inverters is shown in Figure 2. -
Page 7: Parts List
Improper use of the inverter will cause electric shock and burn during the installation and maintenance. Please read the user manual carefully before using the inverter. Also, operate the inverter in strict accordance with this manual and please keep the instructions properly for afterward use. Website: www.sunsynk.com E-mail: sales@globaltech-china.com... -
Page 8: Safety Signs
While disconnecting the input and output of the inverter for maintenance, please wait for at least 5 minutes until the inverter discharge the remnant electricity. Shock Hazard: When the solar array is exposed to sunshine, it will generate a high DC voltage on it. It is prohibited touching. Website: www.sunsynk.com E-mail: sales@globaltech-china.com... -
Page 9: Notes For Using
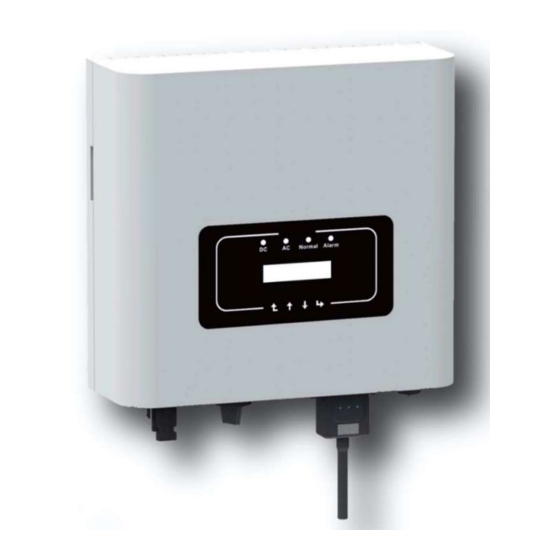
AC connection is normal. Next is the operating indicator, which also gives a green light if the output is normal. The last indicator on the right is an alarm indicator, which gives a red light that indicates alarming. Website: www.sunsynk.com E-mail: sales@globaltech-china.com... -
Page 10: Buttons
Modify adjustable parameters (use ESC and ENTER button 3.4. LCD Display SUN-1K/2K/3K-G single-phase string inverters use a dot matrix display, mainly contains the following: Inverter operation status and information; Operating information; Warning message and malfunction display. Website: www.sunsynk.com E-mail: sales@globaltech-china.com... -
Page 11: Product Installation
Consider if the installation environment is helpful to see the inverter LCD display and indicator status clearly. You must offer a ventilated environment if inverter installed in the airtight house. Website: www.sunsynk.com E-mail: sales@globaltech-china.com... -
Page 12: Figure 6 - Installing Angle
Safety Hint: Do not place or store any items next to the inverter. Figure 6 - Installing angle. Figure 7 - Installation gap. Website: www.sunsynk.com E-mail: sales@globaltech-china.com... -
Page 13: Inverter Installation
1. Locate on the appropriate wall according to the bolt position on the mounting bracket, then mark the hole. On the brick wall, the installation must be suitable for the expansion bolt installation. Figure 9 - Inverter hanging plate installation. Website: www.sunsynk.com E-mail: sales@globaltech-china.com... -
Page 14: Figure 10 - Inverter Hanging Plate Back View
3. Hang the inverter to the top of the mounting rack and then use the M4 screw in the accessory to lock the inverter heat sink to the hanging plate, to ensure that the inverter will not move. Figure 10 - Inverter hanging plate back view. Website: www.sunsynk.com E-mail: sales@globaltech-china.com... -
Page 15: Electrical Connection
Strip off the DC wire about 7mm, disassemble the connector cap nut (see Figure 12). Figure 12 - Disassemble the connector cap nut. b) Crimp the metal terminals with crimping pliers as shown in Figure 13. Figure 13 - Crimp the contact pin to the wire. Website: www.sunsynk.com E-mail: sales@globaltech-china.com... -
Page 16: Figure 14 - Connector With Cap Nut Screwed On
Therefore, before connecting the DC input line, the solar panel needs to be blocked by the opaque material, and the DC switch should be 'OFF'. Otherwise, the high voltage of the inverter may lead to life-threatening conditions. Website: www.sunsynk.com E-mail: sales@globaltech-china.com... -
Page 17: Ac Input Terminal Connection
Specification 2.5mm 2.5mm 2.5mm 18mm 18mm 18mm Model SUN-1K-G SUN-2K-G SUN-3K-G Breaker 100A/400V 16A/400V 20A/400V Max. Cable Outside cable (2+PE) 20m Length Figure 16 - AC connector structure (1. Matching socket 2. Sleeve 3. Sealing core 4. Sealing nut). -
Page 18: Figure 17 - Strip The Ac Cable
The connection hole of the AC connection terminal labeling is shown in Figure 18. Figure 18 - AC connector hole pattern. 6. Set the sleeve and sealing ring in place. 7. Connect the terminals to the inverter as shown in Figure 19. Website: www.sunsynk.com E-mail: sales@globaltech-china.com... -
Page 19: The Connection Of The Ground Line
The installation of the shell ground wire is shown in Figure 20. Figure 20 - Installation of the shell ground wire. Website: www.sunsynk.com E-mail: sales@globaltech-china.com... -
Page 20: Inverter Monitoring Connection
When installing the Wi-Fi Plug, remove the sealing plate, replace it with the sealing plate with a square hole in the accessories, and tighten the screws. Then, insert the Wi-Fi Plug into the interface and fix it with a screw. The Wi-Fi Plug configuration needs to be performed after various electrical connections Website: www.sunsynk.com E-mail: sales@globaltech-china.com... -
Page 21: Configuration Of Wi-Fi Plug
PV shall not exceed the maximum input power of the inverter. Each PV module shall not exceed the rated power of each channel. c) The short circuit current of each series of PV modules cannot be greater than 10A at any time Website: www.sunsynk.com E-mail: sales@globaltech-china.com... -
Page 22: Start Up The Inverter
Figure 23, the red lines connected to the utility grid said wire (L), the blue line shows the zero line (N), Website: www.sunsynk.com E-mail: sales@globaltech-china.com... -
Page 23: Use Of Limiter Function
[parameter setting] to enter setup submenu, and then select [running parameters] as shown in Figure 24. Please input the default password 1234 by pressing the button [up down, confirm], enter the operation parameter setting interface, shown in Figure 25. Figure 24 - Parameter setting. Website: www.sunsynk.com E-mail: sales@globaltech-china.com... -
Page 24: Notes While Using Limiter Function
When using the limiter function, you need to ensure that the PV input's opening voltage is no more than 450V. Otherwise, it may cause inverter malfunction. Do not have this limitation if the inverter is not working under the limiter function. Website: www.sunsynk.com E-mail: sales@globaltech-china.com... -
Page 25: General Operation
Press the Up key and the Down key to see the current DC voltage, DC current, AC voltage, AC current, inverter radiator temperature, software version number and Wi-fi connection state of the inverter. Figure 27 - LCD operation flow chart. Website: www.sunsynk.com E-mail: sales@globaltech-china.com... -
Page 26: The Initial Interface
You can check the single-phase voltage, current, and grid frequency. Figure 31 - Temperature. In this interface, you can see the temperature of the inverter. It indicates the temperature of the radiator. There are four submenus in the Main Menu. Figure 32 - Main menu. Website: www.sunsynk.com E-mail: sales@globaltech-china.com... -
Page 27: Device Information
It can keep four-fault records on the menu, including time. Customers can deal with it depends on the error code. Figure 34 - Fault record. 8.4. ON/OFF Setting Figure 35 - ON/OFF setting. When the inverter is turned off, it stops immediately and does not work until its turning on. Website: www.sunsynk.com E-mail: sales@globaltech-china.com... -
Page 28: Parameter Setting
All of this information for maintenance reference. Figure 36 - Setting. System Parameter includes time set, language set, display set and factory reset. Figure 37 - System parameter. 8.5.1. Time set Figure 38 - Time set. Website: www.sunsynk.com E-mail: sales@globaltech-china.com... -
Page 29: Language Set
Figure 39 - Language set. 8.5.3. Running Parameters Note: Password required - only for access-authorized engineer. Un-authorized access may avoid the warranty. The initial password is 1234. Figure 40 - Password. Figure 41 - Running param. Website: www.sunsynk.com E-mail: sales@globaltech-china.com... -
Page 30: Protect Parameters
Engineer Only. We will set the parameters depending on the safety requirements, so customers do not need to reset it. The password is 1234. Figure 42 - Protect parameters. Note: Engineer Only. Figure 43 - Custom. Website: www.sunsynk.com E-mail: sales@globaltech-china.com... -
Page 31: Repair And Maintenance
IGBT damaged by excessive drop voltage Auxiliary switch power supply failure Ac main contactor errors AC auxiliary contactor errors Reserved DC firmware over current AC firmware over current GFCI(RCD) Ac leakage current fault Three phase current, over-current fault Website: www.sunsynk.com E-mail: sales@globaltech-china.com... - Page 32 AC reverse irrigation AC grid U over current AC grid V over current AC grid W over current Reactor A phase over current Reactor B phase over current Reactor C phase over current IGBT heat sink high temperature Website: www.sunsynk.com E-mail: sales@globaltech-china.com...
-
Page 33: Troubleshooting
1. The serial number of the inverter; 2. The distributor/dealer of the inverter (if available); 3. Installation date; 4. The description of the problem (include LCD error code and LED status indicator lights); 5. Your contact details. Website: www.sunsynk.com E-mail: sales@globaltech-china.com... -
Page 34: Specification
11. SPECIFICATION Website: www.sunsynk.com E-mail: sales@globaltech-china.com... - Page 35 Website: www.sunsynk.com E-mail: sales@globaltech-china.com...
- Page 36 Website: www.sunsynk.com E-mail: sales@globaltech-china.com...
- Page 37 Global Tech China Ltd, 3 Floor, Wai Yip Industrial Building.171 Wai Yip Street, Kwun Tong, Kowloon, Hong Kong. Tel: +852 2884 4318 Fax: +8522884 4816 www.sunsynk.com / sales@globaltech-china.com / www.globaltechhk.com Website: www.sunsynk.com E-mail: sales@globaltech-china.com...
Need help?
Do you have a question about the SUN-1K-G and is the answer not in the manual?
Questions and answers