
Related Manuals for CDA-TEK AFX


Summary of Contents for CDA-TEK AFX
- Page 1 USER GUIDE INCLUDES MMX GUIDE User Guide Version 1.1 Rev 3 AFX USER GUIDE WWW.CDATEK.COM...
- Page 2 WELCOME TO THE AFX Thank you for purchasing the AFX by CDA-TEK. With the AFX, you will be able to control and monitor the primary controls of your Blackmagic Pocket Cinema Camera wirelessly via Bluetooth LE as well as use its focus controls to provide autofocus functionality.
-
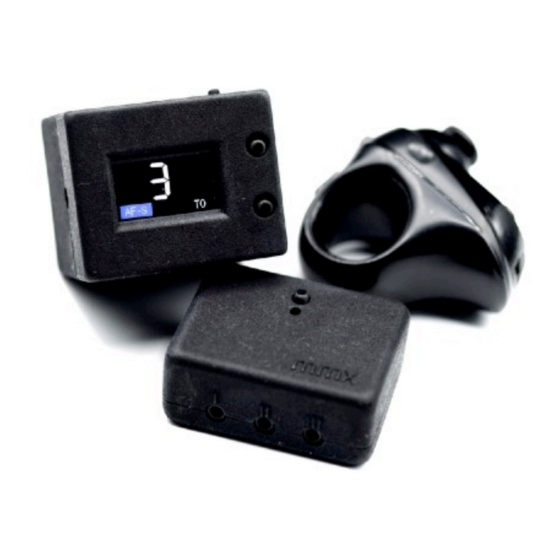
Page 3: General Overview
2 cm and 12 metres and has the advantage of being able to be used in low and even no light situations. The AFX uses this measurement to automatically move the lens on your camera to the relevant position for that distance thereby adding a centre point continuous autofocus capability to cameras that do not provide it and also, with the use of optional Tilta Nucleus N or M motors, to manual focus lenses. -
Page 4: System Overview
OPTIONS - MMX section of the User Guide. You are able to use all of the AFX’s focus controls in the same way, irrespective of if are using it to control a native electronic lens on a Pocket 4K or Pocket 6K camera, via a motor on its integral interface port or via a motor connected to the MMX. -
Page 5: Getting Started
60 minutes. The AFX is powered on using the reset switch of the unit, or by pressing the B button if it is in Hibernate mode or automatically by applying USB power when the battery is empty. - Page 6 When you have determined which type to use, navigate to the AFX Control Type field using the B button on the AFX unit and then press the A button to step through the available options until the one you require is displayed.
- Page 7 Your camera will display a PIN number to be entered and the AFX will invoke its PIN entry screen below. Use the A button on the AFX to increase the value of the number to match the first one in the requested PIN, then press the B button to move to the next number and repeat the process until you match all six numbers.
- Page 8 The amount of time will vary between approximately 5 minutes and 20 minutes depending on the lens type used as the AFX uses a different number of calibration “TRACKS” for different lens types but this will only ever need to be done once for each lens.
- Page 9 4] Set focal Length (auto for P4K/P6K) 5] Increment Calibration Point * 6] Store Calibration Point * 7] Set Infinity Point 8] Set Infinity Point 9] Write CALIBRATION * NOTE : Steps 5 & 6 are repeated for all calibration points AFX USER GUIDE WWW.CDATEK.COM...
- Page 10 If you are using a Blackmagic Pocket Cinema Camera, please skip to the next page. For cameras using manual lenses controlled through an attached Tilta focus motor, the process is invoked by a long press of the A button on the AFX unit to invoke the AFX LENS DATABASE MENU.
- Page 11 AFX from your camera. For calibrations of motor controlled lenses, the Camera and Lens fields are selected by moving to the relevant field and selecting the next value from the extensive list of manufacturer names built in to the AFX with the A button.
- Page 12 FIRST LAUNCH - Calibrating A Lens(pt 3) Profiling Lens - POCKET 6K ONLY. This page is only applicable if you are using a Pocket 6K camera with your AFX and should be skipped if you are using a Pocket 4K or Motor based configuration.
- Page 13 The optional “Motor Direction” field is used to change the direction of an attached focus motor, either directly or via an MMX, and is toggled using the A button on the AFX unit. When these fields are set, navigate to the the “OK” field using the B button on the AFX unit and then press the A button to confirm and proceed to the main calibration process.
- Page 14 When you are satisfied that the image is in focus, pressing the C button on the R1 Controller will cause the AFX to take a distance reading to match to this focus position. If you have made an error and wish to move the camera for better focus, pressing the C button again will take another reading.
- Page 15 D button to confirm and complete the process. If you are calibrating a “Prime” type of lens then the AFX will now write the completed CALIBRATION FILE to the DATABASE and the AFX will reboot into the main application.
- Page 16 CALIBRATION file for the whole lens setup and reboot the AFX. When you are using a “F.I.Z”, type lens with the AFX you can control switching to the next F-STOP in either direction by pressing the A and B buttons on the R1 Controller when the AFX is in COMMAND mode and the currently set F-STOP will be displayed in both the COMMAND and FOCUS screens. ...
- Page 17 IN USE - BASIC OPERATION Startup With you first lens calibrated, you are now ready to begin using your AFX with it and after power on you will see the following startup sequence. The initial screen displays the version number of the AFX software and provides an opportunity for you to enter the SETUP MENU by pressing the A button on the AFX unit or got into HIBERNATE mode by pressing the B button.
- Page 18 A button on the AFX unit. With the screen loaded, you use the A button on the AFX unit to step to the next lens in the DATABASE until you find the one that you want to load and then use the B button to navigate to the “Load Lens”...
- Page 19 Introducing the R1 Controller Please ensure you initialise the R1 Controller using (Mode + C) command after each restart The R1 Controller is used for the live control of all operations of the AFX and consists of ten different keys.
- Page 20 A button on the AFX unit to switch to it. The FOCUS SCREEN shows the current AF mode and if this is displaying AF-C instead of AF-S on your AFX then do a short press of the JOY L on the R1 Controller now to change it.
- Page 21 AF Mode indicator has changed to With AF-C now selected and active, the AFX will change focus automatically when you direct the camera to a new focus target and will continue to do so until you press the LOW TRIG again to de-activate it.
- Page 22 To make changes on your camera from the R1 Controller, you must be in COMMAND MODE and you can select this by pressing the B button on the AFX unit or by a long press of the UP TRIG on the R1 if you are using a Pocket 4K camera.
- Page 23 AFX’s QUAD LOCK functionality. To use QUAD LOCK you should be in FOCUS MODE, which can be selected by the B button on the AFX or a long press of the UP TRIG for non-Pocket 6K cameras.
- Page 24 MEMORY target. Pressing the A,B,C or D button on the R1 will change the target and the QL: display will be updated accordingly. Using this mode, when you use MANUAL FOCUS, the AFX will automatically stop sending any further focus commands when the currently selected MEMORY target point has been reached.
- Page 25 IN USE - AUTOFOCUS ADJUSTMENTS Accessing and using the AUTOFOCUS ADJUSTMENTS As well as the global AFX PREFERENCES that are set from the SETUP MENU (See AFX PREFERENCES MENU in MENU REFERENCE GUIDE - PART 2 for full description of...
- Page 26 CLIENT ID it is currently set to. The CLIENT ID should be set to match the SERVER ID of the AFX that you want to attach the MMX to and you should refer to AFX PREFERENCES MENU in MENU REFERENCE GUIDE - PART 2 for information about how to set this on the AFX.
- Page 27 Failed to find matching AFX SERVER ID If the CLIENT ID is set to 6, indicating that the MMX should be connected by wire on Port 3 to the AFX, the INDICATOR LED will flash GREEN when data is received from the AFX.
- Page 28 DOWN triangle to toggle it to ON. As the Tilta Focus Wheel does not store the Bluetooth mode setting on power off, you must switch it to ON prior to using it with the AFX again if you have powered the wheel down in the meantime.
-
Page 29: Power-On Sequence
When you switch the R1 Controller on, its LED will begin flashing BLUE to indicate that it is awaiting a Bluetooth connection. When the AFX boots, this LED will go out to indicate that it is successfully connected to the AFX. -
Page 30: Power Management
Hibernate mode. When the AFX is connected to a Pocket 4K or Pocket 6K, the second automatic method is invoked if the camera breaks communication for a period of 20 seconds. -
Page 31: Hints And Tips
3. When mounting the AFX, we recommend having it as low profile as possible in terms of the top of the lens. Please remember that as the AFX is an outboard system it is not necessary to mount it on the focal plane of the camera as it is the relationship between the AFX’s position when being calibrated that defines the relationship to the focus... - Page 32 Configuring the Setup options and Maintenance functions Although the general operation of the AFX in terms of using it to control focus and camera settings is designed to be as simple as possible, it does offer a wide range of different options in terms of setup and system maintenance.
-
Page 33: Setup Menu
SETTINGS AFX Preferences Accesses AFX PREFERENCES MENU See Below : AFX CONTROL AFX Control Type Selects device type that AFX will control TYPE DEFINTIONS Switch function of REC button on attached Tilta Wheel REC AFC control wheel between Record On/Off and AF-C On/... - Page 34 HYBRID/F.I.Z/MOTOR ONLY modes Selects minimum distance of change (in CM) Sensitivity between LIDAR range data to trigger re-focus Save Saves AFX preferences to NVRAM and re-boots AFX AFX LENS DATABASE MENU FUNCTION DESCRIPTION SETTINGS Displays Camera Name, Lens Name, Lens Details...
-
Page 35: Maintenance Menu
Double Click Selects timing interval in ms to register multiple clicks 150-250 Tune of A and B buttons on the AFX unit Clears BLE bonding between AFX and P4K/6K Clear Bonds cameras.Bonding must ALSO be cleared in camera before Re-Pairing AFX Firmware Accesses FIRMWARE UPDATE mode. -
Page 36: Function List
MENU REFERENCE GUIDE - PART 4 AFX PREFERENCES MENU FUNCTION LIST Function Description Settings AP + Increases Aperture value of attached electronic lens AP - Decreases Aperture value of attached electronic lens ISO + Increases ISO level ISO - Decreases ISO level... - Page 37 Select zoom speed for motor attached to zoom port Zoom Speed Medium/ (Port 2) of an optional MMX Fast Switches direction of focus motor (either to AFX Focus MTR Dir Interface Port or Port 1 of an MMX) between CW/CCW Clockwise and Counter-Clockwise...
- Page 38 Accesses the ADD NEW LENS MENU Lens CALIBRATION OFFSET MENU Function Description Settings Selects offset distance (in cm) between current AFX Calibration position and its position when the currently loaded 0-999 Offset Lens was Calibrated Selects whether offset direction of the offset is...
- Page 39 Set focal length in mm to be calibrated for the Lens Calibration FL being added to the Database (Automatically 0-999 generated for P4K/P6K Modes) *SEE NOTE Switches direction of focus motor (either to AFX Clockwise/ Motor Direction Interface Port or Port 1 of an MMX) between Anti-...
- Page 40 Zoom Focus and Zoom independently Calibration Tracks : 5 (At user defined focal lengths) Lens where two motors which have been calibrated together and driven as a single unit by the AFX.(Dual Requires Linked focus anamorphic lens for example) Calibration Tracks : 2 (set simultaneously)
- Page 41 CAMERA CONTOL REFERENCE GUIDE AFX FUNCTIONALITY BY CAMERA TYPE Function Pocket 4K Pocket 6K Other Connects to camera over ✓ ✓ Bluetooth Low Energy ✓ ✓ Camera settings control Native electronic lens focus ✓ ✓ control Native electronic aperture ✓...
Need help?
Do you have a question about the AFX and is the answer not in the manual?
Questions and answers