Advertisement
Advertisement
Table of Contents

Summary of Contents for APLICOM A11
- Page 1 Installation guide rev. 1.0.0 Order code K530001 Important: Please read this installation guide before the installation. Aplicom Oy, P.O. Box 33, FI-44101 Äänekoski, Finland, Telephone +358 10 841 9414, Fax +358 14 520 800 Business ID 0995791-7, Äänekoski Info@aplicom.fi www.aplicom.com...
- Page 2 All rights reserved. Reproduction in whole or in part in any form is prohibited without the prior written consent of the copyright owner. Aplicom Oy makes every effort to ensure that the information in this manual is correct, but accepts no liability for any errors or omission.
-
Page 3: Package Content
3. Mechanically install the unit to carefully selected place 4. Connect the vehicle power supply to A11 wiring power supply with fuse protection Note! The internal battery is taken to use when microSIM card is connected and main power is switched on (power is connected). -
Page 4: Mechanical Installation
Select the place of installation from a safe, dry and mechanically protected area. Avoid installation to places of direct sunlight and extreme temperature. Install the external GPS/GLONASS antenna so that it has the best possible open sky view. Dimensions of the A11 are shown below. Note! Install the A11 unit as far away as possible... - Page 5 6cm each. Attach another half of the fastener to the bottom of A11 device and other half firmly to the surface on which the unit shall be fixed. Use the fastener which is delivered in the package.
-
Page 6: Electrical Installation
Connect the cables to A11 device and peripherals as advised in the connection guide. Figure 8. • Install the A11 unit as far away as possible (minimum 1 metres recommended) from the car radio and its • antenna or other electrical devices to avoid any interference. -
Page 7: Testing Installation
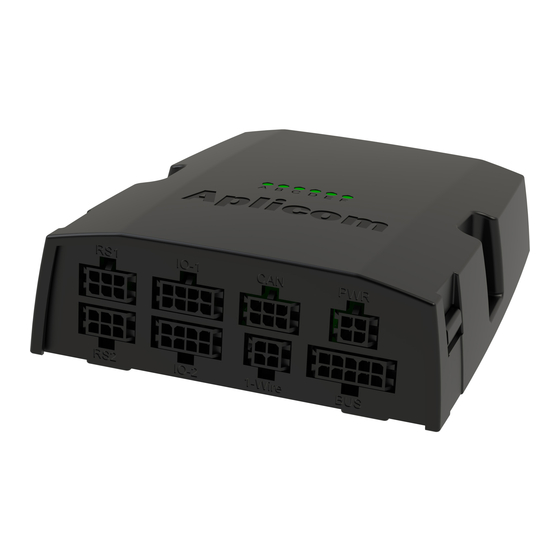
IO cable / IO 1/2 Blue Pin 1, OC 1/2 Grey Pin 2, Pulse 1/2 Pin 3, DIN 1/6 Yellow Pin 4, DIN 2/7 Orange Pin 5, DIN 3/8 Violet Pin 6, DIN 4/9 Brown Pin 7, DIN 5/10 Black Pin 8, GND CAN cable / CAN Yellow... - Page 8 NOTE! This connection guide contains only example connections, not exact application specific connection. Figure 8. Signal connection guide...
-
Page 9: Technical Data
All signal inputs connected to A11 must be fuse protected, max 3A. • As a rule, when pulling Aplicom cables through inlets or tubes during installation, it is not allowed to • pull directly from connectors. Instead the pull must be directed to cable itself. -
Page 10: Troubleshooting
For replacing the internal battery see document K530003 A11 battery replacement guide available on • Aplicom Extranet. DO NOT USE OTHER BATTERIES THAN APLICOM DELIVERED. RISK OF EXPLOSION. DISCONNECT ALL CABLES FROM A11 connectors before changing internal battery. • Disconnect internal battery by removing the microSIM card if the unit is to be transported by airplane •...
Need help?
Do you have a question about the A11 and is the answer not in the manual?
Questions and answers