Brother PT-9400 User Manual
Brother pt-9400: users manual
Hide thumbs
Also See for PT-9400:
- Parts reference list (17 pages) ,
- User manual (108 pages) ,
- User manual (102 pages)

Related Manuals for Brother PT-9400


Summary of Contents for Brother PT-9400
- Page 1 MODEL PT-9400 USER’S GUIDE Read this User’s Guide before you start using your P-Touch. Keep this User’s Guide in a handy place for future reference. ®...
-
Page 2: Table Of Contents
QUICK REFERENCE Chapter 1 Before You Start... 1 EXAMPLES OF WHAT YOU CAN MAKE WITH THIS P-TOUCH ...2 GENERAL DESCRIPTION...4 Features ... 4 LCD display ... 5 Menus... 5 Keyboard... 6 Chapter 2 Getting Started... 7 PRECAUTIONS ...8 Connecting the power supply cord ... 9 Installing a TZ tape cassette ... - Page 3 Chapter 4 Using Labels and Stamps... 61 Laminated tape ...62 Stamp film...62 ERROR MESSAGE LIST ... 65 TROUBLESHOOTING ... 70 MACHINE SPECIFICATIONS ... 73 Appendix ... 75 Symbols...76 Special barcode characters ...80 Fonts ...80 Sizes and widths...81 Type styles ...82 Framing and shading patterns ...83 Background designs ...84 Pre-set templates ...85...
-
Page 4: Quick Reference
QUICK REFERENCE Entering text Adding a space Space bar Adding a capital letter Shift Adding a series of capi- Caps tal letters Adding an accented Type character character Adding a symbol Symbol type) symbol number Symbol to select symbol number Adding a new line New Block Adding a new block... - Page 5 Formatting text Changing the font Font Changing the character Size size Changing the character Width width Changing the character Style style Changing the italic set- Italic ting Changing the line effects Changing the vertical Vert printing setting Changing the label Format length New Block...
- Page 6 Changing the print options (for a template Continue with 6, 7, 8, 9, 0, A or B other than one from the STAMP category) 4 Printing a template from the STAMP cat- egory Printing an ID label (for a template from the STAMP category) New Block 5 Storing the template...
- Page 7 7 Printing many cop- ies while increasing selected text bering field to select (or type) number 8 Printing a mirror image of the text 9 Inverting the printed and unprinted areas 0 Changing the shape of the text A Changing how labels are cut B Enlarging text and printing it on 2, 3 or...
-
Page 8: Before You Start
Ch.1 Before You Start Chapter efore tart... -
Page 9: Examples Of What You Can Make
Ch. 1 Before You Start Quickly create a label for a home video by using the Template function ( wish, you can then change the overall style of the text ( With the New Block function ( ferent numbers of lines. In this label, part of the text was formatted using a different font ( p. -
Page 10: With This P-Touch
MAKE WITH THIS P-TOUCH Create larger labels by enlarging the text and printing it on two, three or four labels, which can then be put together ( can decorate your label using the 475 symbols and pictures avail- able with the Symbol function ( Using clear tape and the MIR- ROR function ( p. -
Page 11: General Description
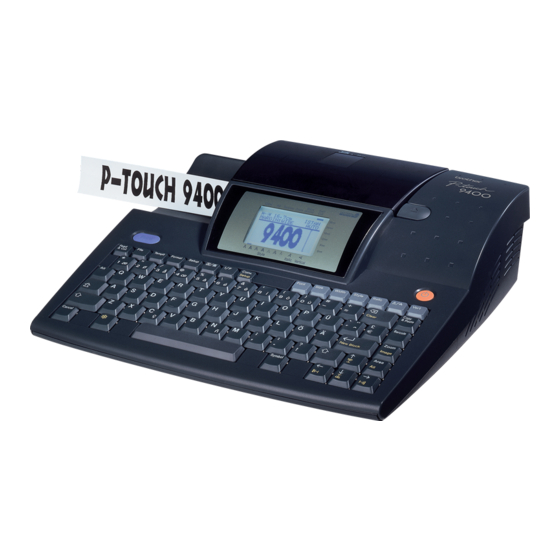
Ch. 1 Before You Start GENERAL DESCRIPTION Features Cover release button Tape compartment cover Tape exit slot LCD display Keyboard Handle Lettering stick Power supply connector... -
Page 12: Lcd Display
LCD display Caps 1 Caps indicator p. 15 2 Alt indicator p. 15 3 Template indicator p. 41 4 Zoom indicator p. 21 5 Background indicator p. 40 6 Half cutter indicator p. 55 7 Font setting p. 24 8 Tape width indicator p. -
Page 13: Keyboard
Ch. 1 Before You Start Keyboard 4 5 6 Print Feed File Templt Format & Cut Caps Shift Cancel Code (power supply) key 2 Print key p. 49 3 Feed & Cut key p. 49 4 File key p. 46 5 Templt (template) key p. -
Page 14: Getting Started
Ch. 2 Chapter etting tarted... -
Page 15: Precautions
Ch. 2 Getting Started Use only Brother TZ tapes with this machine. Do not use tapes that do not have the mark. Before installing a tape cassette, be sure that the tape is correctly fed under the tape guides. Do not pull on the tape being fed from the P-touch. Doing so may damage the tape cassette. -
Page 16: Connecting The Power Supply Cord
Connecting the power supply cord This P-touch can be used anywhere a standard electrical outlet is available. 1 Insert the plug on the end of the power supply cord into the power supply connector on the back of the P-touch. 2 Insert the pronged plug on the other end of the power supply cord into an AC outlet. -
Page 17: Installing A Tz Tape Cassette
Ch. 2 Getting Started Installing a TZ tape cassette A TZ tape cassette is supplied with this P-touch. TZ tape cassettes are available for this machine in a wide variety of colors and sizes, making it possible to make distinctive color-coded and stylized labels. -
Page 18: Turning On & Off The P-Touch
Ch. 2 Getting Started Turning on & off the P-touch The power supply key ( ) is located in the top right corner of the machine’s keyboard. This P-touch will automatically turn off if no key is pressed or no operation is performed for 30 minutes. - Page 19 Ch. 2 Getting Started...
-
Page 20: Functions
Ch. 3 Chapter unctions... -
Page 21: Performing Basic Operations
Ch. 3 Functions Performing basic operations Although most functions can be used just by pressing their keys, the following keys may be needed with certain functions. Code Code ( To use a function printed in yellow on a key, Code hold down while pressing the key for the function that you wish to use. -
Page 22: Entering Text
Entering text Typing in the text for your labels is the same as typing on a typewriter or a computer. In addi- tion, the entered text is normally displayed in WYSIWYG (what-you-see-is-what-you-get) mode, which allows you to see exactly how the label would appear if it were printed. -
Page 23: New Block
Ch. 3 Functions 2 Press the key for the desired character. NOTE To display capital letters, hold down Caps press to turn on Caps mode) before press- ing a letter key. To turn off the Alt mode without adding a char- Cancel acter to the text, press Back-... - Page 24 Symbol ( Symbol In addition to the letters, symbols and numerals on the key tops, there are 475 additional sym- bols and pictures available with the Symbol function. After these symbols or pictures are added to the text, they can be deleted like any other character and some can be formatted using certain text format functions (see pages 24 through 31).
-
Page 25: Barcode Barcode
Ch. 3 Functions Back- Half Caps Alt Template Zoom ground Cutter Style Italic Vertical 5 Press . The selected symbol is added New Block to the text. NOTE To enter a series of symbols, hold down before pressing . Then, continue add- New Block ing characters by selecting them as explained in steps 2 through 4, and holding down... - Page 26 To change the barcode parameters: 2 Press . All or some of the following Format Format parameters can be set. PROTO (protocol) WIDTH (bar width) UNDER#S (numbers printed below barcode) CH.DIG. (check digit) Back- Half Caps Alt Template Zoom ground Cutter [ ]:CHANGE SETTINGS PARAMETER...
- Page 27 Ch. 3 Functions To enter the barcode data: 9 Type in the barcode data. Back- Half Caps Alt Template Zoom ground Cutter PROTOCOL:CODABAR A123456D [FORMAT]:PARAMETER [SYMBOL]:SPECIAL CHARACTER Style Italic Vertical To add special characters to barcodes (only with protocols EAN128, CODE128, CODE39 or CODABAR): 0 Press until the cursor is below...
-
Page 28: Editing Text
Editing text Zoom ( Zoom Image To view text that is too small to be read on the display, the Zoom mode must be turned on, making it easier to edit the text. Zoom mode can be turned on or off by pressing Zoom mode is on, the Zoom indicator lights up. - Page 29 Ch. 3 Functions Back- Half Caps Alt Template Zoom ground Cutter OK TO CLEAR TEXT BUFFER? TEXT & FORMATS TEXT ONLY CANCEL Style Italic Vertical 2 Since 9 is already beside TEXT & FOR- MATS, press . All of the text is New Block erased and all of the format functions are reset to their default settings.
- Page 30 To select an area of the text: 1 Press , or is beside the first character that you want to select. Back- Half Caps Alt Template Zoom ground Cutter 5.3" HELSI MARGIN:WIDE AUTO e r t B e c k e r T r a n s p o r t Style Italic Vertical...
-
Page 31: Formatting
Ch. 3 Functions Copy Copy & Paste ( &Paste The Copy & Paste function is useful for copying already entered characters and pasting them into a different section of the text. To copy and paste text: 1 Select the text that you wish to copy and paste using either the AREA function (see page 22) or the ALL function (see page 23). - Page 32 To change the font before entering the text: 1 Press , or is moved to the point where you want to begin using a different font. 2 Press until the desired font is selected. Font The current setting is shown below FONT at the top of the display and a sample (A) can be seen to the right of the cursor.
- Page 33 Ch. 3 Functions NOTE While selecting a Size setting, the following opera- tions may be used: To display the previous setting, hold down and press Size To select the default setting (AUTO), hold down Shift and press Size To return all text formatting functions to their default settings, hold down (space bar).
- Page 34 Width ( Width The Width function can be used with any of the text sizes to make the size of the characters wider or more narrow. Refer to page 81 for examples of the Width settings. NOTE While selecting a Width setting, the following oper- ations may be used: To display the previous setting, hold down and press...
- Page 35 Ch. 3 Functions Style ( Style You can choose from 7 different text styles to create more personalized labels. Refer to the style samples on page 82. The style of the text at the cursor’s current position is shown by the Style indicators at the bottom of the display.
- Page 36 Italic ( Italic The Italic function can be combined with each of the other text format settings to provide an even larger variety of text styles. When the Italic function is turned on for the text at the cursor’s current position, the Italic indicator at the bot- tom of the display lights up.
- Page 37 Ch. 3 Functions Line effects ( The Line effects function enables you to under- line or strike out certain parts of your text. UNDERLINE NOTE While selecting a Line effects setting, the following operations may be used: To display the previous setting, hold down and press To select the default setting (OFF), hold down Shift...
- Page 38 Vertical ( Vert With the Vertical function, you can print your text vertically along the length of your label. When the Vertical function is turned on for the text at the cursor’s current position, the Vertical indicator at the bottom of the display lights up. NOTE While selecting a Vertical setting, the following operations may be used:...
- Page 39 Ch. 3 Functions Frame/shading ( You can choose from a variety of frames and shadings for emphasizing certain parts or all of the text in your label. Refer to the samples of the frames and shadings on page 83. To apply a frame or shading to all of the text: 1 Press NOTE To return to the text without adding a frame or...
- Page 40 Back- Half Caps Alt Template Zoom ground Cutter [ ]:CONFIRM FRAME/SHADING FRAME SHADING Style Italic Vertical 3 Press New Block 4 Press until 9 moves beside BLOCK. Back- Half Caps Alt Template Zoom ground Cutter [ ]:CONFIRM SHADING BLOCK LINE CHARACTER Style Italic Vertical...
- Page 41 Ch. 3 Functions A Press . The desired frame or shading New Block is applied to the selected blocks of text. NOTE To delete the frame or shading, position the cursor on the left side of the frame/shading that you wish Back Space to delete, and then press Clear...
- Page 42 9 Press New Block 0 Press until 9 moves beside the desired frame or shading pattern. Back- Half Caps Alt Template Zoom ground Cutter [ ]:CONFIRM SHADING Style Italic Vertical A Press . The desired frame or shading New Block is applied to the selected lines of text.
- Page 43 Ch. 3 Functions 7 Press New Block 8 Press , or characters that you wish to frame or apply a shading to are selected. Back- Half Caps Alt Template Zoom ground Cutter [ ]:SELECT END POINT R o b e r t B e c k A B C T r a n s p Style Italic Vertical...
- Page 44 2 Since Î is already beside LENGTH, press Back- Half Caps Alt Template Zoom ground Cutter [ ]:CONFIRM LENGTH AUTO inch Style Italic Vertical 3 Press until the desired setting is displayed (or type in the desired length). NOTE To select the default setting (AUTO), press (space bar).
- Page 45 Ch. 3 Functions Back- Half Caps Alt Template Zoom ground Cutter [ ]:CHANGE SETTINGS FORMAT LENGTH:AUTO MARGIN:WIDE H.ALI :LEFT PITCH :NORMAL BACK :OFF Style Italic Vertical 2 Press until Î moves beside MARGIN. 3 Press Back- Half Caps Alt Template Zoom ground Cutter [ ]:CONFIRM...
- Page 46 3 Press Back- Half Caps Alt Template Zoom ground Cutter [ ]:CONFIRM HORIZONTAL ALIGN [LEFT] [CENTER] [RIGHT] [JUSTIFY] Style Italic Vertical 4 Press until 9 moves beside the desired setting. NOTE To select the default setting ( press (space bar). To return to the previous screen without keep- Cancel ing any changes, press...
- Page 47 Ch. 3 Functions 3 Press Back- Half Caps Alt Template Zoom ground Cutter [ ]:CONFIRM PITCH HIHIHI [NORMAL] H I H I H I [FIXED] Style Italic Vertical 4 Press until 9 moves beside the desired setting. NOTE To select the default setting ( [NORMAL]), press To return to the previous screen without keep- Cancel...
- Page 48 5 Press once to confirm the setting. New Block If SMALL or LARGE was selected, type in the desired text, change the font by press until the desired font setting is dis- Font played, and then press New Block MAT menu appears again. NOTE Up to 20 characters can be entered.
- Page 49 Ch. 3 Functions 2 Select the desired template. NOTE To select the first template, press Code (space bar) (or hold down To select the last template, hold down press If TEMPLATE NO. was selected: Type in a template number (or press ) until the desired template is displayed.
- Page 50 6 Repeat steps 4 and 5 until all of the text that you wish to use is entered. The MENU appears after the last line of text in the tem plate is edited and New Block NOTE To quit Template mode, press moves beside DONE, and then press When the message “OK TO FINISH TEMPLATE?”...
- Page 51 Ch. 3 Functions To print a label or stamp created using a tem- plate: E Press until 9 moves beside PRINT. F Press New Block NOTE Be sure that the correct tape cassette is installed. When printing a stamp, install a stamp film cassette.
- Page 52 K Press until 9 moves beside the desired setting, and then press Refer to pages 46 and 46 for more details on saving files. If the file has not been saved before, select SAVE AS. Back- Half Caps Alt Template Zoom ground Cutter INPUT FILE NAME...
-
Page 53: Storing And Recalling Files
Ch. 3 Functions Storing and recalling files You can store frequently used text in the mem- ory. These text files remain in the memory, even after all characters are erased from the display with the Clear function (see page 21). When each file is stored, it can be given an file name so that it can be searched for. - Page 54 NOTE To return to the previous screen without making Cancel any changes, press 3 Press New Block Back- Half Caps Alt Template Zoom ground Cutter INPUT FILE NAME Address R o b e r t B e c k A B C T r a n s p Style Italic Vertical 4 Edit the file name if you wish.
- Page 55 Ch. 3 Functions 5 Press . The selected file appears in New Block the display. NOTE When a file created using a template is opened, it is opened in Template mode. To delete a file that has been saved: 1 Press File Back- Half...
-
Page 56: Printing
Printing Zoom Image ( Code Image To preview an image of the entire text before it Code is printed, hold down and press the text slowly scrolls across the display to the left. Press (space bar) to stop or con- tinue scrolling the text. - Page 57 Ch. 3 Functions Back- Half Caps Alt Template Zoom ground Cutter [ ]:CHANGE SETTINGS OPTION COPIES:1 NUMBER:OFF MIRROR:OFF INVERT:OFF TRANS : FORM Style Italic Vertical 4 Since Î is already beside COPIES, press Back- Half Caps Alt Template Zoom ground Cutter [ ]:CONFIRM COPIES...
- Page 58 2 Press to move 9 beside OPTION. NOTE To return to the text without making any changes, press at any time. Print 3 Press New Block NOTE To display the OPTION menu quickly, hold Code down and press Print To return to the previous screen without keep- Cancel ing any changes, press To return all functions in the OPTION menu to...
- Page 59 Ch. 3 Functions A Type in a number (or press until the desired number of copies is dis- played. NOTE select default setting (space bar). B Press to confirm the setting and New Block return to the OPTION menu. To print a mirror image of the text: With the MIRROR function, you can print your text in reverse so that it can be read from the adhesive side of the tape.
- Page 60 6 Press to move 9 beside the desired setting. NOTE To select the default setting ( (space bar). 7 Press to confirm the setting and New Block return to the OPTION menu. To print an inverted image of the text: The INVERT function prints all light areas so that they are dark and all dark areas so that they are light.
- Page 61 Ch. 3 Functions 7 Press to confirm the setting and New Block return to the OPTION menu. To change the shape of the text: Use the TRANSFORMATION function to create interesting text effects by molding the text into different shapes. Refer to page 54 for samples of the shapes that are available.
- Page 62 To change the CUT setting: The way that labels are cut off after being printed can be selected using the CUT function. A full cut completely cuts off the label. When a half cut setting is selected, the HALF CUTTER indicator lights up and the tape is cut without cutting the label backing.
- Page 63 Ch. 3 Functions 6 Press to move 9 beside the desired setting. NOTE To select the default setting ( [BOTH]), press (space bar). 7 Press to confirm the setting and New Block return to the OPTION menu. To use SPLIT printing: The SPLIT function enlarges the text and prints it on 2, 3 or 4 labels, which can be assembled to create extra-large labels.
-
Page 64: Setting Display Features
7 Press to apply the setting and return New Block to the OPTION menu. Setting display features Setup ( Setup Pressing displays four functions which let Setup you change the general appearance of text shown on the display. To change the LINE NO. setting: This function allows you to select whether or not the number of the line currently containing the cursor is displayed during Zoom mode. - Page 65 Ch. 3 Functions 3 Press to move 9 beside the set- ting that you wish to select. NOTE To select the default setting, press (space bar). 4 Press once to confirm the setting New Block and return to the SETUP menu. 5 Press again to apply the setting.
- Page 66 2 Press to move Î b 3 Press Back- Half ground Caps Alt Template Zoom Cutter [ ]:CONFIRM UNITS inch Style Italic Vertical 4 Press to move 9 beside the set- ting that you wish to select. NOTE To select the default setting, press (space bar).
- Page 67 Ch. 3 Functions...
-
Page 68: Using Labels And Stamps
Ch. 4 Chapter sing abels and tamps... -
Page 69: Laminated Tape
Ch. 4 Using Labels and Stamps Laminated tape The backing from labels printed on laminated tapes can easily be removed if a half cut setting was used (refer to page 55). However, if a half cut setting was not used, the backing paper can be removed by using the enclosed lettering stick. - Page 70 4 With the glossy side of the stamp film facing up, align one end of the stamp film with the slit in the side of the stamp holder. Glossy side Tape end Slit 5 Hold the end of the stamp film in place with your thumb, then pass the stamp film through the guides while pulling it tight.
- Page 71 3 After the label is cut off, affix it to the end of the holder so that its bottom edge is on the same side of the stamp holder as the raised “brother” logo. Stamping Since the length of time and amount of pressure...
-
Page 72: Error Message List
ERROR MESSAGE LIST ERROR MESSAGE ALL FILES ARE USED BARCODE MUST START & END WITH A, B, C OR D BUFFER EMPTY BUFFER FULL CAN’T FIND FILE CLOSE CASSETTE COVER CUTTER ERROR TURN POWER OFF, THEN ON AGAIN EEPROM ERROR TURN POWER OFF, THEN ON AGAIN HALF CUT ERROR... - Page 73 ERROR MESSAGE LIST ERROR MESSAGE INCORRECT NUMBER OF DIGITS FOR BARCODE TYPE INCORRECT OPERATION FOR NUMBERING FUNCTION INSERT CASSETTE LENGTH LIMIT CAUSE This message appears if the barcode data that is entered contains the incorrect number of digits for the selected barcode protocol.
- Page 74 ERROR MESSAGE LIMIT EXCEEDED SET BETWEEN 4.0-30.0 cm LIMIT EXCEEDED SET BETWEEN 1.6-11.8 inch LINE LIMIT MAX 5 BARCODES MAX 5 BLOCKS MAX 10 LINES MAX 30 CHRS MAX 50 CHRS CAUSE This message appears if the set label length (LENGTH function on the FORMAT menu) is not within the range 4.0 to 30.0 cm.
- Page 75 ERROR MESSAGE LIST ERROR MESSAGE MEMORY FULL MIN 4 DIGITS NO FILES NO PRINTING TEM- PLATES ON IRON- ON OR LETTERING TAPE RAM PROBLEM ROM PROBLEM SET 3/8” TAPE SET 1/2” TAPE SET 3/4” TAPE SET 1” TAPE SET 1 1/2” TAPE CAUSE This message appears if you try to store a message that is too large to...
- Page 76 ERROR MESSAGE SET STAMP L SET STAMP M SYSTEM ERROR TAPE END. CHANGE TAPE CASSETTE TEXT TOO HIGH TEXT TOO LONG UNABLE TO PERFORM THIS OPERATION HERE CAUSE This message appears if an L-size stamp film cassette is not installed when printing a stamp created using a template for L-size stamp film.
-
Page 77: Troubleshooting
TROUBLESHOOTING TROUBLESHOOTING Problem (1) The display stays blank after you have turned on the machine, or abnormal char- acters are displayed. (2) The text shown in the display cannot be read. (3) The machine does not print or the printed characters are blurred. - Page 78 Problem (5) A blank horizontal line appears through the text in the printed label. TROUBLESHOOTING Solution 1 Turn off the machine. 2 Open the tape compartment cover, then remove the tape cassette if one is installed. The print head and rollers are located in the tape compartment.
- Page 79 TROUBLESHOOTING Problem (6) The tape is not ejected correctly after being automatically cut. Cutter Cotton swab Metal piece (Area to be cleaned) (7) The machine has “locked up” (i.e., noth- ing happens when a key is pressed). (8) After turning on the P-touch, the message “BACKUP MEMORY CLEARED”...
-
Page 80: Machine Specifications
MACHINE SPECIFICATIONS HARDWARE Power supply: Input AC 120 V 60Hz (Auto power off if no key is pressed within 30 minutes) Input device: Keyboard (77 keys) LCD: 64 dots 21 indicators (with back light) Print tape: 6 widths available: 1/4” 3/8”... - Page 81 MACHINE SPECIFICATIONS...
-
Page 82: Appendix
ppendix... -
Page 83: Symbols
Appendix Symbols p. 17 The following symbols are available. Category PUNCTUATION Symbol Number Symbol Number BRACKETS Symbol Number ARROWS Symbol Number UNITS Symbol Number Symbol Number SPECIAL Symbol LETTERS Number NUMBERS Symbol Number Symbol Number Symbol Number GENERAL Symbol Number Symbol Number ±... - Page 84 Category WARNING 1 Symbol Number Symbol Number Symbol Number WARNING 2 Symbol Number Symbol Number Symbol Number Symbol Number WARNING 3 Symbol Number Symbol Number Symbol Number GUIDANCE Symbol Number Symbol Number Symbol Number Symbol Number Appendix...
- Page 85 Appendix Category TRAFFIC SIGN Symbol Number SIGNS Symbol Number Symbol Number EVENT Symbol Number Symbol Number ANIMALS Symbol Number PLANTS Symbol Number FOOD&DRINK Symbol Number Symbol Number OFFICE Symbol Number Symbol Number Symbol Number SPORT Symbol Number Symbol Number...
- Page 86 Category MEDICAL Symbol Number TRANSPORTA- Symbol TION Number TOOL Symbol Number ASTRONOMI- Symbol Number POINTING Symbol Number FISH Symbol Number INSECTS Symbol Number VIDEO Symbol Number Appendix...
-
Page 87: Special Barcode Characters
Appendix Special barcode characters The following special characters can only be added to barcodes created using protocols EAN128 and CODE128. Value Character < > The following special characters can only be added to barcodes created using protocols CODE39 or CODABAR. Value Character Fonts... -
Page 88: Sizes And Widths
Sizes and widths pp. 25–27 Samples of the available text sizes and widths are shown below. Width Wide Size 72pt 60pt 48pt 36pt 24pt 18pt 12pt Appendix Medium Narrow... -
Page 89: Type Styles
Appendix Type styles p. 28 Normal Bold Helsinki Brussels San Diego Florida Calgary Brunei Bold Angeles Bermuda Script Istanbul Outline Solid Shadow Outline + Stripe Shadow... -
Page 90: Framing And Shading Patterns
Appendix Framing and shading patterns p. 32 The following frame and shading patterns are available. Frame Shading... -
Page 91: Background Designs
Appendix Background designs Samples of the available background designs are shown below. [SMALL] [LARGE] FLOORING PLATE TILE MARBLES p. 40 ARABIC TARTAN ETHNIC FLOWER GEOMETRI GRADATION 1 GRADATION 2... -
Page 92: Pre-Set Templates
Pre-set templates p. 41 Samples of the available templates are shown below. Template Category name ADDRESS ADDRESS 1 ADDRESS 2 ADDRESS 3 ADDRESS 4 EQUIPMENT EQUIPMENT PLATE PLATE NAMEPLATE NAMEPLATE NAMEPLATE NAMEPLATE Tape Label width length 1” 3.1” (24 mm) (8.0 cm) 1”... - Page 93 Appendix Template Category name SHOP SALE PRICE 1 PRICE 2 SIGN SIGN FLOPPY FLOPPY 1 FLOPPY 2 FLOPPY 3 Tape Label width length 1 1/2” 9.7” (36 mm) (24.6 cm) 1” 2.2” (24 mm) (5.7 cm) 1” 4.3” (24 mm) (11.0 cm) 1 1/2”...
- Page 94 Template Category name VIDEO VHS 1 VHS 2 8mm 1 8mm 2 VHSC AUDIO AUDIO 1 AUDIO 2 AUDIO 3 SLIDE SLIDE FILE FILE 1 FILE 2 Tape Label width length 3/4” 5.5” (18 mm) (14.0 cm) 3/4” 5.5” (18 mm) (14.0 cm) 3/8”...
- Page 95 Appendix Template Category name STAMP NORMAL L NORMAL M FRAMED L FRAMED M 2LINE L 2LINE/ FRAME L VERTICAL L VERTICAL M Tape Label width length STAMP L 4.4” (11.2 cm) STAMP M 4.0” (10.2 cm) STAMP L 4.4” (11.2 cm) STAMP M 4.0”...
-
Page 96: Template Text Styles
Template text styles Samples of the available template text styles are shown below. CHAR. style Sample ORIGINAL ITALIC DYNAMIC CUTE FORMAL ELEGANT FREE NATURAL p. 43 Font Template default ISTANBUL FLORIDA BRUSSELS BERMUDA SCRIPT SAN DIEGO Appendix Style Italic Template default SOLID OUTLINE NORMAL... -
Page 97: Text Transformation Styles
Appendix Text transformation styles Samples of the text transformation shapes are shown below. [OFF] A B C p. 54... -
Page 98: Index
Accented characters 15 All function 23 Alt key 15 Area key 22 BACK (background) function 40 Back Space key 21 Barcode key 18 Barcode special characters 20, 80 Blocks 16 Cancel key 14 Capital letters 15 Caps key 15 CH.DIG. parameter 19 Cleaning Print head 71 Rollers 71... - Page 99 Label length 36 LANGUAGE function 59 LENGTH function 36 Line effects function 30 LINE NO. function 57 Lines 16 MARGIN function 37 MENU menu 43 MIRROR function 52 Multiple copies 49 New Block function 16 NUMBER (numbering) function 50 OPTION menu 50 PARAMETER menu 19 Pasting 24 Pictures 17, 76...
-
Page 100: Accessories
Obtain tape cassettes from your nearest authorized dealer. Use only Brother TZ tapes with this machine. Brother cannot be held responsible for trouble caused by the use of unauthorized supplies. Do not use tapes that do not have the Stock No. - Page 101 Stock No. TZ-325 White characters on black tape TZ-421 Black characters on red tape 1/4” (6-mm)-wide laminated tapes TZ-111 Black characters on clear tape TZ-211 Black characters on white tape TZ-315 White characters on black tape Special tapes Stock No. TZ-SE4 Black characters on 3/4”...
- Page 102 This order form is provided for your convenience should your retailer not stock the item(s) needed or if you prefer to order by telephone. To order by phone, please call Brother International at 1-800- 668-2768 and have your Visa or MasterCard available.
- Page 104 This order form is provided for your convenience should your retailer not stock the item(s) needed or if you prefer to order by telephone. To order by phone, please call Brother International at 1-800- 668-2768 and have your Visa or MasterCard available.
- Page 106 GUÍA DEL USUARIO...
- Page 107 El cable de interfaz incluido deberá utilizarse para asegurar que se satisfacen los límites para aparatos digitales de la Clase Los cambios o modificaciones no expresamente aprobados por Brother Industries, Ltd. pueden invalidar la autoridad del usuario para operar el equipo.
- Page 108 CONTENTS Precauciones... 1 Conexión del cable de alimentación... 1 Instalación de un casete de cinta TZ ... 2 Conexión y desconexión de la alimentación del P-touch ... 2 Realización de las operaciones básicas ... 3 Introducción de texto ... 4 Edición de texto ...
-
Page 110: Precauciones
Precauciones Con esta máquina, utilice solamente cintas TX Brother. No use cintas que no posean la marca Antes de instalar un casete de cinta, cerciórese de que la cinta esté correctamente colocada debajo de las guías de la misma. No tire de la cinta que esté alimentando en el P-touch. Si lo hiciese podría dañar el casete de cinta. -
Page 111: Instalación De Un Casete De Cinta Tz
Instalación de un casete de cinta TZ Con este P-touch se suministra un casete de cinta TZ. Los casetes de cinta TZ están disponi- bles para esta máquina en gran variedad de colores y amaños, permitiendo confeccionar eti- quetas en distintos colores y estilos. Además, esta máquina ha sido diseñada para permitirle cambiar los casetes de cinta rápida y fácilmente. -
Page 112: Realización De Las Operaciones Básicas
Realización de las operaciones básicas Aunque la mayoría de las funciones pueden eje- cutarse presionando simplemente las teclas correspondientes, para ciertas funciones es posi- ble que necesite las teclas siguientes. Code Code ( Para utilizar una función impresa en amarillo en una tecla, mantenga pulsada tecla correspondiente a la función que desee utilizar. -
Page 113: Introducción De Texto
(abajo) Para mover el cursor hasta la línea directa- mente situada debajo de la posición del cursor, presione una vez Para mover el cursor hata el final de todo el texto, mantenga pulsad Para seleccionar el ítem situado debajo en un menú... - Page 114 Alt ( En el modo Alt podrá añadir caracteres acentua- dos o marcas de puntuación especiales al texto. El modo Alt podrá activar y desactivarse presio- nando . Cuando active el modo Alt, se encenderá el indicador Alt. * Con respecto a la tabla, consulte la página 15 de inglés.
- Page 115 Symbol ( Symbol Además de letras, símbolos, y números de las teclas, existen 475 símbolos e imágenes adicio- nales disponibles con la función Symbol. Des- pués de haber añadido estos símbolos o imágenes al texto, podrán borrarse como cual- quier otro carácter,. Y algunos podrán forma- tearse utilizando ciertas funciones de formato de texto (consulte las páginas 11 a 17).
- Page 116 Barcode Barcode ( La función Barcode le permitirá añadir su código de barras deseado a su etiqueta. Ade- más, los diversos parámetros de códigos de barras le permitirán crear códigos de barras per- sonales. NOTA En esta sección se explica cómo introducir un código de barras en su texto.
-
Page 117: Edición De Texto
Para introducir los datos del código de barras: 9 Escriba los datos del código de barras. Para añadir caracteres especiales a códigos de barras (solamente con protocolos EAN128, CODE128, CODE39 o CODABAR): 0 Presione hasta que el cursor quede debajo o a la derecha de donde desee añadir un carácter especial. - Page 118 Code Back Space Clear ( Clear Después de haber impreso su texto, tendrá que borrar la visualización a fin de poder diseñar otro nuevo. Con la función Clear podrá selec- cionar el borrado de todo el texto y todos los ajustes de formato, o simplemente el texto y sus ajustes de formato de texto.
- Page 119 Para seleccionar un área de texto: 1 Presione cursor quede al lado del primer carácter que desee seleccionar. Area 2 Presione . El primer carácter se resal- tará. 3 Presione resalten todos los caracteres que desee seleccionar. 4 Formatee el texto utilizando las funciones de formateo de texto (consulte las páginas 11 a 17) o utilice la función Copy &...
-
Page 120: Formateo
Formateo Para confeccionar etiquetas más decorativas, existe una gran variedad de funciones de forma- teo. Usted podrá utilizar las funciones de formateo de texto siguientes para cambiar el aspecto de los caracteres: Font, Size, Width, Style, Italic, (efectos de línea) y Vert (vertical). Estos efectos podrán aplicarse a parte del texto o a todo él antes o después de haberlo introducido. - Page 121 Size ( Size El tamaño de los caracteres podrá ajustarse utili- zando la Size. Con el ajuste Auto, la máquina comparará su texto con la anchura de la cinta instalada y ajustará automáticamente los carac- teres al mayor tamaño posible. Con respecto a los ajustes de Size, consulte la página 81 de inglés.
- Page 122 Para cambiar la fuente del texto de un área seleccionada: Code 1 Mantenga pulsada para seleccionar todo el texto, o presione Area y utilice seleccionar solamente parte del mismo. 2 Presione hasta que el texto se visualice Size en el tamaño deseado. El ajuste actual se mostrará...
- Page 123 Style ( Style Usted podrá elegir entre 7 tipos diferentes de estilos para crear etiquetas más personalizadas. Con respecto a las muestras, consulte la página 82. de inglés. El estilo del texto en la posición actual del cursor se mostrará mediante los indi- cadores Style de la parte inferior del visualiza- dor.
- Page 124 Para cambiar el ajuste Italic del texto antes de introducirlo: 1 Presione cursor se mueva hasta el punto a partir del que desee comenzar a utilizar un ajuste Ita- lic diferente. 2 Presione para seleccionar ON o OFF. Italic El ajuste actual se mostrará debajo de ITA- LIC de la parte superior del visualizador, y a la derecha del cursor podrá...
- Page 125 Para cambiar el ajuste Line effects del texto de un área seleccionada: Code 1 Mantenga pulsada para seleccionar todo el texto, o presione Area y utilice seleccionar solamente parte del mismo. 2 Presione hasta que el texto se visualice en el ajuste Line effects deseado. El ajuste actual se mostrará...
- Page 126 Frame/shading ( Usted podrá elegir entre gran variedad de cua- dros y sombras para enfatizar ciertas partes o todo el texto de su etiqueta. Con respecto a las muestras, consulte la página 83 de inglés. Para aplicar un cuadro o sombra a todo el texto: 1 Presione NOTA...
- Page 127 NOTA Para borrar el cuadro o el sombreado, coloque el cursor a la izquierda del cuadro/sombreado que desee borrar, y después presione Cuando aparezca el mensaje “OK TO CLEAR FRAME/SHADING”, presione para mover 9 hasta el lado de OK y presione New Block Para conservar el marco/sombreado, presione Cancel...
- Page 128 0 Presione para mover 9 hasta el lado del cuadro o del patrón de sombreado deseado. A Presione . El cuadro o el sombreado New Block deseado se aplicará a los bloques de texto seleccionados. Format ( Format Al presionar la tecla Format se visualizará un menú...
- Page 129 1 Presione Format NOTA Para volver al texto sin realizar ningún cambio, presione Format en cualquier momento. Para devolver todas las funciones del menú FORMAT a sus ajustes predeterminados, man- Code tenga pulsada y presione (barra espaciadora). 2 Presione hasta que Î se mueva al lado de MARGIN.
- Page 130 Para cambiar el ajuste de PITCH : Con esta función podrá seleccionar si cada carácter adquirirá o no la misma anchura. HIHIHI [NORMAL] H I H I H I [FIXED] 1 Presione Format NOTA Para volver al texto sin realizar ningún cambio, presione en cualquier momento.
- Page 131 5 Para confirmar el ajuste, presione una vez New Block Si ha seleccionado SMALL o LARGE, escriba el texto deseado y cambie la fuente presionando hasta que se visualice el Font ajuste de la fuente deseada. NOTA Usted podrá introducir hasta 20 caracteres. También podrá...
- Page 132 3 Presione . La primera línea del texto New Block de la plantilla se mostrará debajo de EDIT TEXT en la parte superior del visualizador. Con respecto a los números de plantillas y a las muestras, consulte Appendix de inglés. 4 Escriba el nuevo texto.
- Page 133 Para continuar la edición de la etiqueta o el sello: C Presione para mover 9 hasta el lado de CONTINUE. D Repita los pasos 4 y 5 hasta haber editado el texto en la forma deseada. Después de haber editado la última línea de texto en la plantilla y de haber presionado aparecerá...
-
Page 134: Almacenamiento E Invocación De Archivos
NOTA El nombre de archivo solamente podrá contener hasta 10 caracteres. M Presione . El texto se almacenará New Block bajo el número seleccionado con el nom- bre de archivo introducido. Para crear otra etiqueta o sello utilizando una plantilla diferente: N Presione para mover 9 hasta el lado de FILE. - Page 135 5 Presione . El texto se almacenará New Block bajo el número seleccionado con el nom- bre de archivo introducido. Para almacenar un archivo que se haya almace- nado antes: 1 Presione 2 Presione para mover 9 hasta el lado de SAVE. NOTA Para volver a la pantalla anterior sin realizar ningún Cancel...
-
Page 136: Impresión
3 Presione New Block 4 Seleccione el archivo que desee borrar. Para explorar a través de los archivos alma- cenados, presione NOTA Para seleccionar todos los archivos almacenados, Code mantenga pulsada y presione Para buscar un archivo específico, escriba una parte del nombre del archivo deseado, y después presione New Block con los nombres que contengan el texto... - Page 137 Para imprimir múltiples copias de una etiqueta: 1 Presione Print 2 Presione para mover 9 hasta el lado de OPTION. NOTA Para volver al texto sin realizar ningún cambio, pre- sione en cualquier momento Print 3 Presione New Block NOTA Para hacer que se visualice rápidamente el menú...
- Page 138 3 Presione New Block NOTA Para hacer que se visualice rápidamente el menú OPTION, mantenga pulsada sione Print Para volver a la pantalla anterior sin realizar ningún cambio, presione Para devolver todas las funciones del menú OPTION a los ajustes predeterminados, man- Code tenga pulsada y presione...
- Page 139 NOTA Para hacer que se visualice rápidamente el menú OPTION, mantenga pulsada sione Print Para volver a la pantalla anterior sin realizar ningúnn cambio, presione Para devolver todas las funciones del menú OPTION a sus ajustes predeterminados, man- Code tenga pulsada y presione (barra espaciadora).
- Page 140 2 Presione para mover 9 hasta el lado de OPTION. NOTA Para volver al texto sin realizar ningún cambio, pre- sione en cualquier momento. Print 3 Presione New Block NOTA Para hacer que se visualice rápidamente el menú OPTION, mantenga pulsada sione Print Para volver a la pantalla anterior sin realizar...
- Page 141 5 Presione 6 Presione para mover 9 hasta el lado del ajuste deseado. NOTA Para seleccionar ajuste ABC ABC [BOTH]), presione (barra espaciadora). 7 Presione para confirmar el ajuste y New Block volver al menú OPTION. Para utilizar la impresión SPLIT: La función SPLIT alargará...
-
Page 142: Ajuste De Las Funciones De Visualización
Ajuste de las funciones de visuali- zación Setup ( Setup Al presionar se visualizarán las cuatro fun- Setup ciones que le permitirán cambiar el aspecto general del texto mostrado en el visualizador. Para cambiar el ajuste de LINE NO.: Esta función le permitirá seleccionar si se visua- lizará... - Page 143 4 Presione para mover Î hasta el lado del ajuste que desee seleccionar. NOTA Para seleccionar el ajuste predeterminado, presione (barra espaciadora). 5 Presione una vez New Block ajuste y volver al menú SETUP. 6 Vuelva a presionar New Block el ajuste.
-
Page 144: Solución De Prodlemas
Solución de prodlemas Problema (1) El visualizador permanece en blanco después de haber conectado la aliment- ación de la máquina, o se visualizan caracteres anormales. (2) El texto mostrado en el visualizador no puede leerse. (3) La máquina no imprime o los caracteres impresos aparecen difuminados. - Page 145 Problema (5) A través del texto de la etiqueta impresa aparece una línea horizontal en blanco. Solución 1 Desconecte la alimentación de la máquina. 2 Abra la cubierta del compartimiento del casete de cinta, y después extraiga éste si está instalado.
- Page 146 Problema (6) La cinta no sale correctamente después de haberse cortado automáticamente. Palillo de cabeza Pieza de metal (Área a limpiarse) (7) La máquina se ha “bloqueado” (es decir, no sucede nada al presionar una tecla). Desconecte máquina, abra la cubierta del comparti- miento del casete de cinta, y extraiga éste.
- Page 147 Problema (8) Después de haber desconectado la ali- mentación del P-touch, aparecerá el mensaje “BACKUP CLEARED”, y se perderán todos los archivos de la memoria. La batería de protección interna está débil. Póngase en contacto con su pro- MEMORY veedor más cercano. Solución...
-
Page 148: Especificaciones De La Máquina
Especificaciones de la máquina HARDWARE Alimentación: 120 V CA, 60 Hz (Desconexión automática de la alimentación si no presiona ninguna tecla antes de 30 minutos) Dispositivo de Teclado (77 teclas) entrada: Visualizador de 64 puntos cristal líquido: 21 indicadores (con iluminación de fondo) Cinta de 6 widths available: impresión:...
Need help?
Do you have a question about the PT-9400 and is the answer not in the manual?
Questions and answers