Table of Contents
Advertisement
Quick Links
Advertisement
Table of Contents

Related Manuals for Pando PLT-7460


Summary of Contents for Pando PLT-7460
- Page 1 PLT-7460 Certificación del Sistema de Gestión de la Calidad Environmental Management System Ce rtification UNE-EN I SO 14001:2015 ES20/208675 Sistema de Gestión de la Calidad Quality Management Syst UNE-EN ISO 9001:2015 ES19/86566 www.pando.es V21.2...
-
Page 5: Table Of Contents
CONTENTS SAFETY INFORMATION......................6 Earthing Instructions........................7 Disposal............................10 PRODUCT OVERVIEW......................11 USING YOUR DISHWASHER ....................12 Loading The Salt Into The Softener.....................12 Basket Loading Tips ........................14 Water Softener ...........................16 Preparing And Loading Dishes ....................17 Function Of The Rinse Aid And Detergent..................20 Filling The Rinse Aid Reservoir ....................21 Filling The Detergent Dispenser....................22 QUICK USER GUIDE ........................23 CONTROL PANEL ........................24... -
Page 6: Safety Information
SAFETY INFORMATION WARNING When using your dishwasher, follow the precautions listed below: Installation and repair can only be carried out by a qualified technician This appliance is intended to be used in house . hold This appliance can be used by children aged 8 and older, and persons with reduced physical, sensory or mental capabilities or lack of experience and knowledge if they have been given supervision or... -
Page 7: Earthing Instructions
Packaging material could be dangerous for children! This appliance is for indoor household use only. To protect against the risk of electrical shock, do not immerse the unit, cord or plug in water or other liquid. Please unplug before cleaning and performing maintenance on the appliance. - Page 8 Do not modify the plug provided with the appliance; If it does not fit the outlet. Have a proper outlet installed by a qualified electrician. Do not abuse, sit on, or stand on the door or dish rack of the dishwasher. Do not operate your dishwasher unless all enclosure panels are properly in place.
- Page 9 Do not wash plastic items unless they are marked “dishwasher safe” or the equivalent. For unmarked plastic items not so marked, check the manufacturer's recommendations. Use only detergent and rinse agents recommended for use in an automatic dishwasher. Never use soap, laundry detergent, or hand washing detergent in your dishwasher.
-
Page 10: Disposal
Disposal For disposing of package and the appliance please go to a recycling center. Therefore cut off the power supply cable and make the door closing device unusable. Cardboard packaging is manufactured from recycled paper and should be disposed in the waste paper collection for recycling. -
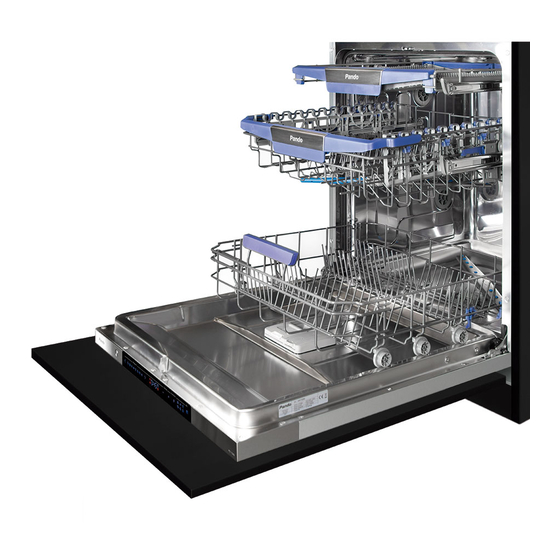
Page 11: Product Overview
Upper spray arm Cup rack Cutlery rack Upper basket Lower basket PANDO WASH SYSTEM 720° The breakthrough innovative spray arm uses two separate rotating axes to maximize water spray to all corners of the dishwasher, ensuring every item receives an exceptional clean. -
Page 12: Using Your Dishwasher
USING YOUR DISHWASHER Before using your dishwasher : Inside Outside 1. Set the water softener 2. Loading the salt Into the softener Loading the basket Fill the detergent dispenser Loading The Salt Into The Softener NOTE: If your model does not have any water softener, you may skip this section. Always use salt intended for dishwasher use. - Page 13 Please follow the steps below for adding dishwasher salt: 1. Remove the lower basket and unscrew the reservoir cap. 2. Place the end of the funnel (supplied) into the hole and pour in about 1.5kg of dishwasher salt. 3. Fill the salt container to its maximum limit with water, It is normal for a small amount of water to come out of the salt container.
-
Page 14: Basket Loading Tips
Basket Loading Tips Adjusting the upper basket To raise the upper basket just lift the upper basket at the center of each side until the basket locks into place in the upper position. It is not necessary to lift the adjuster handle. To lower the upper basket,... - Page 15 Folding back the cup shelves You can load cups or glasses onto the glass support. This is also very convenient for washing wine glasses. Hang your wine glasses onto the pegs of the glass support. Please determine the position according to the Small glass Middle glass size of the wine glasses.
-
Page 16: Water Softener
Water Softener The water softener must be set manually, using the water hardness dial. The water softener is designed to remove minerals and salts from the water, which would have a detrimental or adverse effect on the operation of the appliance. The more minerals there are, the harder your water is. -
Page 17: Preparing And Loading Dishes
NOTE: If your model does not have any water softener, you may skip this section. Water Softener The hardness of the water varies from place to place. If hard water is used in the dishwasher, deposits will form on the dishes and utensils. The appliance is equipped with a special softener that uses a salt containerspecifically designed to eliminate lime and minerals from the water. - Page 18 Recommendations for loading the dishwasher Scrape off any large amounts of leftover food. Soften remnants of burnt food in pans. It is not necessary to rinse the dishes under running water. For best performance of the dishwasher, follow these loading guidelines. (Features and appearance of baskets and cutlery baskets may vary from your model.) Place objects in the dishwasher in following way:...
- Page 19 Loading the upper basket The upper basket is designed to hold more delicate and lighter dishware such as glasses, coffee and tea cups and saucers, as well as plates, small bowls and shallow pans (as long as they are not too dirty).Position the dishes and cookware so that they will not get moved by the spray of water.
-
Page 20: Function Of The Rinse Aid And Detergent
Function Of The Rinse Aid And Detergent The rinse aid is released during the final rinse to prevent water from forming droplets on your dishes, which can leave spots and streaks. It also improves drying by allowing water to roll off the dishes. Your dishwasher is designed to use liquid rinse aids. WARNING Only use branded rinse aid for dishwasher. -
Page 21: Filling The Rinse Aid Reservoir
Filling The Rinse Aid Reservoir Remove the rinse reservoir cap by lifting up the handle . Pour the rinse aid into the dispenser, being careful not to overfill. Close the cap after all. -
Page 22: Filling The Detergent Dispenser
Filling The Detergent Dispenser Sliding it to the right Press down Add detergent into the larger cavity (A) for the main wash cycle . For better cleaning result, especially if you have very dirt items, pour a small amount of detergent onto the door. The additional detergent will activate during the pre-wash phase. -
Page 23: Quick User Guide
QUICK USER GUIDE Please read the corresponding content on the instruction manual for detailed operating method. Install the dishwasher (Please check the section “INSTALLATION INSTRUCTION ”) Inside Outside Load the baskets. Remove larger residue from dishes. Avoid pre-rinsing. Fill the dispenser with detergent and Select a suitable program and rinse aid. -
Page 24: Control Panel
CONTROL PANEL Operation (Button) Press the button to turn on your dishwasher,the screen lights up. Power Press the “ ” or “ ” button to select a program, and the Program corresponding indicator will be lit. Press the “+”button to add the delay time or press the “-”button to decrease the delay time, maximum 24 hours delay can be Delay -/+ defined. - Page 25 Screen Auto For lightly, normally or heavily soiled crockery with or without dried-on food. Hygiene With the sanitize option selected, the water temperature is increased to 70 ˚C for high temperature sanitization. Universal For normally soiled loads, such as pots, plates, glasses and lightly soiled pans.
- Page 26 To show the reminding time and delay time,error codes etc. Screen Strong wash To wash very dirty, hard to clean dishes. ( It can only be used with Hygiene, Universal, ECO, Glass, 90 min ) Energy save when you have less plates to wash ,you can choose it. (It can only be used with , ECO, Hygiene, Universal...
-
Page 27: Loading The Baskets
LOADING THE BASKETS ACCORDING TO EN60436: Loading the dishwasher to its full capacity will contribute to energy and water savings. 1.Upper basket: Number Item Cups Saucers Glasses Mugs Small pot Item Number Oven pot Dessert plates Dinner plates Soup plates Oval platter Melamine dessert plates Melamine bowls... - Page 28 3.Cutlery rack: Item Number Soup spoons Forks Knives 4 4 4 Teaspoons Dessert spoons Information for comparability Serving spoons tests in accordance with EN 60436 Capacity: 14 place settings Serving forks Position of the upper basket: lower position Gravy ladles Program: ECO Rinse aid setting: 6 Softener setting: H3...
- Page 29 Cutlery Rack Used Tips Lift the left basket up, adjust it to lower position, left basket is flat and right basket is sideling. Lift the right basket up, both left and right baskets are flat. Move the right basket from right to left, two basket are overlapping.
-
Page 30: Programselection
PROGRAMSELECTION The table below shows which programs are best for the levels of food residue on them and how much detergent is needed. It also show various information about the programs. Consumption values and program duration are only indicative except for ECO program. ... -
Page 31: Saving Energy
Saving Energy 1. Pre-rinsing of tableware items leads to increased water and energy consumption and is not recommended. 2. Washing tableware in a household dishwasher usually consumes less energy and water in the use phase than hand dishwashing when the household dishwasher is used according to the instructions. -
Page 32: Forget To Add A Dish
Forget To Add A Dish? A forgotten dish can be added any time before the detergent dispenser opens. If this is the case, follow the instructions below: 1. Open the door a little to stopped the washing. 2. After the spray arms stop working, you can open the door completely. 3. -
Page 33: Maintenance And Cleaning
MAINTENANCE AND CLEANING External Care The door and the door seal Clean the door seals regularly with a soft damp cloth to remove food deposits. When the dishwasher is being loaded, food and drink residues may drip onto the sides of the dishwasher door. These surfaces are outside the wash cabinet and are not accessed by water from the spray arms. - Page 34 Coarse filter Coarse filter Main filter Main filter Fine filter Open Open Hold the coarse filter and rotate it The fine filter can be pulled off the anticlockwise to unlock the filter. bottom of the filter assembly. Lift the filter upwards and out of The coarse filter can be detached the dishwasher.
- Page 35 Spray arms It is necessary to clean the spray arms regularly for hard water chemicals will clog the spray arm jets and bearings. To clean the spray arms, follow the instructions below: To remove the upper spray arm, To remove the lower spray arm, pull hold the nut in the center still and out the spray arm upward.
-
Page 36: Caring For The Dishwasher
Caring For The Dishwasher Frost precaution Please take frost protection measures on the dishwasher in winter. Every time after washing cycles, please operate as follows: 1. Cut off the electrical power to the dishwasher at the supply source. 2. Turn off the water supply and disconnect the water inlet pipe from the water valve. 3. -
Page 37: Troubleshooting Tips
TROUBLESHOOTING TIPS Before Calling For Service Reviewing the charts on the following pages may save you from calling for service. Problem Possible Causes What To Do Dishwasher doesn't Fuse blown, or the Replace fuse or reset circuit breaker. start circuit break tripped. Remove any other appliances sharing the same circuit with the dishwasher. - Page 38 Problem Possible Causes What To Do Stained tub interior Detergent with Make sure that the detergent has no colourant may colourant. have been used. White film on Hard water minerals. To clean the interior, use the damp soft cloth with dishwasher detergent inside surface and wear rubber gloves.
- Page 39 Problem Possible Causes What To Do The dishes The filter combination Clean and/or fit the filter correctly. are not clean. is not clean or is not Clean the spray arm jets. correctly fitted in the base of wash cabinet. This may cause the spray arm jets to get blocked.
- Page 40 Causes and Recommendations on what to do when drying is not appropiated. Reasons for not having a ne drying process are usually found beyond the product operating, as long as there is not any clear evidence of a product aw. Most of times, reasons can be explained by external elements such as an unappropriated use of the device (settings) or of related washing products (tablets and/or soap) Before contacting Customer Service, dismiss any non-existing aw on the device, as it would mean labour and transport costs...
-
Page 41: Availability Of Spare Parts
Availability Of Spare Parts Seven years after placing the last unit of the model on the market: Motor, circulation and drain pump, heaters and heating elements, including heat pumps (separately or bundled), piping and related equipment including all hoses, valves, filters and aqua stops, structural and interior parts related to door assemblies (separately or bundled), printed circuit boards, electronic displays, pressure switches, thermostats and sensors, software and firmware including... -
Page 42: Error Codes
ERROR CODES If there is a malfunction, the dishwasher will display error codes to identify these: Meanings Codes Possible Causes Faucets is not opened, or water intake is Longer inlet time. restricted,or water pressure is too low. Not reaching required Malfunction of heating element . -
Page 43: Warranty
PANDO WARRANTY CERTIFICATE https://www.pando.es/en/after-sales-services/ www.pando.es/asistencia-tecnica/ https://www.pando.es/fr/service-apres-vente/ www.pando.es... -
Page 44: Technical Information
TECHNICAL INFORMATION Height (H) 815mm Width (W) 598mm Depth (D1) 550mm (with the door closed) Depth (D2) 1150mm (with the door opened 90°) - Page 45 Product information sheet Supplier's name or trade mark: PANDO Supplier's address ( ): Model identifier: PLT-7460 General product parameters: Parameter Value Parameter Value Height Rated capacity ( ) (ps) Dimensions in cm Width Depth EEI ( ) 43,9 Energy efficiency class ( )
-
Page 47: Installation Instruction
PLT-7 60 INSTALLATION INSTRUCTION www.pando.es... -
Page 48: About Power Connection
INSTALLATION INSTRUCTION WARNING Electrical Shock Hazard Disconnect electrical power before installing dishwasher. Failure to do so could result in death or electrical shock. Attention The installation of the pipes and electrical equipments should be done by professionals. About Power Connection WARNING For personal safety: Do not use an extension cord or an adapter... -
Page 49: Water Supply And Drain
Water Supply And Drain Cold water connection Connect the cold water supply hose to a threaded 3/4(inch) connector and make sure that it is fastened tightly in place. If the water pipes are new or have not been used for an extended period of time, let the water run to make sure ordinary supply hose that the water is clear. -
Page 50: Connection Of Drain Hoses
Connection Of Drain Hoses Insert the drain hose into a drain pipe with a minimum diameter of 4 cm, or let it run into the sink, making sure to avoid bending or crimping it. The height of drain pipe must be less than 1000mm. The free end of the hose must not be immersed in water to avoid the back flow of it. -
Page 51: Positioning The Appliance
Positioning The Appliance Position the appliance in the desired location. The back should rest against the wall behind it, and the sides, along the adjacent cabinets or walls. The dishwasher is equipped with water supply and drain hoses that can be positioned either to the right or the left sides to facilitate proper installation. - Page 52 If dishwasher is installed at the corner of the cabinet, there should be some space when the door is opened. Dishwasher Cabinet NOTE: Door of Depending on where your electrical dishwasher outlet is, you may need to cut a hole in the opposite cabinet side.
- Page 53 Step 3. Dishwasher installation steps Please refer to the specific installation steps in the installation Please refer to the specific installation steps in the installation drawings. drawings. 1. Affix the condensation strip under the work surface of cabinet. Please ensure the condensation strip is flush with edge of work surface.
- Page 54 Step 4. Levelling the dishwasher Dishwasher must be level for proper dish rack operation and wash performance. Place a spirit level on door and rack track inside the tub as shown to check that the dishwasher is level. Level the dishwasher by adjusting the three levelling feet individually. When level the dishwasher, please pay attention not to let the dishwasher tip over.
-
Page 55: Sound-Absorbing Strip Installation
SOUND-ABSORBING STRIP INSTALLATION Sound-absorbing strip Left Take away Right Take away the four screws form the right and left side plates. Screw into Remove the protection from the Screw on the screws after all. sound-absorbing strips, then stick the strips to the side plates, please align to the hole postion. - Page 56 INOXPAN S.L. NOTES:...
- Page 57 INOXPAN S.L. NOTES:...
- Page 58 INOXPAN S.L. NOTES:...
- Page 59 INOXPAN S.L. NOTES:...
- Page 60 Av. El Molí de les Mateves,11 Apdo. Correos nº 21 08310 ARGENTONA (Barcelona - Spain) Tel. +34 93 757 94 11 Fax +34 93 757 96 53 www.pando.es com.pando@pando.es Export: export@pando.es Tel. 902 41 55 11 Sistema de Gestión de la Calidad...
Need help?
Do you have a question about the PLT-7460 and is the answer not in the manual?
Questions and answers