Table of Contents
Advertisement
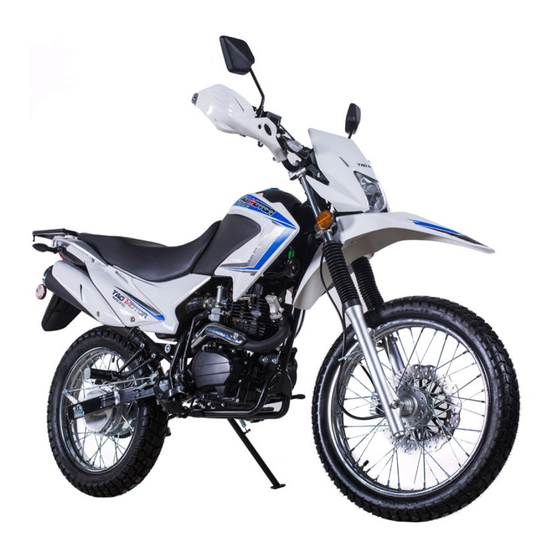
TBR7 Owner's Manual
READ THIS MANUAL CAREFULLY! It contains
important safety and service information.
THIS IS AN UNAUTHORIZED EDIT OF THE ORIGINAL MANUAL.
IT HAS BEEN EDITED FOR SPELLING AND CLARITY AND IS IN
NO WAY ENDORSED OR ACKNOWLEDGED BY TAO MOTOR.
THE EDIT IS INTENDED TO ENHANCE THE ORIGINAL MANUAL
AND NOT REPLACE IT.
Advertisement
Table of Contents

Related Manuals for Tao Motor TBR7


Summary of Contents for Tao Motor TBR7
- Page 1 THIS IS AN UNAUTHORIZED EDIT OF THE ORIGINAL MANUAL. IT HAS BEEN EDITED FOR SPELLING AND CLARITY AND IS IN NO WAY ENDORSED OR ACKNOWLEDGED BY TAO MOTOR. READ THIS MANUAL CAREFULLY! It contains THE EDIT IS INTENDED TO ENHANCE THE ORIGINAL MANUAL important safety and service information.
- Page 2 Please read carefully before operating this vehicle! This vehicle should only be assembled and prepped by an authorized Tao Motor Dealer or professional motorcycle mechanic. You should never try or attempt assembly of this vehicle; it should be done by professionals.
- Page 3 Thank you for your purchasing the Tao Motor TBR7 motorcycle. This manual covers the main data, basic structure, and main procedures of operation, adjustment, maintenance and troubleshooting of this motorcycle. Products are always subject to further improvement, which will cause some difference between the vehicle and this manual.
-
Page 4: Table Of Contents
TABLE OF CONTENTS ENGINE IDLE ADJUSTMENT ............. 22 SAFETY INFORMATION ..............1-3 CLUTCH LEVER ADJUSMENT ............23 WARNING & SAFETY LABELS ............4 HYDRAULIC FRONT BRAKE .............. 24 SPECIFICATIONS ................5,6 REAR BRAKE ................... 25 DESCRIPTION ................7-9 SIDE STAND, SPROCKET ..............26 INSTRUMENT CLUSTER.............. -
Page 5: Safety Information
SAFETY INFORMATION Important Safety Information Take responsibility for your own safety and understand the challenges you can meet while riding. There is much that you can do to protect yourself when you ride. You'll find many helpful recommendations throughout this manual. The following are a few that we consider most important. - Page 6 Improper accessories or modifications can cause a crash in which you can be seriously hurt or killed. Follow all instructions in this owner's manual regarding accessories and modifications. Tao Motor recommends that you use only genuine OEM accessories that have been specifically designed and tested for your motorcycle.
- Page 7 SAFETY INFORMATION Helmets and Eye Protection A helmet is your most important piece of riding gear because it offers the best protection against head injuries. A helmet should fit your head comfortably and securely. A bright-colored helmet and reflective strips can make you more noticeable in traffic. An open-face helmet offers some protection, but a full-face helmet offers more.
-
Page 8: Warning & Safety Labels
WARNING & SAFETY LABELS Please read and understand all of the labels on your TBR7. These labels contain important information for safe and proper operation. Never remove any labels from your motorcycle. If a label becomes difficult to read or comes off, request a new replacement label from your local Tao... -
Page 9: Specifications
SPECIFICATIONS Model TBR 7 Displacement 229cc Overall Length 2040mm 67mm×65mm Cylinder Bore×Stroke Overall Width 840mm Compression Ratio 9.1:1 Overall Height 1200mm Power Output/Max. RPM 11kW/6500 RPM 1345mm Maximum Torque @ RPM 17.5N.m @ 5500 RPM Wheelbase 130 kg Idle RPM 1500 RPM ±150 Dry Weight 150kg(including the driver) - Page 10 SPECIFICATIONS Volume of Lubricating Oil 1.1L Fuse Fuel Tank Capacity 12.5L Battery 12V9Ah Transmission Gear Ratios Ignition Type C.D.I 1st gear 2.909 2nd gear 1.867 3rd gear 1.389 4th gear 1.150 5th gear 0.9545...
-
Page 11: Description
DESCRIPTION Ignition Key Switch Left Rear View Mirror Right Rear View Mirror Speedometer Clutch Lever Front Brake Lever Horn Button Throttle Engine Start Switch... - Page 12 DESCRIPTION The VIN is on the right side of the frame. Fuel Cock/Fuel Valve Side Stand Gear Shifter Rear Wheel...
- Page 13 DESCRIPTION Front Turn Signals Exhaust Muffler Rear View Mirror Seat Cushion Kick Start Lever Rear Brake Lever Front Wheel Front Shock Absorber...
-
Page 14: Instrument Cluster
INSTRUMENT CLUSTER Name Description Shows speed in mph and km/h. Speedometer Indicates turn signal operation. Turn Signal Indicator Turn the knob to reset the trip odometer. Trip Odometer Reset Knob Lit when high beam is on. High Beam Indicator Shows currently selected gear. Gear Position Display Comes on when the transmission is Neutral. -
Page 15: Ignition Switch
IGNITION SWITCH Remarks Position Function The key can be To stop the vehicle engine. removed. (Turns off the electrical system.) For starting or riding the vehicle. The key cannot be (Turns on the electrical system.) removed LOCK Locks the steering. The key can be removed. -
Page 16: Fuel Cock/Valve
FUEL COCK/VALVE RESERVE: With the handle of the fuel cock set to the "RES" position, the fuel is supplied from the reserve. FUEL TANK (Note:The reserved fuel can only be used when The fuel tank capacity is 12.5L in total including 1.1L of Reserve. 91 Octane or higher the normal supply is run out.)In this unleaded fuel is required for this motorcycle. -
Page 17: Starting Engine
STARTING ENGINE STARTING ENGINE (COLD) Engine can also be started in any gear by 1. Turn the fuel valve lever to the "ON" position. NOTE depressing clutch lever and pressing the start 2. Turn the ignition key to the "ON" position. button at the same time "... -
Page 18: Main Switch
MAIN SWITCH Engine Start/Stop Switch Use this switch to "Stop " the engine in an emergency situation. The engine will not start when this switch is set to this position. Set this switch to "Run " position before starting the engine. -
Page 19: Headlight, Horn, Turn Signal Switch Assembly
HEADLIGHT, HORN, TURN SIGNAL SWITCH ASSEMBLY 1. Headlight Switch ① The Headlight Switch has three positions OFF, Running Light, Headlight ON. It’s always recommended you ride with the headlight ON all the time. ② 2. Headlight High/ Low beam switch High beam. -
Page 20: Gear Shifter
GEAR SHIFTER Your motorcycle transmission has 5 forward gears in one-down, four-up shift pattern. Start the engine and let it warm up at idle speed. Apply the clutch lever and select 1st gear, slowly releasing the clutch lever. A small amount of throttle may be needed to Gear Select Lever Up move forward. -
Page 21: Engine Oil
ENGINE OIL The engine oil level should be checked before each ride. In addition, always follow the maintenance schedule for oil changes as shown in the maintenance schedule. NOTE Your new vehicle's engine comes with shipping oil. Shipping oil must be changed before the engine is started for the first time. -
Page 22: Engine Oil Change
ENGINE OIL CHANGE 1. Place the motorcycle on a level surface. 2. Place an oil pan under the engine to collect the used oil. 3. Remove the engine oil filler cap, and then remove the engine oil drain bolt to drain the oil from the crankcase. 4. -
Page 23: Spark Plug
SPARK PLUG Checking the spark plug The spark plug is an important engine component which is easy to check. The spark plug should be removed and checked in accordance with the periodic maintenance and lubrication chart. To remove the spark plug 1. -
Page 24: Air Filter Element
AIR FILTER ELEMENT The air filter element should be serviced at the intervals specified in the periodic maintenance and lubrication chart. Clean and replace as needed. Clean and replace air filter more frequently if used in dusty or dirty areas. Never use low-flash-point solvents or gasoline to clean the air filter element because the engine could catch fire or explode. -
Page 25: Throttle Cable
THROTTLE CABLE ADJUSTMENT Check throttle lever free play, adjust if necessary. NOTE Please check with Tao Motor dealer if throttle cable cannot be adjusted properly. Normal throttle free play is 2mm to 6mm Lubricate cable using silicone cable lubricant to reduce premature wear and to ensure proper movement of the cable. -
Page 26: Engine Idle Adjustment
ENGINE IDLE ADJUSTMENT If it is necessary to adjust the carburetor idle screw due to changed outside environmental conditions, to adjust carburetor idle screw as follows; Warm up the engine by running the vehicle in "Neutral" gear position. Adjust the carburetor idle screw until the desired idle RPM is reached. Turning the idle screw in (clockwise) to raise RPM. Turning the screw out (counterclockwise) will lower RPM. -
Page 27: Clutch Lever Adjusment
Free play at the clutch lever: Check the clutch cable for kinks or signs of wear. If necessary have it replaced by your Tao Motor dealer. Lubricate the clutch cable with a commercially available cable lubricant to prevent premature wear and corrosion. -
Page 28: Hydraulic Front Brake
NOTICE Have your local Tao Motor dealer inspect brakes system for wear or damage. Always contact your local Tao Motor Dealer if you have any concerns after inspecting your brake system for wear or damage. Recommended Brake Fluid Always use brake fluid type DOT 3 or 4. -
Page 29: Rear Brake
2. Apply the brake, release it, and then spin the wheel and check the brake starts to engage. that it rotates freely. Repeat this procedure several times. 3. Check the free play. If you can’t adjust the free play properly, see your Tao Motor dealer. ① ② (2) Rear Brake Adjusting Nut (3) Brake Arm Pin ③... -
Page 30: Side Stand, Sprocket
2. Check the side stand assembly for freedom of movement. Inspect the front and rear sprocket teeth for excessive wear or damage. If necessary, have your Tao Motor dealer replace If the side stand is stiff or squeaky, clean the pivot area and a worn sprocket. -
Page 31: Drive Chain
DRIVE CHAIN 2. Check drive chain slack at several points along the chain. The slack The service life of the chain depends on proper lubrication and should remain constant. If it isn’t, some links may be kinked and adjustment. Poor maintenance can cause premature wear or damage to binding. -
Page 32: Chain Adjusment
CHAIN ADJUSMENT 1. Hold the rear axle shaft (1 ) and loosen the rear axle nut (2). 2. Turn both the right and left chain adjusters clockwise or counterclockwise (3) equally to increase or decrease chain slack. 3. After adjusting, be sure the chain adjusters are equal in length on both sides of the swing arm (4). -
Page 33: Drive Chain Lubrication
The O-rings in this chain can be damaged by steam cleaning, high pressure washers, and certain solvents. Your motorcycle chain should only be removed or replaced by your Tao Motor dealer. When the drive chain becomes extremely dirty, it should be cleaned prior to lubrication. -
Page 34: Battery
BATTERY Battery Removal 1. Make sure the ignition switch is set to the "OFF" position. 2. Remove rear left side cover . 3. Disconnect the negative cable from the battery by unscrewing battery terminal bolt. 4. Disconnect the positive cable from the battery by unscrewing battery terminal bolt. -
Page 35: Battery Charging
1. Main Fuse (10 Amp) 4. Reinstall rear left cover . 2. Fuse Holder If a fuse continues to blow, contact your local Tao Motor dealer to check for 3. Spare Fuse electrical repair. Always use a fuse of the specified rating. Never use any substitute fuses or larger amp fuses than the original rated fuels. -
Page 36: Washing Vehicle
WASHING VEHICLE We recommend the use of a garden hose to wash your motorcycle. High pressure washers can damage certain parts of your motorcycle. If you use a high pressure washer, avoid spraying the following areas: wheel hubs - Muffler outlet - Under seat area - Engine stop button - Brake master cylinder... -
Page 37: Maintenance Schedule
•Items marked with an asterisk should be performed by a dealer as they require special tools, data and technical skills. The following items are critical to keep your Tao Motor vehicle performing correctly. Mileage... -
Page 38: General Maintenance And Lubrication Chart
GENERAL MAINTENANCE AND LUBRICATION CHART INITIAL EVERY WHICHEVER COMES FIRST CHECK OR km (mi) 1300 2500 2500 5000 MAINTENANCE JOB (200) (800) (1600) (1600) (3200) ITEM Drive Chain • Lubricate Lubrication Front Brake* ... - Page 39 GENERAL MAINTENANCE AND LUBRICATION CHART CONTINUED WHICHEVER COMES FIRST INITIAL EVERY CHECK OR km (mi) 1300 2500 2500 5000 MAINTENANCE JOB (200) (800) (1600) (1600) (3200) ITEM Wheel Hub • Check for looseness or damage, and replace if necessary. ...
- Page 40 Lubrication CARBURETOR: Tao Motor recommends using a fuel stabilizer at all times to prevent the buildup of residue from stale or deteriorated fuel. If the vehicle is not in operation for 20 days or more fuel residue can form in jets and passages causing the vehicle not to start.
-
Page 41: Periodic Maintenance Record
PERIODIC MAINTENANCE RECORD MAINTENANCE SERVICING DATE SERVICING DEALER OR PERSON REMARKS INTERVAL PERFORMED... -
Page 42: Electrical Diagram
ELECTRICAL DIAGRAM... -
Page 43: Emission Control System Warranty
As the vehicle owner, you should be aware that Tao Motor may deny your warranty coverage if your vehicle or a part has failed due to abuse, neglect, improper maintenance or unapproved modifications. If you have any questions regarding your warranty rights and responsibilities, you should contact... - Page 44 If such are placement part is used in the repair or maintenance of your engine, and an authorized Tao Motor dealer determines it is defective or causes a failure of a warranted part, your claim for repair of your engine may be denied.
- Page 45 You need to take your Tao Motor Vehicle, along with your sales receipt or other proof of original purchase date, at your expense, to any Tao Motor dealer or service shop who is authorized by Tao Motor to sell or service that Tao Motor product during his normal business hours. Claims for repair or adjustment found to be caused solely by defects in material or workmanship will not be denied because the vehicle was not properly maintained and used.
- Page 46 LIMITED LIABILITY The liability of Tao Motor under this emission control system warranty is limited solely to the remedying of defects in material or workmanship by an authorized Tao Motor dealer at its place of business during customary business hours. This warranty does not cover in convenience or loss of use of the vehicle or transportation of the vehicle to or from the Tao Motor dealer.
- Page 47 Find important product information and how-to videos on our website www.taomotor.com...
Need help?
Do you have a question about the TBR7 and is the answer not in the manual?
Questions and answers