Table of Contents
Advertisement
Quick Links
Advertisement
Table of Contents

Subscribe to Our Youtube Channel
Summary of Contents for Novation Circuit Rhythm
- Page 2 Novation has taken all possible steps to ensure that the information given here is both correct and complete. In no event can Novation accept any liability or responsibility for any loss or damage to the owner of the equipment, any third party, or any equipment which may result from use of this manual or the equipment which it describes.
-
Page 3: Table Of Contents
About this manual ..........................8 What’s In The Box ...........................8 Getting Up and Running ........................9 If you’re on a Mac: ..................................9 If you’re on Windows: ..................................9 Novation Components Overview ....................9 Having Trouble? ...........................10 Power Requirements ........................10 Hardware Overview........................12 Glossary ............................12 Top View ............................16 Rear view ............................19... - Page 4 Projects ...........................81 Switching Projects ........................81 Clearing Projects ..........................81 Saving Projects to new slots ......................82 Changing Project Colours .................................82 Packs ............................83 Loading a Pack ..........................84 Duplicating Packs .........................84 Using microSD Cards ........................85 Components ...........................87 About Components & Navigating to Circuit Rhythm ..............87...
- Page 5 Appendix ..........................88 Firmware Updates ........................88 Setup View ...........................88 Brightness ....................................89 MIDI Channels ....................................89 MIDI I/O ......................................90 Clock settings .....................................91 Analogue clock rates .................................91 Sticky Shift ....................................91 Advanced Setup View ........................92 Easy Start Tool (Mass Storage Device) .............................92 MIDI Thru configuration ................................92 Master Compressor ..................................92 Save Lock .............................93 Project loading problems ......................93...
-
Page 6: Introduction
Integrate Circuit Rhythm into your studio, or unplug and create anywhere using the built-in rechargeable battery. Circuit Rhythm is both a compositional tool and a live performance instrument. It’s an eight track sample-based groovebox with pitching and slicing capabilities. It lets you create music fast: getting patterns together is rapid and intuitive. -
Page 7: Key Features
– save thousands of samples and projects across 32 packs. • Built-in rechargeable battery with 4 hours of battery life • Novation Components integration – send samples, edit Grid FX and backup projects • Full size 5-pin MIDI In, Out and Thru •... -
Page 8: About This Manual
(See pages 16 and 19 ). We’ve used Bold text to name physical things – the top panel controls and rear panel connectors, and have made a point of using the same names used on Circuit Rhythm itself. We’ve used to name the various Views that the grid can display. -
Page 9: Getting Up And Running
Getting Up and Running We’ve made getting up and running with Circuit Rhythm as easy as possible, whether you’re a brand new beatmaker or a seasoned producer. The Easy Start Journey will take you through the basics of making your first beat with Circuit Rhythm, with videos covering the fundamentals of the machine’s workflow. -
Page 10: Having Trouble
(provided that the computer is powered on and that its USB ports have an adequate power rating). You can power your Circuit Rhythm with a USB-C to USB-C cable if required. A cable of similar length to the included USB-A to USB-C cable will offer the same performance. - Page 11 Battery at 50% The battery will be charged while Circuit Rhythm is connected to the AC mains via the AC adaptor, or to a computer’s USB 3.0 port: charging time is up to 4 hours, again depending on initial battery state.
-
Page 12: Hardware Overview
Hardware Overview Glossary Some of the terms used in this manual have a specific meaning as applied to Circuit Rhythm. Here is a list: Term Button Definition Lets you play the samples currently assigned to each Shift + Sample Drum Pads View track manually. - Page 13 Term Button Definition Lets you add samples in real time to a pattern while Record Live Record it’s playing. Also records any movements of the Macro controls. Eight rotary controls whose function varies with the Macro Controls currently selected View; used to “tweak” the sample sounds.
- Page 14 Project to 64 Projects can be saved internally, or as a Pack in flash memory. Circuit Rhythm’s operating mode when samples can be added to the pattern, or when adjustments using the Record Mode Macro controls can be saved. The Record button will be lit bright red.
- Page 15 Term Button Definition All views accessed via using Shift in combination with Shift + button, another button are referred to as secondary views. Secondary View or double-tap a These views may also be accessed by pressing the button corresponding button repeatedly to toggle between the secondary and primary views.
-
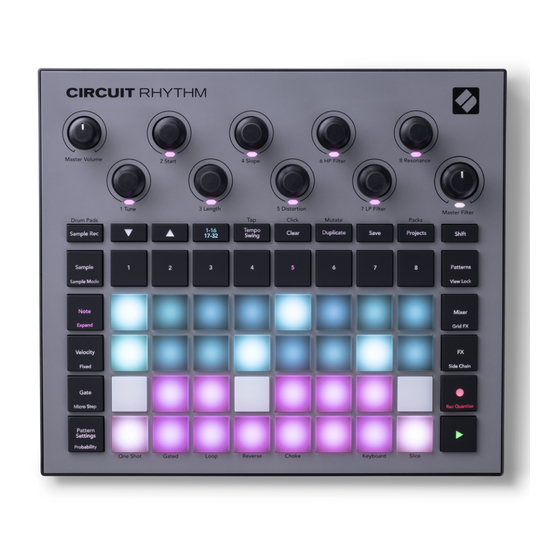
Page 16: Top View
It is always active. Macro controls 1 to 8 – eight multi-functional rotary encoders, with associated RGB LED. The availability and function of these controls varies with Circuit Rhythm’s various views: however, the panel legends describe the encoders’ functions when in... - Page 17 Master Volume – Controls the overall level of Circuit Rhythm’s audio outputs. Most of the remaining buttons select the 32-pad grid to display a specific . Each View View provides information and control of a particular aspect of a particular track, pattern or sound selection, timing adjustments, etc.
- Page 18 Sample – opens the for the currently selected track. Each track may select from Sample View 128 samples, arranged in eight pages of 16 on the two lower grid rows. J and K - these two buttons have different actions (and colours) depending on the currently selected , e.g., in they let you shift the pitch of the...
-
Page 19: Rear View
Rear view Outputs - L/Mono and R – Circuit Rhythm’s main audio outputs on two ¼” TS jack sockets. Max. output level is +5.3 dBu (+/-1.5 dBu). With no plug in the R socket, the L/Mono socket carries a mono mix of L and R channels. -
Page 20: Basics
Basics Powering the unit on Connect the supplied AC adaptor to the USB port using the cable supplied and plug the adaptor into the AC mains. This will ensure that the internal battery becomes fully charged. Connect the main outputs to a monitoring system (powered speakers or a separate amplifier and passive monitors);... - Page 21 After boot-up, the grid display will change to something like that shown below:...
-
Page 22: Getting Started
Getting started We’ve pre-loaded 16 demo Projects into the memories to give you an idea of how Circuit Rhythm works. Press the Play button ; you should hear the first demo Project. If they’re not already lit, press the 1 button , to select Track 1 and Sample ;... -
Page 23: Loading And Saving
Loading and Saving Play for the first time after powering on, the Project which Circuit Rhythm When you press plays will be the last one used when it was powered off. The factory demo described in the previous section was loaded in to Memory Slot 1. - Page 24 There’s nothing special about the slots containing factory demo Projects: you can overwrite these if you wish: you can always re-load them from Novation Components. to save a Project you’ve been working on. If you press Save You don’t need to be in...
-
Page 25: Starting From Scratch
You won’t hear anything just yet. NOTE: On Circuit Rhythm, Patterns are 16 steps long by default. This can be changed to 32 steps for any or all of the eight tracks. This topic is explained in “Step Page” on page 49. - Page 26 Brightly lit pads indicate steps (1, 3, 8, 9, 11 & 14) Play cursor (white pad) that trigger the selected advances through Pattern kick sample PLAY Pads 1-16: Pattern Steps Selected kick drum sample Pads 17-32: Samples You can select a different sample while the Pattern is playing by pressing a different pad on the lower two rows: you can use any of the eight sample pages.
- Page 27 If you want to delete a drum hit, just press its pattern step pad again: you can do this while the sequence is playing or stopped. The brightly lit pads tell you where the hits are. . First, press 3 To add a melody to your beat, you’ll need to use to enter Track Note View...
- Page 28 You can press Note a second time to enter . In this View, the sequencer Expanded Note View steps are replaced by a second chromatic keyboard, which triggers samples one octave higher than the lower: C#’ D#’ F#’ G#’ A#’ C’...
-
Page 29: Using Sample Tracks
Using Sample Tracks Circuit Rhythm has eight separate sample tracks, which correspond to the eight buttons 1 to 8 above the main playing grid. Each of the 16 pads of the lower two rows triggers a different sample: there are eight pages of these (each with 16 samples), which can be selected with the J and K buttons . - Page 30 PLAY Pattern step display Sample pads – colour coding: Track 1 Track 2 Samples (one Track 3 page of eight) Track 4 Track 5 Track 6 Track 7 Track 8 Currently active sample You can audition the samples by pressing the sample pads. To change the active sample, give a different sample pad a quick tap: a longer press will play the sample but leave the previous sample assigned as the active one.
-
Page 31: Sample Flip
Sample Flip Although each track on Circuit Rhythm is monophonic, it is possible to assign different samples to individual steps on a single track. This is useful for creating interesting and intricate drum beats. The action of assigning different samples per-step is called Sample Flip. -
Page 32: Sample Modes
Sample Modes Circuit Rhythm offers several sample play back options: these are selected in Sample Mode View by pressing Shift and Sample , or press Sample again if you are Enter Sample Mode View already in . All the options on... -
Page 33: Keyboard And Slice Note Views
Note Mode allows you to play samples either chromatically or sliced, allowing you to create bass lines, Note View melodies, or chopped up beats with Circuit Rhythm Keyboard Note View By default, each track’s will be in Keyboard mode. In this mode, the lower two rows of Note View –... - Page 34 SLICES SLICES SLICES One Shot Gated Loop Reverse Choke Keyboard Slice Sample Mode View in Slice Mode Selecting the left-most white pad will divide samples into 4 equal slices, the middle pad will do so with 8 slices, and the right-most pad will do so with 16 slices. The default setting is 16 slices. On resuming Note , 4, 8 or 16 pads will be lit corresponding with your selection in View...
- Page 35 Step entry in will behave identically to described above. Switching Slice Note View Keyboard Note View between can often lead to happy accidents, and may be used as Slice Note View Keyboard Note View a performance tool. Live Slice Point Recording Some samples won’t divide into 4, 8 or 16 slices, and the points at which you want to place slices may be spread unevenly across the sample.
-
Page 36: Using The Macros To Sculpt Samples
Using the Macros to sculpt samples Circuit Rhythm’s macro controls provide key parameters for tweaking the sound of your samples. The parameter that each macro controls is printed beneath it. • Macro 1 - (Tune) will alter the tuning of samples on the track over a range of +/-1 octave. -
Page 37: Non-Quantised Record
The table below summarises the functions of each Macro control as applied to the samples: Macro Function Tuning Start point Sample length Attack/decay Distortion HP Filter LP Filter LP Filter Resonance Changes to Macro controls can be recorded to the Pattern – see page 43 for more information. - Page 38 by pressing Shift and Gate , or press Gate again if you are already in Enter Micro Step View . Pads 17 to 22 display the currently selected step’s micro step values. Press another step Gate View pad to select it and view its micro steps. Press a lit step pad to display the micro step value at the step...
-
Page 39: Velocity
Using micro steps can add a whole new range of rhythmic possibilities to any pattern, and can create subtle rhythmic effects, or dramatically wonky grooves. As with many other aspects of Circuit Rhythm, we urge you to experiment! - Page 40 lit in – see below). This also applies to (both Velocity View Note View Slice Keyboard Expanded Keyboard Note View Sample View Drum Pads View Samples programmed using the pattern step pads will always use Fixed Velocity, regardless of the selected velocity mode.
-
Page 41: Probability
This is great for adding a series of “ghost” hits at low volume. Probability Circuit Rhythm’s Probability function can be applied to individual steps on any track. Probability introduces a degree of random variation into a pattern. It is essentially a further step parameter, which decides whether or not the notes on the step will be played during each pass of the Pattern. - Page 42 These three steps have samples assigned to them The pulsing pad is the step whose Probability value is displayed Pattern step display With all eight pads lit, the probability at the selected step is 100% Probability value display There are eight possible values of Probability determining the likelihood that the notes on the chosen step will play in any one pass through the Pattern.
-
Page 43: Recording Knob Movements (Automation)
Recording Knob Movements (Automation) You can tweak the sonic parameters of assigned samples in real time using the Macro controls Circuit Rhythm features automation, which means you can add the effect of these tweaks to the Record recorded pattern by entering Record Mode (by pressing ) while moving the knobs. -
Page 44: Clear And Duplicate
You can delete any Macro automation data you don’t want to keep by holding down Clear moving the knob in question anticlockwise by at least 20% of its rotation – the LED below the knob will turn red to confirm. But note this will clear the automation data for that Macro for the whole Pattern, not just at the sequencer’s current step. -
Page 45: Drum Pads View
Drum Pads View is great for playing live. You can trigger samples for all eight tracks manually, and also Drum Pads View automatically repeat each trigger at one of eight tempo-related rates. This View lets you add rapid bursts of drum beats, especially trap-style hi-hat patterns with a triplet feel. . - Page 46 The eight pads at the right of the two lower rows are trigger pads for each track. Pressing one of these will trigger the currently active sample for that track: this applies whether or not the sequence is running. If you want to add further live samples to the Pattern while it’s playing, enter Record Mode by pressing Rec G: any additional samples added in real time will now be added to the Pattern on a per-track basis.
-
Page 47: Patterns
Each Project in Circuit Rhythm has memory space for eight separate Patterns per track. The true potential of Circuit Rhythm begins to be realised when you start to create interesting variations of a Pattern and then segue them together to be played out as a complete chain of up to 256 (8 x 32) steps. -
Page 48: Clearing Patterns
For example, if the current Pattern had reached Step 11 when you press a second Pattern’s pad while holding down Shift, Circuit Rhythm will remember where the cursor is, and the second Pattern will start playing from Step 12. -
Page 49: Step Page And 16/32-Step Patterns
Step Page and 16/32-step Patterns The default length of a Pattern in Circuit Rhythm is 16 steps, but you can double the length to 32 steps (labelled 1-16/17-32). A Pattern length of 16 steps or fewer is indicated with the Step Page button by the Step Page button showing dim blue. -
Page 50: Chaining Patterns
Patterns 1, 2, 3 and 4 together, or 5, 6 and 7 together, or 4 and 5 together, but you can’t chain 1,2 and 6 together. (However, Circuit Rhythm’s Scenes feature allows you to overcome this restriction: page 59... - Page 51 The following example will illustrate chaining: (Pulsing (Pulsing (Pulsing (Pulsing bright/dim) bright/dim) bright/dim) bright/dim) (Pulsing bright/dim) (Pulsing bright/dim) Patterns View – Page 1 (Pulsing bright/dim) (Pulsing bright/dim) Patterns View – Page 2 example above shows a possible arrangement of Patterns for an 8-pattern Patterns View sequence.
- Page 52 Creating longer, more complex and more interesting sequences is an extension of these principles. Circuit Rhythm allows Pattern chains of up to 256 (8 x 32) steps, where any of the eight tracks can change their pattern every 16 steps (or fewer if start/end points are also altered from the default).
-
Page 53: Pattern Octave
Slice Point Record View will remain unaffected. If the pattern contains notes which are already in the highest octave that Circuit Rhythm can generate, they will remain unaffected by an upward Pattern Octave shift; the same applies to the lowest notes and a downward octave shift. -
Page 54: View Lock
View Lock By default, the Pattern Step display on the upper two rows changes with the selected Pattern (and current Page), so that the play cursor is always visible. If you want to edit one Pattern while continuing to play another Pattern or complete Pattern Chain, you can make use of View Lock. One use of View Lock is to “freeze”... -
Page 55: Pattern Settings
Pattern Settings Although default Pattern lengths are either 16 or 32 steps (see also “Step Page and 16/32-step Patterns” at page 49), it is possible for the Pattern in any track to be any other number of steps in length, up to the maximum of 32 steps. Furthermore, the start and end points of a Pattern may be independently defined, so that sub-sections of a Pattern, of any length, may be played against other tracks with different Pattern lengths, creating some very interesting effects. - Page 56 You can change the end point for the track – and hence shorten the Pattern length - by pressing a different Pattern step pad. The new end point is indicated by a sand illumination, and the “higher” pads either go dark or dim red, the latter indicating that note/hit data has previously been assigned to that step.
-
Page 57: Play Order
Play order Pads 29 to 32 in let you choose the play order the currently selected Pattern will Pattern Settings View use. The pad for the selected play order illuminates brightly: the default play order is forwards (i.e., normal), indicated by Pad 29. Play order selection Forwards Reverse... -
Page 58: Mutate
lower-numbered pads will decrease the play rate. The sync rates available are 1/4, 1/4T, 1/8, 1/8T, 1/16, 1/16T, 1/32, 1/32T, with T representing triplets. 1/16 is the default sync rate, where each step corresponds to a 16th note. Increasing the sync rate is a great way to increase the sequencer’s step resolution at the cost of overall playback time. -
Page 59: Scenes
Scenes Scenes let you assign multiple Patterns and Pattern Chains within a project to a single pad, allowing you to trigger different parts of a song easily. Scenes themselves can also be chained to arrange much longer sequences and thus build up complete song structures. : press Mixer to open this: Scenes are accessed in Mixer View... - Page 60 Mixer View with Shift pressed: (Pulsing bright/dim) Scene pads Pad where Scene is being stored lights brightly while Shift is held All the selected pattern chains are now stored as that Scene. On releasing Shift, the pad with the stored Scene now shows bright white: Mixer View when Shift is released: (Pulsing bright/dim)
-
Page 61: Chaining Scenes To Create An Arrangement
When you select , you will immediately be able to see where Scenes are already stored, as Mixer View their pads will be lit bright white, or bright gold when you press Shift. Assigning Pattern Chains to a Scene does not affect current playback and will not select the Scene nor change your Scene Chain (see below) if you are already in Play Mode: the selected Scene will start when the current Pattern or Pattern Chain is completed –... -
Page 62: Queuing Scenes
(Pulsing bright/dim) Scene pads A Scene Chain is defined here by pressing pads 4 and 6. Scenes 4, 5 and 6 will now play in sequence; the pulsing of Scene 4's pad confirms that it will be the first to play. Note that you can use Scenes to overcome the restriction in of not being able to define Patterns View... -
Page 63: Tempo And Swing
Tempo Circuit Rhythm will operate at any tempo in the range 40 to 240 BPM; the default tempo for a new Project is 90 BPM. The tempo can be set by the internal tempo clock, or by an external MIDI clock source. -
Page 64: Tap Tempo
Tap Tempo If you want to match Circuit Rhythm’s’ tempo to an existing piece of music but you don’t know its BPM, you can use Tap Tempo. Hold down Shift and tap the Tempo/Swing button in time with the track you’re listening to. -
Page 65: Click Track
Analogue Sync Out You can synchronise external equipment – e.g., analogue synths – to Circuit Rhythm with the rear panel Sync Out connector . This provides a sync pulse at a rate proportional to the tempo clock –... -
Page 66: Mixer
Mixer Circuit Rhythm includes an eight-channel mixer to let you adjust the volume of each track relative to the others. By default, all the tracks play at a volume level of 100 (arbitrary units, range 0-127), leaving you with the Master Volume control to adjust the output level as required. - Page 67 Panning You can also position each track anywhere in the stereo image (but you’ll need to be monitoring both left and right outputs or using headphones to hear any effect). Pressing the J button converts the Macro controls to pan controls for each track. The J button goes out and the K button illuminates. The default pan position of every track is stereo-centre, indicated by the Macro LEDs showing white.
-
Page 68: Fx Section
FX Section Circuit Rhythm includes a digital effects processor (FX) which lets you add delay and/or reverb effects to any or all of the tracks making up your Project. There is also a master compressor which is applied to your mix by default. -
Page 69: Reverb
Reverb To add reverb to one or more tracks, select a reverb preset. The pad corresponding to the active preset illuminates brightly. The Macros are now the reverb send level controls for the eight tracks: this is exactly the same arrangement as used in . -
Page 70: Master Compressor
Details of the 16 delay presets are given the table below: PRESET DELAY TYPE MUSICAL DESCRIPTION Slapback Fast Very rapid repeats Slapback Slow Rapid repeats 32nd Triplets 48 cycles per bar 32nd 32 cycles per bar 16th Triplets 24 cycles per bar 16th 16 cycles per bar 16th Ping Pong... -
Page 71: Side Chains
Side Chains Each of the tracks may be independently Side Chained. Side Chain allows the hits of one track to duck the audio level of another track. Using Side Chains, you can add a pumping feel to your beats - this is a staple sound of hip-hop and EDM. -
Page 72: The Filter Knob
Mixer View The Filter Knob The entire audio output of Circuit Rhythm – the sum of the sounds from all eight tracks - is fed through a traditional DJ-style filter section. The control for this is the large Master Filter knob The Filter knob is one of the key performance controls and can be used to radically change the overall sound. -
Page 73: Grid Fx
Grid FX Circuit Rhythm’s Grid FX let you rapidly add a range of additional audio effects from a dedicated set of pads: it’s a great way of adding variations to your patterns in live performance. , which is the secondary view of the Mixer button Grid FX are accessed in . - Page 74 The effects are colour-coded, so you can identify the various types available once you have uploaded them into Circuit Rhythm. As with many other features of Circuit Rhythm, we recommend experimentation with Grid FX to gain an understanding of which type and setting of effect works well your particular style of choice of samples.
-
Page 75: Effect Latching
, incoming audio will be routed through Grid FX (in stereo). This Sample Record View allows Circuit Rhythm to be used as a stereo FX unit. Furthermore, with resample enabled in Sample , Grid FX active during sample recording will be committed to the recorded sample as Record View heard. -
Page 76: Recording Samples (Sample Rec View)
Recording Samples (Sample Rec View) Circuit Rhythm has the capability to record samples via the external inputs : press the Sample Rec button You do this in to open this: Sample Rec View Currently selected sample 16 sample slots (one page of eight) -
Page 77: Recording
If less than 32 seconds worth of sample storage remains on Circuit Rhythm, fewer than 16 pads will be lit. The number of pads that are lit corresponds to the remaining time available. For example, if 6 seconds remain, the first three pads will be lit dim grey, with the remaining pads being unlit. -
Page 78: Record Settings
Disable input monitoring to mute incoming audio – this can be useful as part of a wider setup where audio may be routed both through Circuit Rhythm for sampling, and directly from the source to a mixer or audio interface. -
Page 79: Sample Trimming
Monitor level Use Macro 8 to apply digital gain to incoming audio. This will default to 0 dB upon power-on and is never saved. This value may be increased to +12 dB or reduced to silence. Sample Trimming You can use Macro control 2 (Start) to trim the start point of the recorded sample and Macro control 3 (Length) to trim its duration. -
Page 80: Playback Modes
Note that Row 3 does not indicate absolute sample time: a short sample and a long sample will both display their full duration as eight lit pads. Note also that samples can only be shortened – you can’t add silence at the start or end of a sample. The default precision of the start and end positions is 10 ms per pad, hold Shift to increase the precision to 1 ms. -
Page 81: Projects
Projects. Switching Projects There are some rules governing how Circuit Rhythm responds when you change from one Project to another. If sequencer playback is stopped when you select a new Project in , on pressing... -
Page 82: Saving Projects To New Slots
Saving Projects to new slots Use Save to store the tracks you’ve been working on to a Project memory slot. Save needs to be pressed twice to complete the store process: the first press will flash the Save button; a second press will save your work to the last Project memory that was in use. -
Page 83: Packs
The card slot is on the rear panel A Pack contains the totality of Circuit Rhythm’s current operation, including the contents of all 64 Project memories, all 128 samples and 16 Grid FX presets. A card can hold 31 additional Packs: this enables you to safely save an enormous amount of working content, and can include Projects of greatly differing genres, complete with personalised samples as appropriate. -
Page 84: Loading A Pack
Loading a Pack First select a Pack by pressing any lit pad other than that for the currently loaded Pack. It will start pulsing between dim and bright (in its assigned colour) to confirm that it is “primed” and can now be loaded. -
Page 85: Using Microsd Cards
The “no SD” icon is also displayed in other situations, see ‘Removing a MicroSD card’ below for more details. Circuit Rhythm is fully operational without a MicroSD card, but you will only have access to the internal Pack. If a microSD card is present, Packs View will display the available Packs and allow you to load a new Pack as described in ‘Loading a Pack’... - Page 86 Removing a microSD card If a microSD card is removed while the internal Pack is loaded, Circuit Rhythm will behave as described above for operating from power-up without a card present. Doing so does not hinder your ability to load samples, or to save and load Projects.
-
Page 87: Components
You can access Components at components.novationmusic.com. NOTE: If you are having issues using the web version of Components, try installing the standalone application from the Novation Customer Portal. Additionally, if you are on Windows, we recommend that you install the Novation Driver from novationmusic.com/downloads. -
Page 88: Appendix
Appendix Firmware Updates In order to access all features, you may need to update Circuit Rhythm to the latest firmware version. Components will let you know whether the connected unit is up to date and, if it’s not, Components can update the unit’s firmware to the latest version. -
Page 89: Brightness
Pad 24 dims them by about 50%. This can be of benefit if you are running Circuit Rhythm on its internal battery. You may also wish to run with reduced brightness if performing in conditions of low ambient lighting. -
Page 90: Midi I/O
Setup View for four categories of MIDI data independently: Note, CC (Control Change), Program Change (PGM) and MIDI Clock. This ensures you have a high degree of flexibility in how Circuit Rhythm integrates with the rest of your system. MIDI Rx (receive) and Tx (transmit) can be enabled independently for each of the data categories. -
Page 91: Clock Settings
AUTO mode and the BPM will be set by an externally applied MIDI clock at either the MIDI In or the USB ports if a valid one is applied; if this is not the case, Circuit Rhythm will automatically switch to its internal clock. -
Page 92: Advanced Setup View
MIDI Out. When it is lit dim red, a hardware thru switch is activated and the port acts as a regular MIDI Thru. Master Compressor Circuit Rhythm includes a master compressor, which is applied to all audio outputs from the device. It can be enabled or disabled by pressing FX while in in . -
Page 93: Save Lock
Project loading problems Circuit Rhythm loads the last Project in use when it is powered-up. It is possible that if the power was interrupted while a Project was being saved it may have become corrupted in some way. This might mean that Circuit Rhythm ends up in some anomalous state at power-on. -
Page 94: Bootloader Mode
Note buttons 3. Power Circuit Rhythm on again Circuit Rhythm will now be in Bootloader Mode, and the grid display will display a selection of green lit pads (which may differ from that shown below): Synth 1 Synth 2...
Need help?
Do you have a question about the Circuit Rhythm and is the answer not in the manual?
Questions and answers