Table of Contents
Advertisement
Quick Links
Advertisement
Table of Contents

Summary of Contents for monolith 600046
- Page 1 Belt Drive Turntable with AT-VM95E Cartridge P/Ns 600046, 600047 User's Manual...
-
Page 2: Safety Warnings And Guidelines
SAFETY WARNINGS AND GUIDELINES Please read this entire manual before using this device, paying extra attention to these safety warnings and guidelines. Please keep this manual in a safe place for future reference. • This device is intended for indoor use only. •... - Page 3 • Ensure that power is turned off and disconnected before making any electrical connections. • Clean using a soft, slightly moistened anti-static cloth only. Do not use chemical cleaners, solvents, or detergents. • This device has no user serviceable parts. Do not attempt to open, service, or modify this device.
-
Page 4: Customer Service
CUSTOMER SERVICE The Monoprice Customer Service department is dedicated to ensuring that your ordering, purchasing, and delivery experience is second to none. If you have any problem with your order, please give us an opportunity to make it right. You can contact a Monoprice Customer Service representative through the Live Chat link on our website www.monoprice.com or via email at support@monoprice.com. -
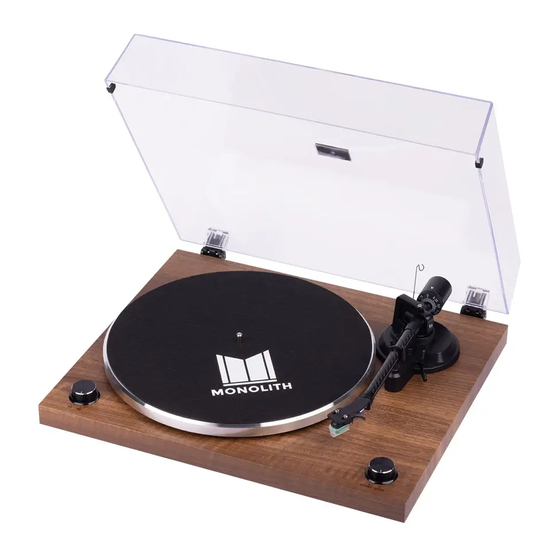
Page 5: Product Overview
PRODUCT OVERVIEW Top View 1. Counterweight 2. Anti-Skating Stub 3. Turntable Platter 4. Tonearm Lift Lever 5. Tonearm Rest 6. 33/45 RPM Selector 7. Carbon Fiber Tonearm 8. Removable Headshell (with installed AT-VM95E cartridge) 9. Start/Stop Knob... - Page 6 Rear View 10. Lid 11. Lid Hinge 12. Ground Terminal 13. Stereo RCA Output Jacks 14. Phono/Line Output Switch 15. Anti-Skating Weight 16. USB-PC Output (USB Type-B) 17. DC IN Jack 18. Bluetooth® Indicator 19. Power Switch...
- Page 7 SETUP Turntable Platter and Belt Setup Perform the following steps to install the Platter and connect the Belt. Note that for best results, place the turntable on a low resonance surface, such as wood or multiple layer ply board, to avoid structural vibrations during playback. 1.
-
Page 8: Tracking Force Adjustment
4. Remove the Red Ribbon from the Belt. Store it in a safe place for future use. 5. Place the Slip Mat on the Platter. Tracking Force Adjustment Perform the following steps to adjust the cartridge tracking force. Note that the included Counterweight is suitable for cartridges weighing between 6.0~8.0 grams. - Page 9 2. Remove the Cartridge Protective Cap. 3. Remove the tie wrap and unlock the Tonearm. 4. Lower the Tonearm Lift Lever and position the Tonearm in the space between the Tonearm Rest and the Platter. 5. Carefully rotate the Counterweight until the Tonearm achieves a neutral, level balance.
-
Page 10: Anti-Skating Force Adjustment
8. Unlock the Tonearm and verify that it is still in balance. If not, repeat steps 5-8 until the Tonearm is balanced and the Tracking Force Dial is at 0. 9. Return the Tonearm to the Tonearm Rest and lock it in place. 10. -
Page 11: Power Connection
Slip the loop on the thread attached to the Anti-Skating Weight over the 3rd groove on the Anti-Skating Stub to set the Anti-Skating Force to the proper value for the included AT-VM95E cartridge, then feed the thread through the hook on the wire support. Phono/Line Selection If you have connected the Stereo RCA Output Jacks to an amplifier, set the Phono/Line Output Switch according to the type of input on your amplifier. -
Page 12: Basic Operation
BASIC OPERATION 1. Place the Power Switch in the ON position. 2. Remove the Cartridge Protective Cap. 3. If you intend to play a 45 RPM record, place the 45 RPM Adapter on the Spindle. 4. Place a record on the Slip Mat, ensuring that it is firmly seated on the Spindle or 45 RPM Adapter. - Page 13 3. Once pairing is complete, the Bluetooth Indicator will stop flashing and will illuminate steadily. 4. If after 2 minutes the Turntable cannot find a device to pair with, the Bluetooth transmitter will become inactive and the Bluetooth Indicator will turn off. If you want to connect again, turn the Turntable off, then turn it back on again.
- Page 14 Recording Note that the following screens and instructions will vary, depending on your operating system and the version of Audacity in use. 1. Launch the Audacity program. 2. Click Edit on the menu bar, then scroll down and click the Preferences... option. Alternatively, press CTRL+P to display the Preferences screen.
- Page 15 4. Open your computer's audio settings and ensure that SSS USB Audio Device is selected as the Default Device for Sound recording. 5. Adjust the Output Volume and Input Volume levels, as desired. 6. Click the button to being recording. The two empty tracks will be displayed. ●...
-
Page 16: Cleaning And Maintenance
9. To save your recording to a file on your computer, click the File entry on the menu bar, then select the Export > option and choose a file format. You will be asked to enter a filename for your saved recording. Notes: •... - Page 17 Stylus Use a commercially available stylus brush and cleaning fluid to clean accumulate dirt and grime from the stylus. Always brush the stylus from back to front. Never brush it from side to side or front to back. Replacing the Stylus After about 300~500 hours of use, the stylus can wear out and cause distorted sound.
- Page 18 Replacing the Cartridge While cartridges themselves cannot wear out with use, you may wish to replace the cartridge with an upgraded version or a cartridge of a different type (e.g., moving coil instead of moving magnet). Perform the following steps to replace the cartridge. 1.
-
Page 19: Troubleshooting
10. Perform a final alignment check on the Cartridge Alignment Protractor to ensure that the cartridge was not moved out of alignment when the screws were tightened. TROUBLESHOOTING Following are a series of potential causes for some problems that might be encountered while using this Turntable. - Page 20 • The speakers may not be selected. Check the speaker selection setting on the amplifier. • There is no connection to the speakers. Check the speaker wire connections at the amplifier and at each speaker. • There is no connection between the Turntable and the amplifier. Check to ensure the Turntable is connected to the amplifier.
- Page 21 • The Phono/Line Output Switch may be improperly set. Check the connection to the amplifier. If connected to a Phono Level input (usually labeled Phono), set the switch to the PHONO position. If connected to a Line Level input (labeled CD, AUX, LINE IN, etc.), set the switch to the LINE position.
-
Page 22: Specifications
Slip Mat. If replaced with a thicker mat, gently turn the screw counterclockwise to reduce the contact force of the stylus on the record. SPECIFICATIONS Turntable 600046, 600047 Nominal Platter Speeds 33 1/3 or 45 RPM Speed Variance ±1.5% Wow and Flutter ≤... -
Page 23: Technical Support
Cartridge Cartridge Model Audio-Technica® AT-VM95E Replacement Stylus AT-VMN95E Cartridge Type Moving Magnet (MM) Stylus Shape Elliptical Recommended Tracking Force 2.0g ±0.2g Frequency Response 20Hz ~ 20kHz Recommended Load Resistance 47kΩ Channel Balance < 2.0dB Channel Separation > 20dB Output Voltage 4.0mV Weight 0.22 oz. -
Page 24: Regulatory Compliance
REGULATORY COMPLIANCE Notice for FCC This device complies with Part 15 of the FCC rules. Operation is subject to the following two conditions: (1) this device may not cause harmful interference, and (2) this device must accept any interference received, including interference that may cause undesired operation. - Page 25 (1) this device may not cause harmful interference, and (2) this device must accept any interference received, including interference that may cause undesired operation. Monoprice™, Monolith™, the Monolith logo, and all Monoprice logos are trademarks of Monoprice Inc. AUDIO-TECHNICA® is a registered trademark of Audio-Technica Corporation.
Need help?
Do you have a question about the 600046 and is the answer not in the manual?
Questions and answers