
Related Manuals for wto CoolSpeed mini

Summary of Contents for wto CoolSpeed mini
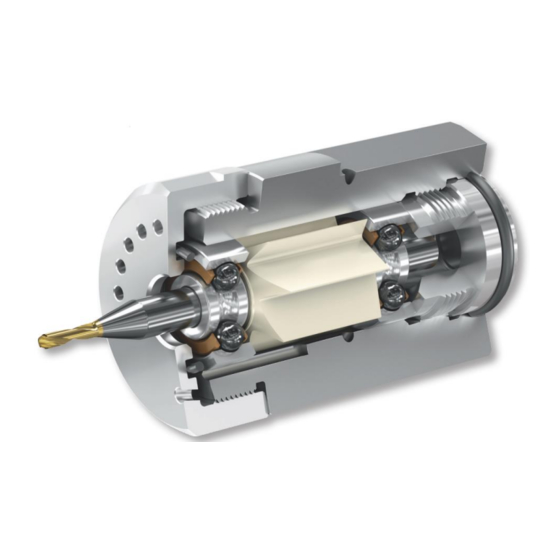
- Page 3 They provide for very high rotation speeds while maintaining perfect run-out values. CoolSpeed mini is designed to machine the workpiece top surface and perform milling, drilling, chamfering and engraving. It requires no machine adaptations, it fits into standard – sealed – tool holders, and several CoolSpeed mini units may be applied into the machine magazine during the machine set-up.
- Page 4 • This chart illustrates the logarithmic nature of the rotation speeds measured at different pressure levels. • The formula displayed within the chart can be used to calculate the rotation speed at any pressure level. • The curve and equation relate to average values.
- Page 5 • This chart illustrates maximum and recommended output power levels measured at different pressure levels. • The formula displayed within the chart can be used to calculate the output power at any pressure level. • The max output power curve is meant as a reference only and should not be used for an actual job.
- Page 6 • This chart illustrates the relationship between the torque and the actual rotation speed. • The formula displayed within the chart can be used to calculate the torque at any rotation speed. Notice that by definition, maximum torque occurs at zero rotation speed resulting in no power.
- Page 7 • This chart illustrates the parabolic relationship between output power and rotation speed at different pressure levels. Notice that there is no power available at zero and at maximum rotation speeds. • This chart illustrates that any external load will cause a reduction in speed;...
- Page 8 Replacement Kit The replacement kit includes 2 bearings and 1 turbine. It is replaced with each new tool (drill or mill). There are unique replacement kits for tool shanks: • 3 mm, 4 mm, 6 mm • 1/8” , 3/16”, 1/4” * Tool is not included.
- Page 9 There are separate assembly devices for tool shanks: • 3 mm, 4 mm, 6 mm • 1/8” , 3/16”, 1/4” * Do not attempt to use alternative devices as you will damage the bearings and the CoolSpeed mini will not perform.
- Page 10 The pressure device is used to measure the through coolant pressure at the main spindle end. • This value is critical as it is used to calculate the CoolSpeed mini rotation speeds. • The device fits into standard – sealed – tool holders, with ID 25 mm / 1 ”.
- Page 11 Pump requirements...
- Page 12 It boils easily, promotes rusting of machine parts, and does not lubricate well. Therefore, other ingredients are necessary to create an optimal cutting fluid. The CoolSpeed mini may use each type of emulsion to drive the turbine. For calculating turbine rotation speed, we assume 95% water (viscosity and density).
- Page 14 For those machines equipped with through main spindle mist, CoolSpeed mini Air requires no machine adaptations, it fits into standard – sealed – tool holders, and several CoolSpeed mini Air units may be applied into the machine magazine during the machine set-up.
- Page 15 • This chart illustrates the logarithmic nature of the rotation speeds measured at different pressure levels. • The formula displayed within the chart can be used to calculate the rotation speed at any pressure level. • The curve is relates to average values. The actual results lie within a small variance from the curve.
- Page 16 • This chart illustrates the relationship between the torque and the actual rotation speed. • Notice that by definition, maximum torque occurs at zero rotation speed resulting in no power. Likewise, at maximum rotation speed there is no available torque, therefore producing zero power.
- Page 17 To the right of the peak lies the working area of the spindle, the peak being its limit. The CoolSpeed mini Air will stop rotating should the power exceed “Max Power”.
- Page 18 Air Filter – Regulator – Lubricator Unit The CoolSpeed mini Air models are driven by air mist. For those machines that do not supply mist through the main spindle, an external ‘air filter – regulator – lubricator’ unit is required.
- Page 19 Esters (The esters are the most widely used synthetic lubricants. They do not have the film strength capacity of a petroleum product, but do have a wide temperature range and are oxidation resistant.) The best choice for CoolSpeed mini Air lubrication oil is the low viscosity (VG 10 to VG22) Synthetic oils.
- Page 20 Replacement Kit The replacement kit includes 2 bearings and 1 turbine. It is replaced with each new tool (drill or mill). There are unique replacement kits for tool shanks: • 3 mm, 4 mm, 6 mm • 1/8” , 3/16”, 1/4” * Tool is not included.
- Page 21 Assembly Device The Assembly Devices are used to assemble the bearings and turbine onto the tool shank. Each diameter is unique and includes a precise ring inside. There are separate assembly devices for tool shanks: • 3 mm, 4 mm, 6 mm •...
- Page 23 CoolSpeed mini assembly (inside the Tool Holder) while the CoolSpeed mini is blocked by the machine horizontal table. In case of wrong torque (too low) the CoolSpeed mini will get out of the Tool holder and be blocked by the horizontal table.
-
Page 24: Tool Replacement
In order to change the replacement kit, open the front cover and remove the used replacement kit. • In case that the rear bearing is stacked inside the CoolSpeed mini housing, it is essential to remove the CoolSpeed mini from the tool holder and open the rear cover. -
Page 25: General Safety Instructions
Before daily operation, inspect CoolSpeed mini parts status and perfection. • Avoid inhalation of the emulsion, oil or air during operation. Use a face mask while operation the CoolSpeed mini. • Follow general safety instructions while operating the CoolSpeed mini – use protecting glasses, work shoos and gloves. -
Page 26: Safety Instructions
Safety Instructions for tool assembly: • The operator must use the WTO assembly device. Never use a device not supplied from WTO. • The tool assembly includes the cutting bit. Be aware of the cutting edge. • Beware while press fit assembling of the bearing and turbine. - Page 27 During initial run (implementation of emulsion pressure) place the tool holder with CoolSpeed mini near the machine table in order to avoid safety issues. In case the CoolSpeed mini is not properly locked, there may be axial movement between CoolSpeed mini and tool holder, but no damage will be present.
-
Page 28: Maintenance
Maintenance • Clean CoolSpeed mini parts after each use. • Apply maintenance oil to the CoolSpeed mini parts before storing. • Clean machine filters every day. • Remove corrosion marks from stainless steel CoolSpeed mini parts. • A used tool assembly in good condition should be clean and oiled before storing. Do not attempt to disassemble the turbine or... - Page 29 • Cutting surface quality. • Change in the noise level. • Static run out of new tool (outside the machine). • Radial and Axial tool edge position (set point). • Sufficient emulsion or oil flow rate from CoolSpeed mini exhaust.
- Page 30 When using CoolSpeed mini Air, check the lubricating oil level. • When using CoolSpeed mini Air, check air pressure in the supply line. • When using CoolSpeed mini , check coolant level in the tank. Fill as required. • Inspect CoolSpeed mini parts for cracks, fractures or distortions. •...
- Page 31 CoolSpeed mini clamping torque – during CoolSpeed mini assembly inside the tool holder, it is recommended to close the CoolSpeed mini inside with moderated torque in order to avoid radial distortion of CoolSpeed mini housing leading to bearing lead-time reduction.
-
Page 32: Questions And Answers
What will happen if the drill size is too big? In case the drill size or the feed rate are too big, the CoolSpeed mini may be under-powered. As a result, the tool core will penetrate inside the turbine, the tool rotation will stop and the tool cutting edge will brake. - Page 33 Is the CoolSpeed mini damaged during a crash? No. Normally, the CoolSpeed mini is not affected by a crush. The tool and bearings will be damaged, so replacing to a new tool with new bearings and turbine will completely solve the problem.
- Page 34 • Can I store the CoolSpeed mini and re-use tomorrow? Yes. Remove the CoolSpeed mini from the tool holder, wash through with running water, spray with WD-40, and place in a safe place. Assure the tool is not damaged. •...
- Page 36 Tool Assembly Procedure Same tool assembly suitable for all CoolSpeed mini models...
- Page 37 Step #1 Insert the first bearing inside the assembly device, direction does not matter. Use the right assembly device per tool shank diameter.
- Page 38 Step #2 Insert the turbine inside the assembly device. Pay attention to the turbine direction; the big cone heads in first. Cone...
- Page 39 Step #3 Insert the second bearing inside the assembly device. The bearing direction does not matter.
- Page 40 Step #4 Insert the tool inside the bridge. Use the right bridge per tool shank diameter (3, 4 or 6 mm).
- Page 41 Step #5 Place the bridge with tool over the device, so the tool tip is placed in through the top bearing.
- Page 42 Step #6 Push the tool into the device and through the bearings and turbine with a press or vise.
- Page 43 Step #7 Pull the bridge up and away from the assembly device.
- Page 44 Step #8 Press the tool further into the device, leaving 5 mm maximum with a press or a vise.
- Page 45 Step #9: Carefully pull the tool assembly out of the device.
- Page 46 Step #10 Insert the tool assembly inside the CoolSpeed mini housing.
- Page 47 Step #11 Check that the O-Ring is inside the front cover. O-Ring WTO #19136 Ø10,00 x 2,00 NBR 70...
- Page 48 Step #12 Insert the front cover over the tool and screw it onto the CoolSpeed mini housing. Use a 24 mm wrench to tighten the cover. 24 mm wrench...
- Page 49 Step #13: Place the CoolSpeed mini into the tool holder. The CoolSpeed mini front cover limits the axial position. Use a sealed tool holder for 25 mm / 1” tools.
- Page 50 Step #14: Tighten tool holder after placing CoolSpeed mini in place. Torque according manufacture instructions. The CoolSpeed mini is ready.
- Page 51 Complete Tool Assembly...
Need help?
Do you have a question about the CoolSpeed mini and is the answer not in the manual?
Questions and answers